So a while back I decided to try building a portable DreamCast, but I wanted to do it differently from most portables.
My idea's are to remove the disk drive and do the IDE mod with DreamShell so I can load games off an CF card. To make it feel more like a handheld game using cartridges, and a GDemu was too much of a pain to try and get.
I am also going to install a wireless internet connection using a Raspberry Pi Zero and DreamPi
If I'm gunna have a portable dreamcast I might as well set it up so I can play Phantasy Star Online
It's my first time setting up a worklog, so if you have some questions or anything let me know!")
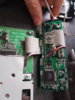
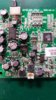
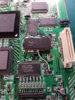
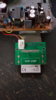
Started off with disassembling the unit, removing the Network adapter port and installing A custom BIOS chip.
I set to always load from the custom bios (won’t need to run the original bios since we won’t have the disk drive.)
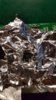
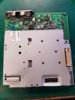
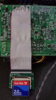
I trimmed the top metal sheet to have more room. I have it set so I can use the original heatsink with the sheet, haven't thought of a better way to have the heatsink yet so I figured this will do for now. Its thin enough but it add some extra weight.
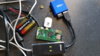
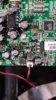
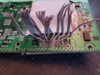
I soldered the IDE cable to the board. I left the plug on the end so that I can easily take it apart for now.
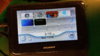
Testing it out it works great, but it was here that I realized you cant run it without the GD ROM (CD Drive) installed. Though I really should have used it with a 3.5" drive cable, the CF card reader I got for that size requires 5v of power and I think a 2.5" can use 3.3v. Ill have to look into it more later and see about ordering a replacement.

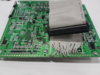
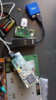
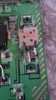
This is also where I realized you can't run it without the GD ROM installed. There is a work around using an Active Crystal Oscillator 33.8688 Mhz, but it was a pain in the butt. I couldn't find any online stores that would sell me just one crystal, so I had to buy 10.
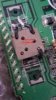
I removed the GD Rom connector and hot glued the crystal where it use to be and soldered the connections to the spots the connector was.
2 to B8 (or any ground)
3 to B23 (P096)
4 to A1 (3.3v)

My idea's are to remove the disk drive and do the IDE mod with DreamShell so I can load games off an CF card. To make it feel more like a handheld game using cartridges, and a GDemu was too much of a pain to try and get.
I am also going to install a wireless internet connection using a Raspberry Pi Zero and DreamPi
If I'm gunna have a portable dreamcast I might as well set it up so I can play Phantasy Star Online
It's my first time setting up a worklog, so if you have some questions or anything let me know!
Started off with disassembling the unit, removing the Network adapter port and installing A custom BIOS chip.
I set to always load from the custom bios (won’t need to run the original bios since we won’t have the disk drive.)
I trimmed the top metal sheet to have more room. I have it set so I can use the original heatsink with the sheet, haven't thought of a better way to have the heatsink yet so I figured this will do for now. Its thin enough but it add some extra weight.
I soldered the IDE cable to the board. I left the plug on the end so that I can easily take it apart for now.
Testing it out it works great, but it was here that I realized you cant run it without the GD ROM (CD Drive) installed. Though I really should have used it with a 3.5" drive cable, the CF card reader I got for that size requires 5v of power and I think a 2.5" can use 3.3v. Ill have to look into it more later and see about ordering a replacement.
This is also where I realized you can't run it without the GD ROM installed. There is a work around using an Active Crystal Oscillator 33.8688 Mhz, but it was a pain in the butt. I couldn't find any online stores that would sell me just one crystal, so I had to buy 10.
I removed the GD Rom connector and hot glued the crystal where it use to be and soldered the connections to the spots the connector was.
2 to B8 (or any ground)
3 to B23 (P096)
4 to A1 (3.3v)