- Joined
- Feb 13, 2017
- Messages
- 243
- Likes
- 47
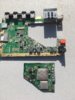
Will it still work?Your cuts look rough. You should try to use a file to file the lines so they are as straight as possible. It'll make sanding out the shorts much less difficult. Circled below are areas that need the most attention at first glance.
Most likely not, it looks like it is shorted out on all sidesWill it still work?
What if I sand it really roughly?Most likely not, it looks like it is shorted out on all sides
Nope. you want to sand it really smooth. Use 200 grit, 400, 600, etc until it is very smooth.What if I sand it really roughly?
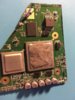
I can see shards of copper hanging off the board. keep on sanding.I'm confused you said,"Most likely not" but then after that you said,"Sand it really smooth". It's pretty dang smooth alright.
So I finally started to trim my wii motherboard, I've got to say it's a pain in the ass. Anyways after a long time of sanding I think I'm good. If anyone else has any advice I'd love to hear it, thanks.
Check to see if the main voltage lines are shorted to ground. One of the 1.8v lines is naturally very low ohms to ground, I think like 9 ohms I measured. Also visually inspect the motherboard. You should be able to see all 6 layers around the edges.How will I know if I sanded enough though? Instead of it being smooth?
I checked with my multi meter and put it on ground and heard a beep, so does that mean there is signal? idkCheck to see if the main voltage lines are shorted to ground. One of the 1.8v lines is naturally very low ohms to ground, I think like 9 ohms I measured. Also visually inspect the motherboard. You should be able to see all 6 layers around the edges.
Beeping means continuity, which is zero or close to zero ohms of resistance. Change your meter's settings to a low number of ohms (like 100Ω) and check again according to Gman's advice.I checked with my multi meter and put it on ground and heard a beep, so does that mean there is signal? idk
Put one probe on a voltage line and the other probe on ground and then see if it beeps. Do this for all voltage lines. You should not hear any beeps.I checked with my multi meter and put it on ground and heard a beep, so does that mean there is signal? idk
Depending on the multimeter settings, a continuity can be triggered by like 50 ohms or less. It will be triggered for some of the lines even if there is no continuity. It is better to measure the resistance.Put one probe on a voltage line and the other probe on ground and then see if it beeps. Do this for all voltage lines. You should not hear any beeps.
Depends, some meters will still beep even with a couple hundred ohms. Setting it to Ω (and a low number if it is not auto-ranging) should give you a number that is greater than 1.0Ω. Less than 1Ω I would say is a shortPut one probe on a voltage line and the other probe on ground and then see if it beeps. Do this for all voltage lines. You should not hear any beeps.