
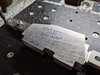
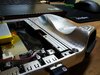
First PCB done and some of the components fitted. RGB is mostly working, kitten approved!

You are using an out of date browser. It may not display this or other websites correctly.
You should upgrade or use an alternative browser.
You should upgrade or use an alternative browser.
Worklog DIY Concept UFO
- Thread starter Dmcke5
- Start date
Ragdoll, nice. I have two of them and they're the most useless cats. They fall off shit and can't comprehend doors. Cute af tho.First PCB done and some of the components fitted. RGB is mostly working, kitten approved!
View attachment 11650
Yeah he's still only little, about 5 months old now. He's an absolute terror compared to our last cat, bites scratches etc. But he's nice when he's calm. Still trying to get the kids used to not winding him up too much haha. He's actually a Ragdoll x Birman but you really can't tell.
Got a bit of programming done on the controller. Managed to navigate here using the joystick as a mouse! Also sorted out the rest of the RGB.

Got a bit of programming done on the controller. Managed to navigate here using the joystick as a mouse! Also sorted out the rest of the RGB.
Small update, managed to get my new joystick adapted/surround sorted during the week.

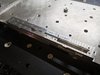
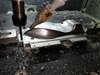
I've just set up a bit of alloy on my machine so I should have some correct case rear sides by tomorrow afternoon. Then I'll move onto the hand grips!
I've just set up a bit of alloy on my machine so I should have some correct case rear sides by tomorrow afternoon. Then I'll move onto the hand grips!
All set up and under way!


You even milled in the screwposts, are you even human dude?
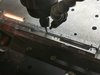
Hahahaha no, the truth is I'm just a tight arse with access to an almost unlimited supply of small scraps of material. Plus making customs clamps allows me to set jobs up on my machine in the ideal way. For the more complex shapes I like to load them into the model of my CNC machine, locate them on the deck and then work out what I'll need to hold them down. That way I know I can do a good job of clamping down the difficult jobs without running the tool into the clamps.
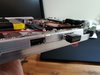
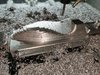
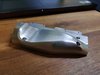
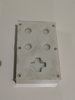
And second side done. Little bit of vibration above the USB ports. Not really a surprise since it's only about 2x2mm thick through there. I'll be able to fill it up with epoxy and sand it back before painting so no big deal. Everything fits this time so I'm pretty happy with that! Time to start working on the grips!


Attachments

amazing, simply amazing.
Thanks mate! I'm just eager to see how it looks once it's all together!
Well that's about 90% of the machining on the inside of one grip done. Still got a few holes to drill, then I can work out how to set it up upside down and do the outside!


Finished the inside! And it even fits, so that's a bonus! Can't wait to see how it looks (and how much lighter it gets) once I've processed the outside. The machining on the outside should be pretty straightforward, but it's going to be very time consuming. Considering setting up my camera for a time lapse if I can make it work.


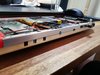
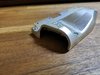
Outside of the first grip is done! Took about 6 hours for this side so including the internal machining about 9 hours in total machining time for this part. I could have done a finer step-over for a better finish but it would have increased the machining time dramatically. The surface finish is good enough anyway, a quick sand is all it'll take to make it nice and smooth and ready for painting. There is a small rough area on the bottom of the large trigger cut out (top in the picture) on the inside. I think this was due to my height not being set perfectly on the outside, this grip is about 0.1mm thicker than it was supposed to be so the outside machining didn't quite clean it up. No big deal though as a bit of sanding will quickly sort that out and it matches up pretty well everywhere else.
Sorry about the photo spam on this one, I was going to time-lapse it but couldn't find the right cable for my camera so I decided to just go for it instead. I'll leave most of the pictures as thumbnails but here's a picture of it finished and fitted up! I won't bother with photos for the left grip, the process will be exactly the same, just a mirror image and I'm sure you guys get the idea by now haha. Next step though is probably going to be the buttons since my Silicone and resin pigment finally turned up yesterday after almost a month of waiting for it in the post.

Sorry about the photo spam on this one, I was going to time-lapse it but couldn't find the right cable for my camera so I decided to just go for it instead. I'll leave most of the pictures as thumbnails but here's a picture of it finished and fitted up! I won't bother with photos for the left grip, the process will be exactly the same, just a mirror image and I'm sure you guys get the idea by now haha. Next step though is probably going to be the buttons since my Silicone and resin pigment finally turned up yesterday after almost a month of waiting for it in the post.
Attachments
-
 IMG_20200506_123339.jpg2.5 MB · Views: 527
 -
 IMG_20200506_134953.jpg4.2 MB · Views: 521
 -
 IMG_20200506_151844.jpg2.5 MB · Views: 520
 -
 IMG_20200506_164709.jpg2.6 MB · Views: 517
 -
 IMG_20200506_174556.jpg5.9 MB · Views: 525
 -
 IMG_20200506_180836.jpg1.9 MB · Views: 514
 -
 IMG_20200506_180843.jpg2.3 MB · Views: 564
 -
 IMG_20200506_181020.jpg3.4 MB · Views: 585
 -
 IMG_20200506_181030.jpg3.3 MB · Views: 599
Trust me, that's how my face looks the entire time I'm waiting for the part to come off the machine haha
Alright guys, wish me luck!
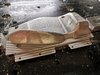
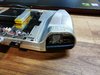
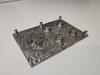
Mold is all filled up with silicone now, hope I mixed it properly. Guess we'll find out in a few hours time! I really have no idea if this is going to work or not, this is my first ever go with liquid silicone or really any sort of molding. The pins around the outside of the mold are to help me align the clear button centres on the mold for when the time comes to pour in the epoxy.
Mold is all filled up with silicone now, hope I mixed it properly. Guess we'll find out in a few hours time! I really have no idea if this is going to work or not, this is my first ever go with liquid silicone or really any sort of molding. The pins around the outside of the mold are to help me align the clear button centres on the mold for when the time comes to pour in the epoxy.
Attachments
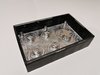
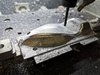
Looks a bit dirty, I guess washing the aluminium with hot water and detergent wasn't enough to get rid of the traces of metal polish entirely but it appears to have set! I'm impressed with the level of detail the silicone takes on, you can even see the machine marks in places I haven't sanded/polished! I'll give it till tonight so it's been a full 24 hours before putting any epoxy in it, just in case it's still not completely set yet but it's looking promising so far!

Attachments
TrapCat
.
Man I can't even describe how inspiring your work is. That is truly amazing. I love it when I see stuff this well thought out and carefully made. Keep up the incredible work! Waiting for updates
Thanks mate, I appreciate the kind words!Man I can't even describe how inspiring your work is. That is truly amazing. I love it when I see stuff this well thought out and carefully made. Keep up the incredible work! Waiting for updates
Small update, no pictures this time. I've had a couple of goes at casting the resin buttons but I'm not having a lot of luck. The first lot I did using the black epoxy pigment powder looked great in the mixing container but once I had a small amount of it in the mold it was obvious that it wasn't even close to dark enough to stop light shining through. The resin was also still fairly soft and tacky after 24 hours so I'm not sure what's going on there. I had another go last night without the clear button centers as I can't be bothered making more of those until I've got the epoxy sorted out. I tried a bit of black ink from a ball-point pen. Colour looks promising and I've used a bit more catalyst than what the instructions say to use this time, so hopefully it will set properly. Failing that I might buy some different resin from one of the resin-art type places to see if their stuff works better as I'm really not convinced this resin is working properly. All the resin pouring videos I've watched on youtube use a resin that appears to be mixed 50/50 or at least 75/25 but the stuff I managed to find locally just uses a few drops of catalyst. I don't know anything about resin so I don't know if that means I've got the wrong variety or something but its just an observation I've made.
I got the call to go back to work next week so this is my last working from home week for now. I'm still going to try and finish the machining on the left grip this week while I'm here so that the bulk of the machining is complete before my spare time runs out.
TrapCat
.
I'm sure you may have already tried all this but maybe you could make a batch of small [maybe square] samples with different quantities of catalyst and check them periodically noting down how hard they are. This way you can find the exact amount of catalyst you need. Good luck!