nobble
.
- Joined
- Apr 30, 2017
- Messages
- 170
- Likes
- 268
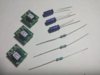
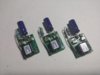
Got my custom regulators assembled now. Batteries will be soon.. I'll use thermal paste and epoxy to keep the heatsinks on the chips as well. I'm trying to work bit by bit on a few things at once to complete this at a steady pace.
Attachments
-
 2.1 MB Views: 290
 -
 2.2 MB Views: 305

")