
Hey guys, ive been on this forum for quite sometime and im ready for my wii portable. I have one question first before I begin trimming and updating my guide. I have 2 wii's one 6 layer and 4 layer, which one should I use for my first portable. Thanks, -Alvaro
You are using an out of date browser. It may not display this or other websites correctly.
You should upgrade or use an alternative browser.
You should upgrade or use an alternative browser.
Worklog FIRST WII PORTABLE TIME
- Thread starter Alvaro
- Start date
There are drawbacks and advantages of both revisions. The six layer has vias to work with for relocating bluetooth, but you will need to be more thorough when sanding, and battery life will be reduced because of the less efficient processor on the 6 layers. The four layer is more forgiving when sanding, but if you want bluetooth, you will have to solder to rather small traces on the board.
How much shorter do you think battery life would be I'm planning to do 6 layer since it'll be easier I guess for my first portable.There are drawbacks and advantages of both revisions. The six layer has vias to work with for relocating bluetooth, but you will need to be more thorough when sanding, and battery life will be reduced because of the less efficient processor on the 6 layers. The four layer is more forgiving when sanding, but if you want bluetooth, you will have to solder to rather small traces on the board.
It was between 8-8.5 watts for 6 layer and 5.5-6 watts on 4 layer, tested under the same conditions.
Last edited:
I have another question so I was looking into testing the games I just downloaded and they arent loading up. They are ciso format and I just put them in the "games" folder in the root of the USB. Every time I click "Wii Games" it says can't find games rebuild cache. Any ideas, I googled this and couldn't seem to find a working solution.
https://bitbuilt.net/forums/index.php?threads/setting-up-wii-and-gamecube-games.391/I have another question so I was looking into testing the games I just downloaded and they arent loading up. They are ciso format and I just put them in the "games" folder in the root of the USB. Every time I click "Wii Games" it says can't find games rebuild cache. Any ideas, I googled this and couldn't seem to find a working solution.
You have to convert the Wii ISOs to WBFS. There is a link here along with instructions on where to put the resulting WBFS file.
what if its a ciso?https://bitbuilt.net/forums/index.php?threads/setting-up-wii-and-gamecube-games.391/
You have to convert the Wii ISOs to WBFS. There is a link here along with instructions on where to put the resulting WBFS file.
Edit: Found way to convert, does NTFS format work with Portablize Mii?
Last edited:
No, the installation guide tells you this. You need to read the guides in the PM section.does NTFS format work with Portablize Mii?
- Joined
- Jan 31, 2016
- Messages
- 1,364
- Likes
- 2,953
- Portables
- 6
It was between 8-8.5 watts for 6 layer and 5.5-6 watts on 4 layer, tested under the same conditions.AFAIK we haven't tested the difference between 4 and 6 layers for sure, but Shank gave an estimate that 4 layers use a little more than half the power. @Shank correct me if I'm wrong on that
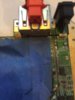
During disassembly this screw got stuck so I went on then had to use brute force at the end. Pretty gruesome. Used dermal and pliers...
-merge-
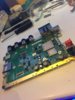
Finished tear down
-merge-
Hey guys half way done with the trim. I scathed a trace on the edge of the trim, do you think the Wii still works? Pics of both sides. I believe it's called "C71 R36" and "C70 R38". Thanks for the help in advance!
-merge-
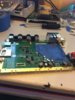
^^^ wouldn't let me attach another picture. Here's front
-merge-
Finished tear down
-merge-
Hey guys half way done with the trim. I scathed a trace on the edge of the trim, do you think the Wii still works? Pics of both sides. I believe it's called "C71 R36" and "C70 R38". Thanks for the help in advance!
-merge-
^^^ wouldn't let me attach another picture. Here's front
Attachments
Last edited by a moderator:
I know it's your worklog, but posting 4 times in a row in the span of an hour and a half is a bit much.
The Wii will still work as long as no internal layers are bridged. You'll need to remember which trace is damaged (if it even is damaged) when you pull audio from either the preamp or the AVE. The trimming guide has all the diagrams you need for that.
Merged the posts together, it was a bit much... Top looks fine, not much important up there. Bottom looks OK, if you check with a multimeter you can see if the trace is broken or not, and if it's shorted or not.
You should go ahead and finish cutting the board before you go troubleshooting this.
You should go ahead and finish cutting the board before you go troubleshooting this.
The Wii will still work as long as no internal layers are bridged. You'll need to remember which trace is damaged (if it even is damaged) when you pull audio from either the preamp or the AVE. The trimming guide has all the diagrams you need for that.
Ok thanks guys, will finish trim today and ponder next step.Merged the posts together, it was a bit much... Top looks fine, not much important up there. Bottom looks OK, if you check with a multimeter you can see if the trace is broken or not, and if it's shorted or not.
You should go ahead and finish cutting the board before you go troubleshooting this.
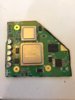
I finished trimming. What should I do next? Chip relocations? Also I have vague information on regulators so please recommend me some regulators I could buy and how many. Just about anything I need for the board could you tell me. Like Proto board or something. Thanks.
Attachments
- Joined
- Dec 16, 2016
- Messages
- 1,143
- Likes
- 2,867
- Location
- The Oregon Wildlands
- Portables
- just so many i am so cool
I finished trimming. What should I do next? Chip relocations? Also I have vague information on regulators so please recommend me some regulators I could buy and how many. Just about anything I need for the board could you tell me. Like Proto board or something. Thanks.
This is how to do custom regulators. Don't try to use cheaper ones, they won't work.
Start sanding. One of the sucky things about 6 layers is that they take a LOT of sanding. Once you've got a nice, even edge check for shorts on the various voltage points on the board. Once you've eliminated the shorts, you can relocate U10. I'd get going on regulators ASAP as you can't move on without them.
Good luck!
I did a lot of sanding as it was way off the line. Im afraid if I keep going I will mess something up. Also thanks for this guide I did not even know it existed. Thanks!This is how to do custom regulators. Don't try to use cheaper ones, they won't work.
Start sanding. One of the sucky things about 6 layers is that they take a LOT of sanding. Once you've got a nice, even edge check for shorts on the various voltage points on the board. Once you've eliminated the shorts, you can relocate U10. I'd get going on regulators ASAP as you can't move on without them.
Good luck!
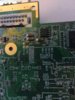
Edit: Can I sand off the edge popping out on the left?
Edit again: Also was I supposed to keep this capacitor
You can pull that capacitor off, it's not needed. Also when we say a lot of sanding, we mean with high grit sandpaper (eg 800, 1000, 1200 grit) to get rid of the very tiny pieces of the board that can cause shorts between layers and make the wii not turn on.
I will keep sanding, I just don't wanna sand a trace away lol.You can pull that capacitor off, it's not needed. Also when we say a lot of sanding, we mean with high grit sandpaper (eg 800, 1000, 1200 grit) to get rid of the very tiny pieces of the board that can cause shorts between layers and make the wii not turn on.
You don't have to sand a bunch of the board away, just make sure there are no shorts on the sides. Very high grit sandpaper doesn't take away much material at a timeI will keep sanding, I just don't wanna sand a trace away lol.
Similar threads
- Replies
- 9
- Views
- 4K
- Replies
- 33
- Views
- 16K