
- Joined
- Jan 15, 2020
- Messages
- 63
- Likes
- 56
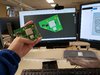
I designed this template to take away any of the uncertainty when trimming the Wii Motherboard. This makes sure the cut lines for a Wii are in the exact same place every single time, and it ensures the trimmed Wii matches the shape in the CAD software so it makes designing things more exact. I've attached the trim template and a corresponding 3D model for the trimmed Wii. Right now I only have a template for the OMGWTF trim, but I hope to add more trims in the future. Huge thanks to everyone in the community who developed this trim and made all the documentation on this. I only made the cad model and trim template.
Trim Template
Trimmed Wii
The idea with this is to use a template to draw an exact line on the Wii, remove the template, trim around the line, and sand down to the line. I’ll throw a little “Guide” together for it below. I have no doubt in my mind that my “Guide” is not perfect. I’ll try to make it better over time but if you have any uncertainty it is probably better to look at The Compendium or The Definitive Wii Trimming Guide. Follow at your own risk.
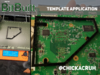
Print out the STL of the trim template for the Wii and snap it onto the backside of the Wii Motherboard. The backside has fewer components so it is easier to draw the lines on and also cut. With the template on, trace around the inside of it to make your trim lines.
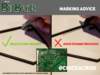
Make sure that when you trace your line is along the edge and doesn’t have a gap with the spacer. If it does have a gap, just be aware of the distance when sanding.
Remove the template from your Wii and set up your Dremel. Make sure to wear proper safety equipment like protective eyewear, and be in a well-ventilated room or outside if you can. Be prepared for dust when cutting the motherboard, and be prepared for the smell. Make sure your Wii is properly secured so it doesn’t go flying once you put your Dremel against it. Use masking tape to cover up important components inside the lines like the CPU, GPU, and NAND. This helps protect them from getting bits of copper stuck in between them and killing them

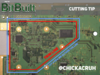
Once you are properly set up, carefully and slowly cut a couple of millimeters around your lines. It’s easier to cut from the back of the motherboard because there are less protruding components. Take your time. It’s better to cut further away from the lines instead of inside. You can always sand it down later if there is extra material, but if you cut too far in, you’ll have to start over.
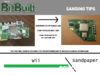
Clean off any of the dust created from the Dremel. With your roughly trimmed Wii, you need to sand it down to the marked line. Start with a rough grit like 200 grit sandpaper and work your way up to at least 800 grit sandpaper. Make sure the edges are nice and smooth to prevent any bridging between layers. It helps to sand at an angle as shown in the picture below.
Beware of these components when sanding. The resistor next to the NAND is not necessary, but it is good for the longevity of your Wii. If you cut too far along this top side, it should be fine as long as you didn’t cut into these traces for the Nand. Check your resistances to make sure they roughly match the ones here. If they are off, something might have gone wrong. Sanding further and cleaning the board could help.

In theory, your Wii should now fit inside the template if you put it back in, and it will also now match the cad file I attached at the top of this post.

I encourage you guys to take what I’ve made here and do your own thing with it, and please give any feedback so I can improve this project over time. This is definitely not perfect but I hope with feedback from y'all I can at least make it better. I would really appreciate it.
Trim Template
Trimmed Wii
The idea with this is to use a template to draw an exact line on the Wii, remove the template, trim around the line, and sand down to the line. I’ll throw a little “Guide” together for it below. I have no doubt in my mind that my “Guide” is not perfect. I’ll try to make it better over time but if you have any uncertainty it is probably better to look at The Compendium or The Definitive Wii Trimming Guide. Follow at your own risk.
Print out the STL of the trim template for the Wii and snap it onto the backside of the Wii Motherboard. The backside has fewer components so it is easier to draw the lines on and also cut. With the template on, trace around the inside of it to make your trim lines.
Make sure that when you trace your line is along the edge and doesn’t have a gap with the spacer. If it does have a gap, just be aware of the distance when sanding.
Remove the template from your Wii and set up your Dremel. Make sure to wear proper safety equipment like protective eyewear, and be in a well-ventilated room or outside if you can. Be prepared for dust when cutting the motherboard, and be prepared for the smell. Make sure your Wii is properly secured so it doesn’t go flying once you put your Dremel against it. Use masking tape to cover up important components inside the lines like the CPU, GPU, and NAND. This helps protect them from getting bits of copper stuck in between them and killing them
Once you are properly set up, carefully and slowly cut a couple of millimeters around your lines. It’s easier to cut from the back of the motherboard because there are less protruding components. Take your time. It’s better to cut further away from the lines instead of inside. You can always sand it down later if there is extra material, but if you cut too far in, you’ll have to start over.
Clean off any of the dust created from the Dremel. With your roughly trimmed Wii, you need to sand it down to the marked line. Start with a rough grit like 200 grit sandpaper and work your way up to at least 800 grit sandpaper. Make sure the edges are nice and smooth to prevent any bridging between layers. It helps to sand at an angle as shown in the picture below.
Beware of these components when sanding. The resistor next to the NAND is not necessary, but it is good for the longevity of your Wii. If you cut too far along this top side, it should be fine as long as you didn’t cut into these traces for the Nand. Check your resistances to make sure they roughly match the ones here. If they are off, something might have gone wrong. Sanding further and cleaning the board could help.
In theory, your Wii should now fit inside the template if you put it back in, and it will also now match the cad file I attached at the top of this post.
I encourage you guys to take what I’ve made here and do your own thing with it, and please give any feedback so I can improve this project over time. This is definitely not perfect but I hope with feedback from y'all I can at least make it better. I would really appreciate it.
Attachments
-
41.1 KB Views: 9
-
375.7 KB Views: 8
Last edited by a moderator: