Question Building a wii portable

Joined
Sep 13, 2021
Messages
8
Likes
0
Hey Everyone. Hope you are all having a great day.

I was wondering if someone would be able to point me in the right direction of making a portable. I am new to the hard-modding scene and would like so assistance. I am very skeptical about just diving head first into it because I don't want to stuff something up. I am looking to have clock (for convenience) and bluetooth (for play via wiimotes). Trimming the board is the scariest part for me if someone could please put me at ease with trimming and show exact lines for trimming that would be amazing. (OMGWTF Trim).

Items/Tools I have:

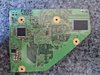
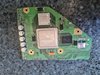
4-Layer RVK-CPU-01 Board
-----------------|
RVL-PMS 2 |
PMS-PD 2 |
U-AMP 2 | All from 4layertech.com
GC+ 2 |
----------------|
Controllable Soldering Iron
Flux
Wires
Dremel
ABYX buttons
D-Pad
Micro SD Card
Card Reader (Came with PMS-PD 2 from 4layertech)
---------------------|
1x Speaker |
On/Off Switch | From digikey.com.au
LED Pipe |
---------------------|

Thanks in advance to anyone that helps out. All help is appreciated.
 
Last edited:
Joined
Aug 7, 2021
Messages
67
Likes
25
Location
United States, Florida
with these parts, i’d recommend attempting to build a g-wii; there are lots of worklogs in the forums about how and you can dm gman on the forums, he’ll print you the case for $35 (plus shipping). good luck!
 
Joined
Sep 13, 2021
Messages
8
Likes
0
with these parts, i’d recommend attempting to build a g-wii; there are lots of worklogs in the forums about how and you can dm gman on the forums, he’ll print you the case for $35 (plus shipping). good luck!
Thanks for the reply, I'll definitely start gathering everything I need and create up a worklog for it.
I have a 3d printer and a bunch of slt files I found from searching all over the network and the BitBuilt forums. I noticed that there is a USB mouth in the top of the case, would I be able to remove that and run the system from the micro sd card to usb adapter being inside the console?

Thanks
 
Joined
Aug 7, 2021
Messages
67
Likes
25
Location
United States, Florida
Thanks for the reply, I'll definitely start gathering everything I need and create up a worklog for it.
I have a 3d printer and a bunch of slt files I found from searching all over the network and the BitBuilt forums. I noticed that there is a USB mouth in the top of the case, would I be able to remove that and run the system from the micro sd card to usb adapter being inside the console?

Thanks
go for the g wii rev 2 design; it has all the same features as the gboy including usb c charging and internal storage. if you want, i can send you the zip with all the stls for that design update.
 
Joined
Aug 7, 2021
Messages
67
Likes
25
Location
United States, Florida
Trimming the board is the scariest part for me if someone could please put me at ease with trimming and show exact lines for trimming that would be amazing. (OMGWTF Trim).
for the exact lines for OMGWTF, check out the definitive wii triming guide.

also a quick note: using your RVL-PMS 2, you don’t have to relocate U10 because it can emulate it which is a nice quality of life feature.
 
Joined
Sep 13, 2021
Messages
8
Likes
0
go for the g wii rev 2 design; it has all the same features as the gboy including usb c charging and internal storage. if you want, i can send you the zip with all the stls for that design update.
If you could please send me those that would be great. When it comes to assembly, should i just follow a guide for it here on the forum? also what is the best tool to use to relocate bluetooth. (cutting traces and soldering to them)
 
Joined
Aug 7, 2021
Messages
67
Likes
25
Location
United States, Florida
If you could please send me those that would be great. When it comes to assembly, should i just follow a guide for it here on the forum? also what is the best tool to use to relocate bluetooth. (cutting traces and soldering to them)
yes, i'd look at a variety of sources such as worklogs here on the main forums, and also check out the gboy build guide (even though it's discontinued, i'm sure you can find something helpful in here: https://manual.bitbuilt.net/guide/g-boy-rev-3-complete-kit-assembly/). the best tool to relocate bluetooth is a soldering iron, and if you can get one, a hot air station (although it isnt required; you can manage with just a temperature controlled iron). for cutting traces you can just use a craft knife or an exacto knife. it really doesnt matter too much, just don't cut too deep.

Ok cool thanks.

Gotcha, thanks for pointing that out
no problem! glad to help : )
 
Joined
Sep 13, 2021
Messages
8
Likes
0
So I'm about three weeks into my system and have come to a block. I am unable to get power from the batteries through the PMS to the console, and fan. I was told that I needed to use 22 awg wire, but I got 21 by mistake. My multimeter gives a 5v reading when testing the CHARGE pin from the PMS side of the wire though. Am I able to get a list of voltages that I should be getting from the pins and do I *need* to use 22awg wire or is 21 adequate.

Thanks in advance
 
Joined
Sep 30, 2021
Messages
49
Likes
69
Location
Idaho
Portables
2
Does your multimeter have a continuity function? Often they will have a function where they beep or otherwise display if what you are probing has a good connection. If your multimeter has this ability it is a good practice to make sure that after you have soldered a wire that there is continuity. However if you are getting the proper voltages on the designated pins, then everything should be properly connected.

It’s hard to diagnose blind.. Some pictures would be useful!
 
Last edited:

Stitches

2 and a Half Dollarydoos
Staff member
.
.
Joined
Feb 5, 2017
Messages
3,848
Likes
3,025
Location
Banana Bender Land, Australia
Portables
6
So I'm about three weeks into my system and have come to a block. I am unable to get power from the batteries through the PMS to the console, and fan. I was told that I needed to use 22 awg wire, but I got 21 by mistake. My multimeter gives a 5v reading when testing the CHARGE pin from the PMS side of the wire though. Am I able to get a list of voltages that I should be getting from the pins and do I *need* to use 22awg wire or is 21 adequate.

Thanks in advance
21AWG is fine for power, it's just slightly thicker than 22 and that's perfectly fine for the major voltage lines. Also yeah what Justin said, pics pls! We can't help if we can't see all of your wiring.
 
Joined
Sep 13, 2021
Messages
8
Likes
0
Heya,

Sorry its taken me so long to respond. I figured out the problem are started to construct, but then came across magic smoke with the PMS and my consoles board failed the resistance testing. I am included some pictures of the consoles mobo hoping that the board isn't busted and just needs a little sanding along the edges.

Thanks.
 

Attachments

Top