
- Joined
- Mar 6, 2016
- Messages
- 193
- Likes
- 254
Crazzyleprechaun's Pii Wii Pocket Worklog
I've been wanting to finish this portable for so long but unfortunately time and lack of skills wasn't on my side when I attempted to build this in 2017 (I think that's when I started). Either way I have revisited this project many time in the past and have failed as I wasn't satisfied with how it would turn out but now no matter what I want to finish it especially since revisions of the 4Layer products are pretty much perfect and I believe I have the skills to make it.
Planned feature list
- 3.5 inch IPS Display using Direct Drive
- PMS Rev 2
- UAMP
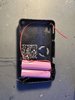
- 4 x 18650
- 3D printed button mounts
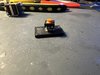
First attempt at wiring up the direct drive board. I have been saving it for a special project that'd I'd pretty much keep forever
This was such a struggle YvetalGriffen gave me this a while ago. It's 3.5 inch screen converter to direct drive. Basically 54 pin -> 40 pin FFC. Once I finally got this workingI knew it was possible to build the Piiwii pocket the way I wanted to so I started working on the back half.
Here's my build process of the back half so far not sure if it will be safe to have the PMS like this but I've added mounts to each of the screw posts and I'll shield it from the heatsink with Kapton tape once everything is wired.
This is all I have for now and I'll probably make more updates pretty soon as I really want to finish this build.
Attachments
-
 1.5 MB Views: 34
 -
 2.1 MB Views: 37
Last edited:
