
- Joined
- Aug 7, 2023
- Messages
- 14
- Likes
- 5
Background info:
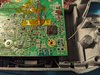
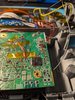
I am in the process of building my ashida for the first time. I have been able to play games on it, and have everything (but VGA) hooked up at this point. My PMS-2 stopped outputting 3.3v after I tried upgrading from component to VGA. I had a pretty ugly solder bridge along the bottom left 8 pins of my AVE-RVL that I was able to clean up as best I could (foreshadowing) before soldering the V and H sync lines. After soldering everything up the display wouldn't power on. A little troubleshooting later I found the PMS-2 wasn't outputting 3.3v at all. Looking at the AVE-RVL I notice a little solder between the 5&6th and 6&7th pins. (See pictures.) All other outputs from the PMS-2 measure the correct voltage.
My question:
1. Did these little solder shorts fry my PMS-2 or Wii MoBo?
2. What is the best way to troubleshoot the PMS-2? Desolder everything and test it again with just the 21700 attatched?
3. This is my second post about this Ashida, should I be putting this in a worklog, or are individual posts okay? I'm new to using forms and am still a little clumsy.
4. Is there a way to remove the solder from the AVE-RVL? I tried using a solder sucker and quite a bit of flux. But, cannot get that last bit out.
Any input is appreciated.
Attachments

Last edited: