Worklog Kawaii

Am I really too late? What a bummer. I'd love to get back to building and get one of your awesome cases!

Thanks, Predue! Don't worry, you're not too late. The design still needs some work, and I have to do test fits and thermal testing with the initial case prototypes. After everything is proven out, we'll open actual preorders for a small run of CNC'd cases.
 
Wow, this looks awesome. I’ll definitely pick one up when they come up for order!!
 
69419bed91d019c6f175247e2d240a5.jpg
1722148663520.jpeg

Progress is going very smoothly
 
Look like they went through all of their sales so is there going to be anything that we can buy after?

~~ Double Post Merged - Please do not double post! ~~

Am I really too late? What a bummer. I'd love to get back to building and get one of your awesome cases!
@Wesk and @YveltalGriffin : You guys are mad!! (in a positive way)
I was reading about it on a technic-news site and even though your names were not directly written there I knew it had to be from bitbuilt :D
Congrats on your project.
Contact me I'd like to get one also
 
Wesk and I really appreciate all the interest, but I need to clarify some things for all the newcomers!
  • Nothing has been sold yet. The Google Form was an interest check, not a preorder form.
  • Please read the entire thread before asking questions! Wesk and I have already addressed the form closure and future preorder plans here and here.
Most importantly:
  • When preorders DO open, they will be for the CNC'd aluminum shell ONLY.
  • You will still need to do a LOT of advanced modding and PCB assembly to build a functional Kawaii:
    • Perform a Wii OMEGA trim (example 1, example 2, example 3)
    • Assemble a Thundervolt PCB (link to docs)
    • Order and assemble the Kawaii internal PCB
    • Order and assemble the Kawaii dock PCB
    • Wire everything together
Kawaii will be a challenging build, and there won't be a full kit you can buy, or even a step-by-step assembly guide. For folks who want to get their feet wet in the world of portablizing, the Noldendo Wii Micro and the Ashida are much better introductory projects.

I hope this clears up any confusion as to the nature of the project!
 

Those look fantastic! If I had the time to build still I'd be all over this like white on rice! The Pogo pin dock and the portability is right up my alley. T

his entire project is just jaw dropping for me, I never foresaw the Wii being put in such a compact shell with so many features still being available via the dock. Simply amazing how talented and imaginative you guys are, I'd have never been able to come up with anything close to this.
 
Quick update on dock progress!

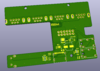
The dock PCB is complete. It's 2 layers (because I'm a lazy bum) and incorporates 5V USB-C power input, the power button, a bicolor status LED, power switching and overcurrent protection for the Kawaii, Y/CVBS demuxing, and controller/AV jacks.

top.PNG
bot.PNG

dock.png
dock2.png


One 3.5mm TRRS jack is for stereo audio and composite video. The other one is for YPbPr component video.

I did a survey of cheap 3.5mm to RCA cables on Amazon and found that the "camcorder" pinout was the most common, so that's the pinout I went with for the AV jack:

1722313604823.png


This is a good opportunity to shed some light on how MODE and YPbPr work with the dock. To support both composite and YPbPr, the MODE pin has to be broken out to the dock somehow, and pulled high when the user plugs a 3.5mm cable into the YPbPr jack (replicating how the stock Wii component cables function). There's also the issue of only having 12 pogo pins to work with-- one pin short if you want to transmit everything separately.

So, the MODE pin controls two analog switches which live on the Kawaii and the dock and handle switching Y and composite onto a shared Y/CVBS pogo pin.

Dock-side schematic:

schem.PNG


MODE is routed all the way through to the dock, where it connects to the Normally Connected switch pin of the YPbPr jack, and is pulled low by Y's 75-ohm termination resistor. In this default state, the analog switch in the Kawaii is sending composite video through the Y/CVBS pin, and the dock-side switch only routes composite to the AV jack.

When a user plugs a cable into the YPbPr jack, the MODE switch pin is disconnected from the Y pin and is pulled high by the 1M resistor (value might need to change, we'll see). This toggles the analog switches in the Kawaii and dock to send Y through the Y/CVBS pin and to the YPbPr jack. Obviously MODE going high also tells the Wii to enable progressive video. With this method, composite video never touches the YPbPr jack and Y never touches the AV jack. Still need to test all this, but I think it should work!

The dock MCAD has also been tweaked a bit to accommodate the finalized PCB. It's got some smoother corners, a new font for the logo (Shin Go Pro), and a lightpipe for the bicolor status LED.

mcad1.PNG


Very snug fit for the electronics inside!

mcad2.PNG


Wesk's work modeling all the components and KiCAD's excellent STEP exporting have made the interconnect planning completely painless.

mcad3.PNG


mcad5.PNG
mcad4.PNG


I want to give @Ding a huge shoutout for being a CNC wizard and machining the cases for this project. You rock!
 

Attachments

  • render.PNG
    render.PNG
    201.3 KB · Views: 168
Last edited:
Woah, making the wii this small is crazy work, I didn't expect something like this to be at all possible
 
Any possibility to post 3d cad files or your renderings? Love to see the tolerences and possibly 3d print some test parts to see if theres any possiblity to compact this more :) still what a wonderful idea and cant wait to pre order a cnc case!
 
Any possibility to post 3d cad files or your renderings? Love to see the tolerences and possibly 3d print some test parts to see if theres any possiblity to compact this more :) still what a wonderful idea and cant wait to pre order a cnc case!
My understanding is there's still some massaging of the overall design. It was stated the kawaii will be open sourced when finished though, so I'm sure the files would be posted then.
 
My understanding is there's still some massaging of the overall design. It was stated the kawaii will be open sourced when finished though, so I'm sure the files would be posted then.
Thats true, i sure cant wait, hoping to be able to design and make a modular switch esc version of it using the docking design and portablility of the kawaii and having a modified dock with a screen and battery, but for now i guess its still to the drawing boards for me while i wait!
 
1310f4a54c6e66522cc76fc82a73264.jpg
9893fad59178449b8cc12410f656edb.jpg
d9cfac815009a4aecff76b6fce6137a.jpg
d817b9aecb0aed229ecf14ed803da0c.jpg

进度更新,阳极氧化颜色很漂亮!!!

内部处理痕迹将在后续版本中清理。

雷雕效果后续更新……
 

Attachments

  • 04e2058ce8243a7615ba1b10d72ecbb.jpg
    04e2058ce8243a7615ba1b10d72ecbb.jpg
    4 MB · Views: 168
Last edited:
I'm an italian electronic engineering student passionate about consoles and I hope one day to have the idea and the possibility to do something similar to your amazing project!
But until that day, every day I check for big or even small updates and I can't wait to see it working!!
 
I received the Kawaii PCBs in the mail this week. Just waiting on some components to arrive before I can begin assembly.

IMG_20240816_180546~2.jpg
IMG_20240816_180629~2.jpg


And here are the latest photos of the laser engraved shell, courtesy of @Ding! Looks just like the renders

mmexport1723842062260.jpg

mmexport1723842060684.jpg
mmexport1723842065637.jpg


Next steps include trimming some OMEGAs, assembling and testing the internal and dock PCBs, and getting RGB LED control working with Thundervolt. (@loopj already prototyped this, so it should be painless)
 
Damn, that case looks incredible. Well done guys! Can’t wait to make one!
 
Back
Top