
You are using an out of date browser. It may not display this or other websites correctly.
You should upgrade or use an alternative browser.
You should upgrade or use an alternative browser.
Worklog FBD008-Ultra Slim
- Thread starter FatBaldDad
- Start date
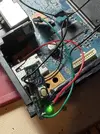
Hah, I might be wired badly or something but, whenever I touch, well, pretty much any pin OR ground with Green LED (7), the console just shuts down. And I cant get the green light to turn on, only the red one. Weird.
I can’t take credit for this diagram and I did not create it; however, this is what I referenced. Whomever made it — thank you!!
You need to provide EVER_+8.5V to the SW board for the common on the resistors and for /RED_ON (1) and /GREEN_ON (7). These are sinking outputs from the console (they provide a ground).
NOTE: If you dont want the LEDs to be really bright, you could try EVER_+3.3V. Sometimes those third party, AliExpress replacemnt sw boards, the LEDs can be really bright...
I added a diagram that may help a little more.
Last edited:
Strnadik
.
- Joined
- Feb 3, 2026
- Messages
- 7
- Likes
- 1
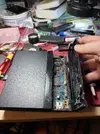
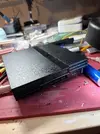
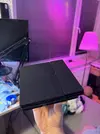
Thank you @FatBaldDad for previous advice. I have "completed" the UltraSlim, I wasted 2 days doing something I didn't have experience with and now that I'm looking at it, I hate it :/ I wanted to have a true "PS2" UltraSlim, as in, a true original shell, memory card springs, the LED, bells n whistles! So I spent 2 days fighting the pinouts for the power pcb, I dremelled entire today which just made so much mess, uneven surfaces, it all just looks crooked asf :/ Here, take a look. It's "done", but I am going to dissasemble it out of spite and print myself the usual UltraSlim shell. On mine, the ElectronShepherd doesnt hold properly, the power button holds by the will of the hot glue... eh... I tried. I didn't comppllletely waste the time, I guess, it taught me some stuff.
Attachments
Great job! that is a neat little console.Thank you @FatBaldDad for previous advice. I have "completed" the UltraSlim, I wasted 2 days doing something I didn't have experience with and now that I'm looking at it, I hate it :/ I wanted to have a true "PS2" UltraSlim, as in, a true original shell, memory card springs, the LED, bells n whistles! So I spent 2 days fighting the pinouts for the power pcb, I dremelled entire today which just made so much mess, uneven surfaces, it all just looks crooked asf :/ Here, take a look. It's "done", but I am going to dissasemble it out of spite and print myself the usual UltraSlim shell. On mine, the ElectronShepherd doesnt hold properly, the power button holds by the will of the hot glue... eh... I tried. I didn't comppllletely waste the time, I guess, it taught me some stuff.
I love this! because what you just described is the modder experience. Every modder starts with frustration, mess, wasted time, and that “I hate this” moment. What modder hasn’t fought pinouts, soldered something backward, fried a board, burned their fingers, or stared at a crooked cut wanting to go dig a hole and bury the whole thing?
What matters is that you did it. You now know things you didn’t two days ago and that knowledge is yours now. Next time will be cleaner and easier because of this one.
I really appreciate you sharing your work. A lot of people have no idea what actually goes into making or modifying consoles — or anything of this nature, really. They only see the end result. But those little celebrations, though, when an LED turns on because you got the circuit right? That’s the fun part and I find it very rewarding.
You powered through! I’d say keep this one, and build another… then another… and yet another.
I feel like it would be helpful for the community to standardize the naming of these different types of builds.
One possible way to think about it is that “Super Slim” or “Mini Slim” could refer primarily to shell and/or motherboard modifications based around the original plastic housing, whereas “Ultra Slim” would specifically describe the printed shell design pioneered by Wesk, typically paired with a board mod.
This also ties into something I’d like to explore in the future, building what I’m tentatively calling the “µSlim,” based on Tschicki’s board design. If I move forward with that, I’d love to name it something like the “TSCH-8000 µSlim” as a nod to his fantastic work.
Strnadik
.
- Joined
- Feb 3, 2026
- Messages
- 7
- Likes
- 1
Aww, that just made my day ^^ Thank you for the positive words, and you are absolutely right! At the end of the day I had learned quite alot about the PS2, I scoured the forums for board scans, schematics, various 3.3 and 8v standby locations, I know the SCPH-79000 like my shoes now lol.Great job! that is a neat little console.
I love this! because what you just described is the modder experience. Every modder starts with frustration, mess, wasted time, and that “I hate this” moment. What modder hasn’t fought pinouts, soldered something backward, fried a board, burned their fingers, or stared at a crooked cut wanting to go dig a hole and bury the whole thing?
What matters is that you did it. You now know things you didn’t two days ago and that knowledge is yours now. Next time will be cleaner and easier because of this one.
I really appreciate you sharing your work. A lot of people have no idea what actually goes into making or modifying consoles — or anything of this nature, really. They only see the end result. But those little celebrations, though, when an LED turns on because you got the circuit right? That’s the fun part and I find it very rewarding.
You powered through! I’d say keep this one, and build another… then another… and yet another.
And you know what? I cooled down, I looked at the poor thing, and I thought... Well.. I already trimmed the shell for 2 days... I already cut into the heatsink for this specific case... I already snapped the power pcb in half and I really really wanted to have the LED right... I reeeeally really wanted the memory card spring doors that are missing in every UltraSlim build right??
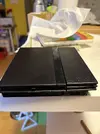
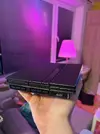
 So I said forget the new shell. I will do the unspeakable and help myself with a bit more hotglue - I assembled the shell and hotglued the necessary uneven spots, I secured the power button, taped the video wires away from 5v cause that was causing interference... aaand look! Doesn't look too shabby once FULLY closed and hopefully forever!
Attachments

Strnadik
.
- Joined
- Feb 3, 2026
- Messages
- 7
- Likes
- 1
As a sidenote, you know what pumped me up to do this because "it can't be so hard"? Aliexpress listing for EXACTLY what I wanted to do. No seams, no visible cuts, but seems to be the OG shell! https://www.aliexpress.com/item/1005006448800309.html
Agreed!Aww, that just made my day ^^ Thank you for the positive words, and you are absolutely right! At the end of the day I had learned quite alot about the PS2, I scoured the forums for board scans, schematics, various 3.3 and 8v standby locations, I know the SCPH-79000 like my shoes now lol.
And you know what? I cooled down, I looked at the poor thing, and I thought... Well.. I already trimmed the shell for 2 days... I already cut into the heatsink for this specific case... I already snapped the power pcb in half and I really really wanted to have the LED right... I reeeeally really wanted the memory card spring doors that are missing in every UltraSlim build right??
moahdib
.
- Joined
- Jun 16, 2025
- Messages
- 49
- Likes
- 36
@Strnadik
Your ps2 mini and mine are twins! I also use an original shell for mine!
@FatBaldDad
Nice work on the diagrams. Much better looking than mine. I am just using paint program and lack any graphical skills lol
Your ps2 mini and mine are twins! I also use an original shell for mine!
@FatBaldDad
Nice work on the diagrams. Much better looking than mine. I am just using paint program and lack any graphical skills lol
Thank you! I use screenpresso@Strnadik
Your ps2 mini and mine are twins! I also use an original shell for mine!
@FatBaldDad
Nice work on the diagrams. Much better looking than mine. I am just using paint program and lack any graphical skills lol
- Joined
- May 17, 2026
- Messages
- 1
- Likes
- 0
First post, I’ll definitely be following this build!RESERVED - Internal BlueRetro HW2 Install
I’m looking to do your HW2 internal BlueRetro mod as detailed here:
Are you planning to do the install the same way for this build, or are you thinking of changing anything in the approach?
I have a lot of questions, but I’ll start with this one.
")
I do it differently, this build is actually finished. I keep coming back to fill in the gaps, lol.
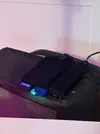
On this build I used a dev board. Now I have my own board.
I

I went with a more universal approach, has the boot/reset buttons, UART interface, and OLED. I put the pads together so you could use a JHT connector or solder to to a pad. I use it in other models.
On this build I used a dev board. Now I have my own board.
I
I went with a more universal approach, has the boot/reset buttons, UART interface, and OLED. I put the pads together so you could use a JHT connector or solder to to a pad. I use it in other models.
Last edited:
- Joined
- Nov 22, 2023
- Messages
- 76
- Likes
- 86
man ive been wanting to hook up the LED for ages, thats going to be really helpfulAre you following the schematic in the above link?This was next to the cover on my work log, lol!Oops, I forgot to add this part, lol!
I can’t take credit for this diagram and I did not create it; however, this is what I referenced. Whomever made it — thank you!!
You need to provide EVER_+8.5V to the SW board for the common on the resistors and for /RED_ON (1) and /GREEN_ON (7). These are sinking outputs from the console (they provide a ground).
NOTE: If you dont want the LEDs to be really bright, you could try EVER_+3.3V. Sometimes those third party, AliExpress replacemnt sw boards, the LEDs can be really bright...
I added a diagram that may help a little more.
View attachment 41590
View attachment 41593