Worklog Retro Lite CM4 - A StonedEdge and Dmcke5 collaboration

Dmcke5

.
2020 1st Place Winner
Joined
Feb 16, 2020
Messages
216
Likes
883
Location
Queensland, Australia
Portables
3
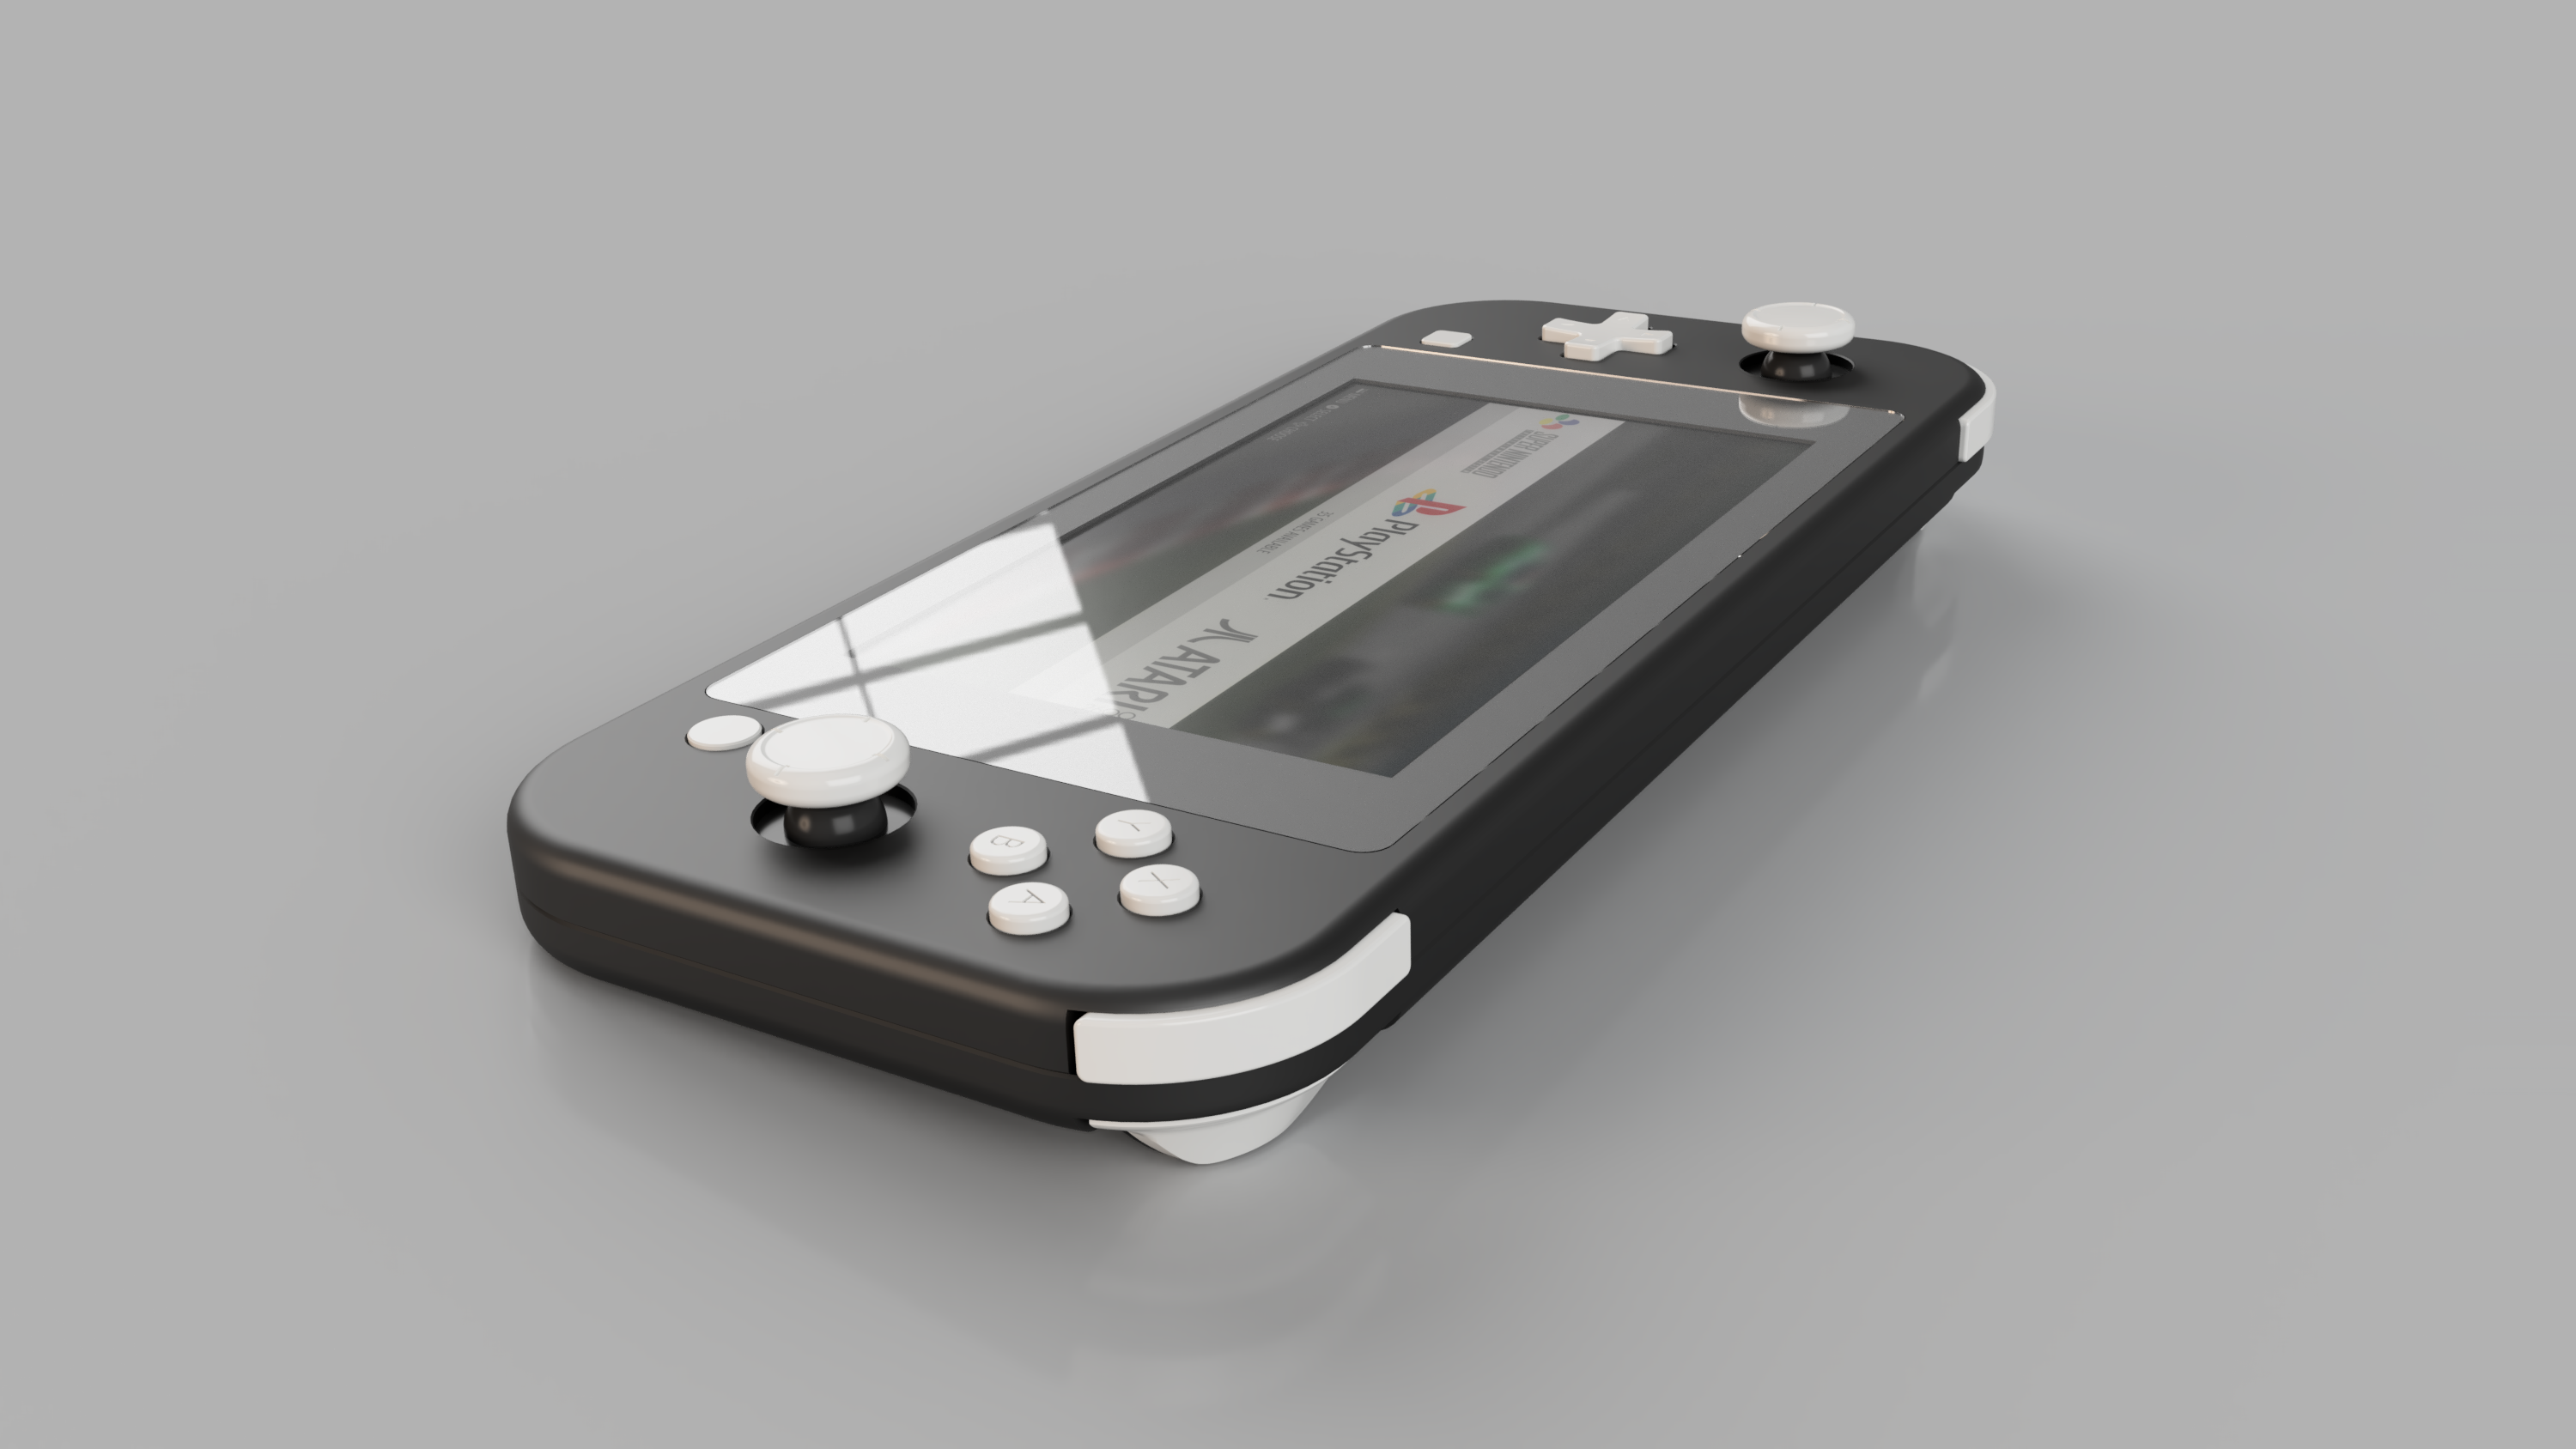
Introducing our new project, the Retro Lite CM4. A Raspberry pi Compute Module 4 based Retropie handheld in a switch lite form factor.

Under the direction of StonedEdge I've begun designing the case to "clone" a nintendo switch lite case as closely as possible. Features we are hoping to include are as follows:

5 - 5.5" LCD IPS screen (parallel interface)
Dual Switch Joysticks
Stereo speakers
Resin Cast buttons and dpad
Anodized aluminum housing
Custom Copper Heatsink and fan
Raspberry Pi CM4
AIO PCB including arduino (for control input), battery management, Back light boost converter and audio amplifier
USB C Charging and data transfer
External HDMI output
4000mah battery

9b0c6b02-ab9b-46d7-a814-0201cb88e658.PNG


Still got a lot of work to do, and StonedEdge needs to finish his WiiSP before I'll let him work on this. But I'll post some more renders as I work on the model!
 

Dmcke5

.
2020 1st Place Winner
Joined
Feb 16, 2020
Messages
216
Likes
883
Location
Queensland, Australia
Portables
3
Amazing!! How much battery life do you expect with a 4000 mAh battery?
Hopefully at least 2 hours under a heavy load. Some of the lighter consoles will hopefully last more like 4 hours but we won't really know till we try it.
 

MRKane

.
2021 3rd Place Winner
Joined
Nov 5, 2017
Messages
404
Likes
487
I had my arm twisted (with money) to make a Raspberry Pi 4 portable for someone I know - I should poke him this way as this promises to be better than anything I'd cobble together!
 

Dmcke5

.
2020 1st Place Winner
Joined
Feb 16, 2020
Messages
216
Likes
883
Location
Queensland, Australia
Portables
3
Slowly making some progress on the design. Top and bottom trigger buttons are done for now, but I will need to make some to test before I go too much further to ensure they work the way I hope. Front triggers shouldn't be a problem but the rear triggers (not pictured here) are a bit of a strange idea that I haven't tested on anything yet.

Assuming the triggers work, the basic profiles for the controller PCB's are pretty much done. We're going with clicky tactile buttons on everything for this one, really not finding I'm a huge fan of the squishy tacts. I'm tempted to try a clicky switch with rubber membrane like they use in the switch, but that will depend on if I can find a suitable membrane.

I think I'm going to try and tackle the controller PCB's myself as I'd like to learn, but I will leave the complex main PCB for StonedEdge as I really don't think I'm experienced enough yet to pull it off. The controller PCB will have all of the Arduino circuitry on them as well, so they should only need a ribbon cable to connect them to the main pcb.

We are going with a Mini HDMI port on the base next to the USB-C charge/data port to try and keep things as electrically simple as possible. Since the CM4 only has one usb port, we will need to include a USB hub circuit to allow external USB access whilst allowing us to continue using the internal USB port that the Arduino will occupy.

Still deciding on the screen, I've found a 5.5" IPS 1080p option but it uses MIPI communication so we would need to find a suitable control circuit to include in the PCB to make that work. It may prove to be less complicated than copying the HDMI to TTL driver board, but at least I know that combination already works.

If anyone wants to see how I've done certain things or has any input, let me know! Happy to provide extra details!

Capture.PNG
 
Joined
Sep 21, 2020
Messages
65
Likes
118
Location
Melbourne, Australia
Portables
1 (Aran)
designs Looking pretty sweet so far
I've been looking at using smd switches like in the joycans also.
 

MRKane

.
2021 3rd Place Winner
Joined
Nov 5, 2017
Messages
404
Likes
487
Actually I'd be interested to see what your trigger button design is - I'm currently remodelling that part of my PS2 portable to change the hold position and thus make the balance more comfortable so am always keen to see other ideas :)
 

Dmcke5

.
2020 1st Place Winner
Joined
Feb 16, 2020
Messages
216
Likes
883
Location
Queensland, Australia
Portables
3
Actually I'd be interested to see what your trigger button design is - I'm currently remodelling that part of my PS2 portable to change the hold position and thus make the balance more comfortable so am always keen to see other ideas :)
No worries. About to do a bit more machining on a certain acrylic case, but once I'm done I'll get a couple of screen captures of my lower triggers and show you what I'm thinking!
 

Dmcke5

.
2020 1st Place Winner
Joined
Feb 16, 2020
Messages
216
Likes
883
Location
Queensland, Australia
Portables
3
Thought I should post a little update.
The designs for my controller PCB's are done and I should have my first batch of boards in the post this afternoon! I'm hoping I'll have time to populate the board tonight but we'll see how it goes. Next step is to get an outline for the main PCB sorted so I can pass it on to StonedEdge and he can work his magic while I finish off the design of the case and machine the first prototype. Should start to see some actual progress soon hopefully!
Controller PCB's Front.PNG
 

Dmcke5

.
2020 1st Place Winner
Joined
Feb 16, 2020
Messages
216
Likes
883
Location
Queensland, Australia
Portables
3
Had a small issue with the 5 pin FFC connector having top contacts instead of bottom contacts which I've substituted for some I had spare from my last project. I also didn't realise I needed to break out the reset pin to be able to flash a bootloader, but I was able to work around that issue by soldering a wire onto the cap that normally joins that pin to ground. So it all appears to be working now!
Did a quick bit of programming on it last night. It now has an inbuilt calibration function for the joysticks that can be triggered with a button combination (start + right joystick button) which resets mid point and limits for both joysticks and stores them to EEPROM.
Next step is to finish off the profile of the main PCB so that we can start getting everything together in eagle for it. Hopefully in doing so I will also have everything I need to complete the model so I can start machining a prototype case!
IMG_20201123_235141.jpg
 
Joined
Dec 13, 2020
Messages
2
Likes
0
Looking forward for it. I hope the USB C will also support Data, not only charging :) Starting price, release date? Will it work with eMMC, microSD card or both?
 

Dmcke5

.
2020 1st Place Winner
Joined
Feb 16, 2020
Messages
216
Likes
883
Location
Queensland, Australia
Portables
3
Looking forward for it. I hope the USB C will also support Data, not only charging :) Starting price, release date? Will it work with eMMC, microSD card or both?
The plan is that the USB-C will be a usb host capable port so that a USB drive can be connected for transferring roms or an external controller for docked mode. Connection to the internal storage wouldn't make much sense for most people, as the raspberry pie file system isn't a windows/mac native format. Should work with either version of the compute module, we are planning to include an SD card slot (however it will most likely be internal, since it rarely needs to be removed and we are running out of space along the top and bottom sides). As for prices, I'm not sure we'll ever be able to sell them. The machined housing alone will most likely be worth around the $200 USD mark as it is plus by the time you add all the required electronics you are looking at a pretty expensive unit.
As for a release date? 2021? Hopefully? haha
 

Dmcke5

.
2020 1st Place Winner
Joined
Feb 16, 2020
Messages
216
Likes
883
Location
Queensland, Australia
Portables
3
Made a nice little discovery in my controller code yesterday. Turns out the arduino joystick library is actually pretty slow at making changes to the state of the buttons, so I added an array of current button states to store the last sent button state so I can update the buttons only when they change rather than on every cycle. This is a small difference from the example code the library gives you but makes a huge difference in cycle time when you're dealing with a lot of buttons. I went from 20ms per processor cycle to 3-4ms just by making this change. This should make a big difference to responsiveness as my debounce code requires a minimum of two processor cycles to commit a change to a button state. So in theory I have actually gone from an input latency of 40ms down to about 8ms. As for how that actually translates to the USB output I have no idea, but it can't be a bad thing. This will also apply to both of my previous builds which is a nice little bonus.

I have ordered some acrylic for the first prototype housing so hopefully I will be able to make some progress on that over the holidays!
 

MRKane

.
2021 3rd Place Winner
Joined
Nov 5, 2017
Messages
404
Likes
487
If you're using the Arduino mini (or similar) for control input I really should bug you about that code to get a leg-up on the Pi I'm working on!
 

Dmcke5

.
2020 1st Place Winner
Joined
Feb 16, 2020
Messages
216
Likes
883
Location
Queensland, Australia
Portables
3
If you're using the Arduino mini (or similar) for control input I really should bug you about that code to get a leg-up on the Pi I'm working on!
The reason I'm actually working on the code again is because someone asked me for a copy of it. You're welcome to a copy of it too once I finish making my refinements! It's mostly commented too so hopefully nice and easy to understand.
I'll PM you a link for it once I've finished it off.

I made even more progress with it today. After having a closer look at how the joystick library functions I discovered that the way it is used in the examples is terribly inefficient. I was able to make some further changes and I'm now down to below 1ms per cycle and I think I still have some room for improvement.
 
Joined
Sep 27, 2016
Messages
400
Likes
836
Just started looking into pi portables myself and definitely will be watching this thread. I too am interested in your controller code and how you implement the controller altogether! I was just going to experiment using a GC+ with a gc to usb adapter for a pc and hope that works with the pi... Looking forward to seeing more!
 
Top