Worklog black ashida, a beginning ...

Joined
Sep 7, 2022
Messages
12
Likes
7
Okay, after more than a year, I can finally start working on a wii portable.
I found out about bitbuilt last summer and was shocked to discover what some people could do with my childhood console.

first time I opened bitbuilt, I found the ultrawii sakura of @YveltalGriffin and wanted to do my own. After some research, I realized that I didn't had any chance, because I never know how 3d printing or solder worked. I continue searching for another model of wii portable that was more "easy" to do and found the Ashida. 3d files all ready to be printed, a BOM with all the pieces required and a lot of documentation on how everything worked.

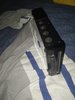
After a month, I finally bought a 4 layer black wii.
IMG_20230811_221306.jpg
Installed rvloader and all little things, and it was ready to be cut. But, I was scared of using a dremel, I didn't and actually hadn't cut it, and just told to myself, "I can do it later", so I should do that next month, since I can't work on my wii portable, because I work for the rest of the summer.

For the rest, I bought all the 4 layer tech board. CG+2, PMS-PD2, RVL-AMP, PMS-Lite and the ashida pcb set.
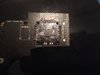
So, I soldered CG+2 and also soldered RVL-AMP to the ashida set.IMG_20230811_221507.jpgIMG_20230811_221455.jpg

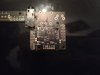
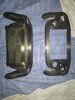
To learn how to use everything from 3d printing to soldering iron, I go to an association called FabLab, which is a french association where we can use 3d printing machines, soldering iron, hot air station, and all kind of repair or create stuff. People also help us and teach us how to use all this tools. That way, I was able to print a black case and sand it a bit for adjustment.
IMG_20230811_221205.jpg
That's all I could do from now, I wait for the rest to be delivered. Like the GameCube controller, the heatsinks and all.

Also, I was wondering if anyone know where I could find another potentiometer or the same one anywhere else, because I have like 20 bucks of shipping cost, for a 1 buck potentiometer, which I found a little bit silly to be honest.
And also if there is another fan, because, it isn't available until November 27th and that would be awesome if I didn't have to wait 3 month for a fan …

(sorry for bad image quality, I just have my old phone to take these ones)
 

Stitches

2 and a Half Dollarydoos
Staff member
.
.
Joined
Feb 5, 2017
Messages
3,848
Likes
3,026
Location
Banana Bender Land, Australia
Portables
6
What specific potentiometer do you need? The volume wheel or one of the LR trigger slide pots?

As for the fan, any 5v axial fan of the same dimensions will do. You don't have to use the exact fan that's in the BOM, just a fan of that same size.
 
Joined
Sep 7, 2022
Messages
12
Likes
7
What specific potentiometer do you need? The volume wheel or one of the LR trigger slide pots?

As for the fan, any 5v axial fan of the same dimensions will do. You don't have to use the exact fan that's in the BOM, just a fan of that same size.
Thanks for the Quick reply

The potentiometer that I can't find is the wheel for the sound, I hadn't found one of the good dimension

As for the fan, I will search for one
In stock this Time.
 

Stitches

2 and a Half Dollarydoos
Staff member
.
.
Joined
Feb 5, 2017
Messages
3,848
Likes
3,026
Location
Banana Bender Land, Australia
Portables
6
For the volume wheel you can use any single channel linear b103 10k ohm wheel potentiometer
 
Joined
Sep 7, 2022
Messages
12
Likes
7
ok, I ordered everything and it should arrive in september,

There should be more news next month since I won't be able to work on the project for the 2 future weeks

I will sand a bit more my case though, since I still see a lot of lines on it
I had a question, apart from sanding it, and apply clear coat to it, is there a way to smooth it a little, since I don't have clear coat for the moment
 
Last edited:

Stitches

2 and a Half Dollarydoos
Staff member
.
.
Joined
Feb 5, 2017
Messages
3,848
Likes
3,026
Location
Banana Bender Land, Australia
Portables
6
ok, I ordered everything and it should arrive in september,

There should be more news next month since I won't be able to work on the project for the 2 future weeks

I will sand a bit more my case though, since I still see a lot of lines on the case
I had a question, apart from sanding it, and apply clear coat to it, is there a way to smooth it a little, since I don't have clear coat for the moment
Yeah you can use a filler product. There's putty type filler that you apply manually (use gloves), and spray filler that's a bit more time effective. Both will take several passes of applying filler, being left to cure, and then sanding back down to plastic to get properly smooth. It's what we used to do back when frankencasing was the norm
 
Joined
Sep 7, 2022
Messages
12
Likes
7
I might have messed up ...

I was planning on giving news later but I think it's best to ask about it

the person who I thought had a dremel didn't have one, so, I didn't know how to do and while I was discuting with someone IRL, he told me that I could try with a cutter

eventually, I figured I should try and I did, but I don't think we can call it perfect ( I also try to relocate the mx chip and it went really well )

IMG_20230909_172545.jpg
IMG_20230909_172534.jpg


The problem is that some things went off when I accidentally it them while cutting the wii ( 3 on top and one on the other side )


IMG_20230909_172545.png
IMG_20230909_172534.png


I have no idea if the wii is dead and I don't know if I can test it before Tuesday or Wednesday, I have a multimeter with me but I can't solder anything before these day
So, we'll see, if you can tell me how I can test it it would be great, because, the sooner I know it's dead, the sooner I'll buy a new one
 

CrazyGadget

Crazy Helpful, CrazyGadget
.
Joined
Jun 6, 2020
Messages
611
Likes
879
Location
Downing's Closet
Portables
???
A cutter? What exactly is that? There are a lot of gouges along the edge of the board on both sides, which could potentially short the outer and inner layers of the board together... The component next to the NAND that got yeeted is a decoupling cap, which isn't 100% necessary, but the vias providing 3v3 and gnd to those two pins on the NAND look to be gone as well. You'll need to reestablish those connections with some magnet wire. It's a bit tricky if you don't have a ton of soldering experience, but you can think of it as practice for soldering H and V to the AVE later.

What grits did you sand the edges with? They still look pretty rough. You should check the resistances between your voltage rails using this guide. Who knows, maybe those gouges are harmless.
 

Stitches

2 and a Half Dollarydoos
Staff member
.
.
Joined
Feb 5, 2017
Messages
3,848
Likes
3,026
Location
Banana Bender Land, Australia
Portables
6
Please tell me you didn't use scissors/tin snips to do this
 
Joined
Sep 7, 2022
Messages
12
Likes
7
what I call a cutter is a really sharp knife, It wasn't the best to use, but with a little bit of work, I think my wii is still alive

The multimeter I wanted to use was an old one that my family had somewhere and I don't really know how to use it so I'll come back later with the resistances
I'll also use sandpaper on the edges, I didn't finish when I posted yesterday, I was just scared that I had take off a important component so I posted quickly to know about it

And also, I was wondering, which pin don't have 3.3v and gnd ? I figured that you were talking about the vias that goes to the component next to the nand, but I am not really sure and I don't want to mess up my nand and kill my wii for good this time
 
Joined
Sep 7, 2022
Messages
12
Likes
7
Ok, I got the resistances
IMG_20230918_120017.jpg

I really think my wii is alive, I just need to finish the shell ( I got everything Yesterday )

I just don't know what traces @CrazyGadget talked about on the pin of the nand, if anyone could tell me about it

So, next news will be about my portable or about my broken wii
 

Stitches

2 and a Half Dollarydoos
Staff member
.
.
Joined
Feb 5, 2017
Messages
3,848
Likes
3,026
Location
Banana Bender Land, Australia
Portables
6
Ok, I got the resistancesView attachment 29888
I really think my wii is alive, I just need to finish the shell ( I got everything Yesterday )

I just don't know what traces @CrazyGadget talked about on the pin of the nand, if anyone could tell me about it

So, next news will be about my portable or about my broken wii
You cut too close to the pins of the NAND chip, and have removed the vias that feed 3.3v and GND to that side of the NAND. You will need to consult the NAND pinout diagram in the LMAO trimming guide and run a 3.3v and a GND wire to the respective pins to restore functionality. Ideally you'd also relocate the little ceramic filtering capacitor that was there, but it looks to have been destroyed.

EDIT: I also just noticed that you've slashed a few of the NAND pins quite deeply, which may have severed them. You'll want to use the pinout I mentioned above to check continuity between the NAND legs and the vias that they should be connected to
 
Joined
Sep 7, 2022
Messages
12
Likes
7
I check continuity on the nand pin, and they're all connected, I also checked if the ground and 3,3v was connected, and it is ! I don't know if that means that it'll work, but I Hope so !

So, i'm still not sure of what the thing I destroyed next to the nand was for, but i'll try without it since some people already told me that it wasn't necessary

I also destroyed my fan, because, there was some 3d support left and when I pressed on the center of the fan, it broke completly, so, i'll buy a New one and i'll probable start to solder without it, and add it in probably a week or less
 

Stitches

2 and a Half Dollarydoos
Staff member
.
.
Joined
Feb 5, 2017
Messages
3,848
Likes
3,026
Location
Banana Bender Land, Australia
Portables
6
I check continuity on the nand pin, and they're all connected, I also checked if the ground and 3,3v was connected, and it is ! I don't know if that means that it'll work, but I Hope so !

So, i'm still not sure of what the thing I destroyed next to the nand was for, but i'll try without it since some people already told me that it wasn't necessary

I also destroyed my fan, because, there was some 3d support left and when I pressed on the center of the fan, it broke completly, so, i'll buy a New one and i'll probable start to solder without it, and add it in probably a week or less
The thing you destroyed was a filtering capacitor to "clean" the voltage being fed to that side of the NAND chip. It's not essential to boot the system, but it contributes substantially to the reliability and longevity of the NAND chip
 
Joined
Sep 7, 2022
Messages
12
Likes
7
The thing you destroyed was a filtering capacitor to "clean" the voltage being fed to that side of the NAND chip. It's not essential to boot the system, but it contributes substantially to the reliability and longevity of the NAND chip
Yeah, but I destroyed it and i don't have any spare ones so, i'll have to do without it
 

BasicBass

DO NOT BUY/SELL WITH USER
.
Joined
Mar 21, 2022
Messages
25
Likes
7
Yeah, but I destroyed it and i don't have any spare ones so, i'll have to do without it
Not completly true, I believe (check shanks wii compendium bom thing), the cap you killed was a simple 100 nf capacitor. I used lost mine (nand relocation) and just stole some from the wiis power regulators. You could prob steal one from somewhere on the wii if the size matches.
 
Joined
Sep 7, 2022
Messages
12
Likes
7
Ok, it has been a really long time, but I'm back !

During the last few months, I had to stop working on my ashida for personnal reasons, but I Can continue now.

Because it has been a really long time since the last update, I wanted to Come back with a lot of progress, so I wanted to finish solder signal wires going to the wii before updating.
Long story short, I absolutely destroyed the pin on the video chip when I tried to solder horizontal Sync, damn coffee...

After that, I bought a New Wii and cut it better, left more Space this Time and sanded it, it had a short on the 1v Line and I ended up breaking it too when trying to repare it. For the wii that I just bought, i'll cover it with tape to ensure that there won't be any copper pieces that get stuck under a component, because that's the only reasons left to explain why there was a short on the last one.

Honestly, I wasn't expecting the solder to be this hard, but that's what make me keep going, it's because it's difficult that I want to finish this project. I'll Come back later with, I Hope, resistance of the next trim.
 
Joined
Sep 7, 2022
Messages
12
Likes
7
ok, I trimmed my wii and got these resistances
image_2024-01-27_185627509.png

I don't know if the fluctuation on the 3.3v is normal but the board looks pretty clean so i'll test it during the week
 
Top