Worklog [2026 Contest Entry] A Destructive Trio: Xbox 360 + PS2 + Wii - "The Trifecta"

Joined
May 29, 2026
Messages
17
Likes
24
Portables
If you can carry it, it's portable.
I've been using these forums for a while now, and finally decided to make an account and try my hand at this year's summer contest. I know a lot of people on these forums like to create portables, but I decided to go a different route. I am going to attempt (I hope successfully) to create "The Trifecta."

What is the Trifecta you ask?

Well, the Trifecta is a mashup of a Wii, PS2 (Slim), & an Xbox 360 in an Xbox 360 shell.
Screenshot 2026-05-29 131057.webp

^ Something like this, don't mind the scale.

Also, before anyone says anything, I am using a Later-Gen Falcon (post April 2008) so the Xbox 360 will stay alive (hopefully).

The essentials are as follows:

1. Externally there can only be one power plug (the Xbox 360 PSU plug).
2. All consoles must also output video via one plug (the Xbox 360 AV out).
3. All consoles must boot independently of one another.
4. All consoles must be able to play games and be able to connect controllers.
5. None of the consoles can overheat or have thermal issues (that's gonna be tough).

Here are my stretch goals:

1. Have all of them be able to output via HDMI (custom boards or internal adapters).
2. Have some sort of integrated controller for console/mode selection (rather then the external switches I'm currently planning on).
3. Spend under 20 dollars on additional components or parts for the build (excluding the use of my 3D printer, the consoles, and basic soldering supplies or components I already have ;)).

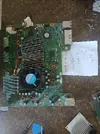
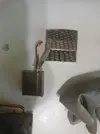
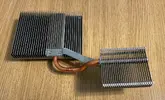
Here's some pictures of what I've got going so far:

20260529_135410~2.webp


20260529_134015.webp


20260529_134011.webp


I'll post an update in a couple of days, so keep an eye out.
 
Last edited:
A new update should be out very soon! Although in the meantime, I have a question for you guys...

Would you rather see RGH 1.2 (using a Matrix) on the 360 or should I stick with just using a soft mod (ABadAvatar)?

Right now the plan is to just use a soft mod for the final product, but if you guys would rather see RGH 1.2 I can put in the extra effort and get it booting.
I used to be pretty well versed in the 360 game, and my honest recommendation would be to go for the RGH 3!

While RGH 1.2 is still good especially if you have a matrix chip already on hand, I heard through the grapevine a while ago that the matrix chips specifically can put a lot of stress on the southbridge in the long run (but are still good to get the job done!), so I would look into RGH3! Less components and better boot times iirc!
Thanks for the reply, I am doing a Falcon board, so that's why I originally went with RGH 1.2 because at least in my experience RGH 3 isn't as reliable on the fat models as on the slim models. If I was using a slim model, it would be RGH 3 all the way.

I do think I found out why RGH 3 is less reliable on the fat models. In 15432's write up about how he created RGH 3, he mentions something very specific, "the CPU_PLL_BYPASS assertion on Fats gives a slowdown ratio of 128, while Slim revisions have a five times higher slowdown ratio of 640." He then goes on to explain that the only way for RGH 3 to work even somewhat reliably on the fat models is overclocking the southbridge. At the very least I found it an interesting read: https://swarm.ptsecurity.com/xbox-360-security-in-details-the-long-way-to-rgh3/
 
Update!

Ok, so after a lot of debate the first thing I decided I would tackle is trying to figure out Xbox 360 thermals while creating more space for the Wii & PS2 Slim. The most obvious choice to make more space would be to remove the fans and the heatsinks from both the CPU and GPU, but that's not possible unless you want instant overheating.

Here's the thing though, the CPU heatsink is massive compared to the GPU heatsink. There are two different CPU and GPU heatsink styles, both either have a aluminum heatsink with a copper slug/heat pipe or they are just plain aluminum.

Here are some examples:

1780516943502.webp

CPU Heatsink + Copper Image Credit: (Xenon Library)

1780516964219.webp

CPU Heatsink Image Credit: (Xenon Library)

1780512761037.webp

GPU Heatsink + Copper Image Credit: (Xenon Library)

1780516989064.webp

GPU Heatsink Image Credit: (Xenon Library)

Now, in a perfect world you could just take a GPU heatsink from a donor board put it on the CPU, and everything would be great, right? Sadly, you can't just do that because the power rail has some tall capacitors located at the right of the CPU, and these are so close that they prohibit putting the long GPU heatsink on the CPU. So, what do you do? You take the GPU heatsink, and trim it down into a square the size of the CPU heatsink base. >:D

Here was my donor GPU heatsink as it sat:
20260601_162242.webp

As you can see, I bent the fins to make the line where I wanted to cut the aluminum to fit it to the proper size. Then with a little work, it was trimmed!
1780514112058.webp

I then cut off the heat pipe to make some more room in the case, and besides we won't be needing it anyway. :)
With the heat pipe removed, I mounted the new heatsink on with some brand new thermal paste, and we were ready to rumble. Since the stock fans were out, I then went through my pile of parts and pulled out a old computer fan, and this mounted right on the heatsink almost perfectly.

1780514507034.webp


Then I went and took an old replacement AMD K7 heatsink with two small fans mounted on it. I removed those fans and mounted them to both the main GPU heatsink and the secondary GPU heatsink.

1780514714275.webp
\

^ Here it is (with the two fans removed).

Here's the Xbox 360 with all the fans installed.

1780514829882.webp


Then I needed a place to get 12 V for the fans from, I could have pulled it from the fan header, but that's not any fun. I had to modify the cable for the disc drive anyway (to make the Xbox 360 think the disc drive was there). Luckily, there are two 12 v pins on the disc drive header.

1780515085617.webp

Image Credits: (Console Mods Wiki)

So I did some soldering and wired up the three fans to the 2 12 v sources and GND.

1780515264563.webp

Cable management will come later.

I then went and tested the Xbox 360, and it didn't explode, in fact it seemed to run really well, also the fans were quieter than I expected.

Then after taking a long time to get a flash drive set up, (the Xbox 360 likes FAT32, but I forgot my flash drive was exFAT, and was confused for way too long.) I was able to use the ABadAvatar exploit, and boot Aurora). After about 7 minutes of gaming off of the flash drive (Forza Horizon IV), the main temps were wildly low, the CPU was at ~53 C, with the GPU & EDRAM at ~48 C. More extensive testing to come.

1780515878743.webp

So far, I'm happy with how this has turned out. I think next I'm gonna be trying to model some mounts for the other two boards, and/or figure out power distribution.

As a quick side note, I bought some of these XL4015 buck converters (which took 8 dollars out of our 20 dollar budget :(). These are necessary for powering the PS2 Slim board though. I am also hopeful these won't introduce very much noise. I don't know how good they are, so we might have a noisy power rail on our hands. :\

1780516226827.webp


I'll put out another update soon, so stay posted!
 

Attachments

  • 1780514470512.webp
    1780514470512.webp
    527.6 KB · Views: 2
  • 20260601_165044.webp
    20260601_165044.webp
    260.3 KB · Views: 2
  • 1780512790387.webp
    1780512790387.webp
    102.4 KB · Views: 2
Last edited:
Mini Update!

I have been working hard and will get a full update out soon. For now, here's some code that might provide a small clue to what part of the Trifecta I've been working on. ;)
Python:
"""
Raspberry Pi Pico Multi-Console Power Management Script
by MegamindSquared (https://github.com/jamesisapro?tab=repositories)
This was made for the BitBuilt 2026 Summer Contest.
(C) 2026 MegamindSquared, licensed under the MIT License. Please credit the original author if you use or modify this code.
"""
from machine import Pin
import time
MAIN_BUTTON = Pin(14, Pin.IN, Pin.PULL_UP)
# High (1) = Transistor -> MOSFET = GND -> ON
# Low (0)  = Transistor -> MOSFET = 12V -> OFF
GATE_5V_DEFAULT = Pin(2, Pin.OUT)
GATE_12V_PS2    = Pin(3, Pin.OUT)
GATE_12V_WII    = Pin(4, Pin.OUT)
GATE_12V_360    = Pin(5, Pin.OUT)
PULSE_7  = 7
PULSE_8  = 8
PULSE_9  = 9
Pin(PULSE_7, Pin.IN)
Pin(PULSE_8, Pin.IN)
Pin(PULSE_9, Pin.IN)
# System State
current_console = 0  # 0 = Standby/Off 1 = Wii 2 = PS2 3 = Xbox 360
def set_standby_state():
    print("Now in standby")
    GATE_12V_PS2.value(0)
    GATE_12V_WII.value(0)
    GATE_12V_360.value(0)
    GATE_5V_DEFAULT.value(0)
    time.sleep_ms(200) 
def simulate_button_press(target_pin_number, duration_ms=250):
    """Safely simulates a physical short-to-GND without backfeeding voltage, rather than using 3.3V/GND states."""
    pulse_pin = Pin(target_pin_number, Pin.OUT, value=0)
    time.sleep_ms(duration_ms)
    pulse_pin = Pin(target_pin_number, Pin.IN)
    time.sleep_ms(100)
# Button Timing
press_count = 0
last_press_time = 0
debounce_ms = 50
click_window_ms = 500
# Force the system into its proper default state.
set_standby_state()
print("Standing by...")
while True:
    now = time.ticks_ms()
 
    if MAIN_BUTTON.value() == 0:
        if time.ticks_diff(now, last_press_time) > debounce_ms:
            press_count += 1
            last_press_time = now
            while MAIN_BUTTON.value() == 0:
                time.sleep_ms(10)
    if press_count > 0 and time.ticks_diff(time.ticks_ms(), last_press_time) > click_window_ms:
    
        if press_count > 0 and current_console > 0:
            print("Executing power off sequence for the currently on console...")
        
            if current_console == 1:
                print("Shutting down Wii...")
                simulate_button_press(PULSE_7)
                time.sleep(2)                 
                GATE_12V_WII.value(0)           
            
            elif current_console == 2:
                print("Shutting down PS2...")
                simulate_button_press(PULSE_8)
                time.sleep(2)                   
                GATE_12V_PS2.value(0)         
            
            elif current_console == 3:
                print("Shutting down Xbox 360...")
                simulate_button_press(PULSE_9)
                time.sleep(5) # The Xbox 360 SMC can be finicky about early power cuts, so we give it extra time.
                GATE_12V_360.value(0)
            set_standby_state()
            current_console = 0
        else:
            if press_count == 1:
                print("Wii Active")
                GATE_5V_DEFAULT.value(1)
                time.sleep_ms(150)   
                GATE_12V_WII.value(1)
                time.sleep(1)         
                simulate_button_press(PULSE_7)
                current_console = 1
            elif press_count == 2:
                print("PS2 Active")
                GATE_5V_DEFAULT.value(1)
                time.sleep_ms(150)   
                GATE_12V_PS2.value(1)
                time.sleep(1)       
                simulate_button_press(PULSE_8)
                current_console = 2
            elif press_count == 3:
                print("Xbox 360 Active")
                GATE_5V_DEFAULT.value(0)
                time.sleep_ms(150)
                GATE_12V_360.value(1)    # Turn on 12V rail for Xbox 360 (Not really, because the 5V short is cut, so it won't power on, but it toggles the driving transistor so when power is received the MOSFET will forward it.
                time.sleep(1)       
                simulate_button_press(PULSE_9)
                current_console = 3
        press_count = 0
    
    time.sleep_ms(10)

1781210931336.webp

^ For the record I was unaware of the plastic, and was really wondering why it stuck on so well even when the solder was liquid. Oh well, I guess we know now.

Stay Posted!
 
Last edited:
Update! Albeit a painful one.

I know it's been a few weeks since my last update, and a lot has happened. Some of it good, some not so good but here we go.

Ok, so the problem I wanted to solve before this update was getting the Xbox 360 PSU to power all consoles. I wanted to be able to switch what console receives 12v using a microcontroller, then when it had a good 12V rail I wanted to send a power on pulse to the respective console. I wanted to do all this from a single button.

At first I planned on using N-Channel MOSFETs to cut/supply power, as they had an attractive price per performance ratio, and I found some good ones that could switch off of 3.3v.

1781807726410.webp

^ Like this

Then I found out that N-Channel MOSFETs are used for low side switching, and I didn't want to low side switch any of the consoles, as that would leave floating power which might back feed through lines or blow stuff out trying to make it back to GND. So I pivoted to P-Channel MOSFETs. I wanted some that could handle a lot of power (mostly for the Xbox 360 as it pulls 12V at 14.2 A). I did some research and decided on the IRF4905(PBF).

1781807688265.webp


I needed at least 3 (one to power on the Xbox 360, one for the Wii, & one for the PS2), that would have set me back ~16 dollars after shipping. I ended up finding a great deal on Amazon, and got 10 + 5 heatsinks for 10 dollars.

1781808153269.webp


Now might be a good time to mention that our budget is absolutely gone. To properly drive these MOSFETs, I had to buy some discrete transistors, I wanted to stock up anyway, so I bought a big pack for another 10 dollars so our total is around 30 dollars now.

Ok now to get into the nitty gritty, I first had to isolate the PSU from the Xbox 360 so I desoldered it, and found out about the magic plastic underneath. O.o

1781808778864.webp

^ Here it was halfway through.

1781808818691.webp


^Now here it is taken out.

I then took some time to find out what pins did what.

1781808879088.webp


From there I decided to make a schematic of our circuit and start wiring.

1781808966752.webp

^ I hope this is right. :|

I then made 4 of them and was ready to go.

1781809101914.webp


I then spent way too much time wiring up a POC.

1781809239728.webp

^ Obviously this won't do.

I could say I didn't buy a couple of perfboards, but I dropped another 10 bucks so we don't have a pile of spaghetti. Then I wired up one line, and...

1781809436879.webp

^ It worked!

Then I decided to make two more, and finally, I wired up a transistor to be able to switch the power-enable line.

1781809857720.webp
1781809881380.webp

^ Voilà

I ran a test, and it worked!
sorta...

It enabled the right lines and everything but I was only getting ~8.5 V out of the MOSFET rather than the expected 12.

I am unsure what the issue is, but I will be messing around with it some more and hopefully get it working, or if I have too, I can pivot and find a different solution.

That's it for this update, and hopefully I will have another update out sometime soon.

Stay Posted!
 

Attachments

  • 1781807291315.webp
    1781807291315.webp
    54.5 KB · Views: 1
Last edited:
Back
Top