Guide scph-79004 gh-061-51 trim

elpax

.
Joined
Feb 3, 2025
Messages
5
Likes
7
Hello.

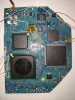
I have gh-061-51 motherboard from scph-79004 console.

I have found useful info about it posted by @Nold here:

The motherboard has some differences compared to gh-062-02.
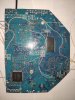
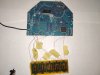
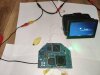
My question is: is it safe to cut it this way? (see attached photo)

top.png
bottom.png

I also attached a .psd file in case you need to make any edits.
 

Attachments

Last edited:
Trim was successful. I created a compendium that contains:
  • Advanced trim
  • Advanced voltage relocation
  • Capacitor relocation
  • Reset button
  • Standby led
  • CMOS battery
Notes:
  • To make a straight cut from the CMOS battery side, you need to relocate 1 capacitor. It is marked with a yellow circle in the compendium. Unsolder it from place 1 and glue it upside down to place 2. And solder it back with wires to place 1.
  • The five components marked with blue crosses need to be removed.
  • If the voltage relocation goes straight to the board and not to a component leg or open trace, you will need to scratch the board and solder a wire directly to the board.
I am attaching a couple of photos, a preview of the compendium, and also the compendium itself in .psd format.

Here are also some links with useful information on this motherboard that helped in creating the compendium:
And of course, a huge thanks to @Nold for his compendium and to everyone who contributed to the creation of "The Definitive PS2 Trimming Guide".
 

Attachments

  • pic (1).jpg
    pic (1).jpg
    7.8 MB · Views: 123
  • pic (2).jpg
    pic (2).jpg
    5.9 MB · Views: 123
  • pic (3).jpg
    pic (3).jpg
    7.7 MB · Views: 129
  • pic (4).jpg
    pic (4).jpg
    6.1 MB · Views: 110
  • pic (5).jpg
    pic (5).jpg
    5.1 MB · Views: 128
  • pic (6).jpg
    pic (6).jpg
    5.1 MB · Views: 133
  • gh-061-51_final.png
    gh-061-51_final.png
    9.5 MB · Views: 116
  • gh-061-51_final.psd
    gh-061-51_final.psd
    45.2 MB · Views: 126
Back
Top