Question Nintendo playstation

Joined
Jan 24, 2022
Messages
57
Likes
48
Location
Almería-Spain
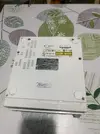
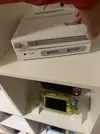
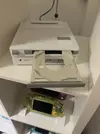
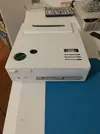
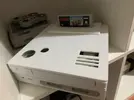
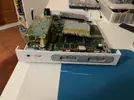
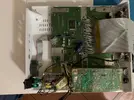
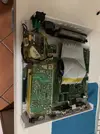
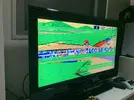
Hey guys, I'm bringing you this crazy project of mine. I saw a case design on the forum created by @Wesk and I couldn't resist trying to create my own version of the legendary prototype. I put an SNES inside, removing as much of the motherboard's height as possible. I changed the voltage to 5V to unify the voltages because the idea is also to use a Raspberry Pi 4 and thus be able to use an IDE CD drive with USB conversion. In theory, the Lakka emulator can do it, but I'm waiting for the converter to do tests. The thing is, since the cartridge slot doesn't line up, I used an IDE cable to extend the cartridge port and relocate it to its new position. I tested it and it worked fine, but when I try to play, the game freezes at startup. I don't know if it's because of extending the port with cables or because of the voltage. I'm currently using a modified PS2 9000 power supply to lower the voltage, but since it's not exact, it's 5.4V. I don't know if this would also be enough to make it work. I failed, what do you think?
 

Attachments

  • IMG_1598.webp
    IMG_1598.webp
    309.1 KB · Views: 44
  • IMG_1599.webp
    IMG_1599.webp
    220.4 KB · Views: 38
  • IMG_1601.webp
    IMG_1601.webp
    433.6 KB · Views: 42
  • IMG_1595.webp
    IMG_1595.webp
    528.8 KB · Views: 43
  • IMG_1596.webp
    IMG_1596.webp
    618.1 KB · Views: 47
  • IMG_1597.webp
    IMG_1597.webp
    681.2 KB · Views: 40
  • IMG_1593.webp
    IMG_1593.webp
    593.5 KB · Views: 31
  • IMG_1600.webp
    IMG_1600.webp
    370 KB · Views: 40
  • IMG_1603.webp
    IMG_1603.webp
    527.9 KB · Views: 38
  • IMG_1602.webp
    IMG_1602.webp
    499.3 KB · Views: 47
You have my attention
It's working now, except for connecting the old CD drive to the Raspberry Pi and freezing when playing physical SNES games. I lowered the voltage to 5V by adding some resistors to the power supply, but I still get freezing when playing cartridges. Maybe it just needs a good cleaning of the SNES slot. I'll keep you posted. Cheers.
 
Hey guys, it's great to hear from you. I wanted to share some pictures of how my Nintendo PlayStation is coming along after printing a few more parts and enabling the Lakka emulator reader on the Raspberry Pi 4. The reader is functional, but it can't be run directly from it. I was only able to transfer ROMs to the Pi's storage. Oh well, it's something, I hope you like it.
 

Attachments

  • IMG_0444.webp
    IMG_0444.webp
    414.4 KB · Views: 12
  • IMG_0445.webp
    IMG_0445.webp
    386.6 KB · Views: 17
  • IMG_0442.webp
    IMG_0442.webp
    366.9 KB · Views: 11
  • IMG_0441.webp
    IMG_0441.webp
    322.2 KB · Views: 15
  • IMG_0440.webp
    IMG_0440.webp
    320.2 KB · Views: 14
  • IMG_0439.webp
    IMG_0439.webp
    348.7 KB · Views: 19
  • IMG_0443.webp
    IMG_0443.webp
    511.3 KB · Views: 12
  • IMG_0447.webp
    IMG_0447.webp
    311 KB · Views: 10
  • IMG_0448.webp
    IMG_0448.webp
    235.7 KB · Views: 17
  • IMG_0449.webp
    IMG_0449.webp
    195.5 KB · Views: 24
  • IMG_0450.webp
    IMG_0450.webp
    422.5 KB · Views: 20
  • IMG_0451.webp
    IMG_0451.webp
    352 KB · Views: 14
Hey man, thanks for the stl files. I got them printed and it looks great. Ill have to figure out the best way to put it together once I get the right parts. On yours, Is the SNES and the Pi just 2 completely different pieces of hardware in there? Im curious how youre booting into the emulator for PS1 games, while also using the actual SNES you have in there. Mostly as far as video/power/controllers are. Does the emulator just use the USB port on the back? Do they share video ports or is the SNES exclusively through RCA and the Pi through HDMI? How do you have power hooked up to both? I love this project so much and I just wanna pick your brain on it. I have an idea of using a Hyperkin Supaboy for my guts, as it has a cart slot, controller ports, and has a video out, and then also doing a Pi for the PS1, but I really want to see if I can make the CD drive be a functioning audio CD player using the buttons on the top. Looks like it may be possible to use another Pi as a controller for it.
 
Hi @Dooz ,I'm glad the parts from my model worked for you. What I did with the SNES board was remove the 7805 transistor so I could lock it to 5V like the Raspberry Pi and thus unify the power supply to 5V. For the disc drive, I added a second 12V power supply. They work with an external switch near the power outlet. When powered on, the Raspberry Pi starts automatically, but the SNES still uses its on/off button on the main board. The disc drive buttons are enabled, one on each side of the disc tray. The HDMI output is only for the Raspberry Pi; the SNES has its original video connector. You could unify the HDMI output for both using a 3-pin switch to power either the SNES or the Raspberry Pi depending on which button is pressed, but that would require adding more components or a kit to add HDMI to the SNES, and the case is already running out of space with everything else. I tried unifying the controls from the SNES port with an Arduino Pro Micro programmed to switch between the two controllers. I tried connecting an SNES controller to a USB port to be recognized by a PC, Raspberry Pi, etc., but because the SNES port is receiving 5V, the SNES board powers on and interrupts the controller signals, so I ruled that out. I connected the controllers to the Raspberry Pi via Bluetooth. I hope this answers your questions. Cheers.
 
hi, where can I download the STL file? I’d love to print it and turn it into an emulation machine.
 
I drew them with Fusion 360 using Wesk's model as a base; I made the reset functional for the SNES board using an SMD switch; the other one is just a cover.
 
Back
Top