Hey guys  , in this thread post i'll basically document all my steps for creating my first ever wii portable, for anyone who wants to know what parts i've bought and i'm using, here's a list with them:
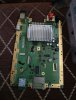
1x Untrimmed Wii Family Edition Motherboard (it has 4 layer board and low consumption which is exactly what i need for my project, and also i won't trim it due to the risks of it and lack of experience with very micro soldering)
1x DC UPS 5V 9V 12V Output 6x 18650 Battery (to power on the wii, screen and other stuff via 5v usb port and 12v3a port in which the wii power cable will go in)
1x Wii to USB-C cable (for power)
1x Wii to HDMI cable (for source output for the screen)
1x 7 inch Screen with HDMI and powers on via Micro-USB cable
1x 16GB USB Flash Drive (for RVLoader, Games etc)
1x USB-C to 5*5x2.1mm adapter (so i can plug it in my UPS/Power bank)
1x Teared down WiiMote with every single button wired to an individual SW Switch
1x Teared down Nunchuk with the 2 trigger buttons wired to an individual SW Switch
1x 1 USB Male to 3 USB Female cable (to plug most of the USB stuff in that i need)
1x Mini Speaker (for sound ofc)
1x 4K x 2K Video Audio Extractor HDMI with 3.5mm jack port (so my speaker and screen can both work as my screen doesn't have built in speakers)
1x HDMI 90 degree angle adapter (since currently the hdmi cable in the screen hits the micro-usb cable due to it's need for micro-usb power too)
1x 2 in 1 USB Hub (just in case)
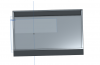
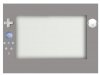
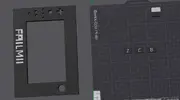
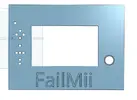
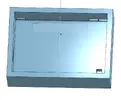
i know it sounds like quite a lot of stuff to fit in a case, but trust me, it's not that hard if you plan on how to lay the cables in etc etc, and ofc if you don't care that much about the spaghetti stuff that you'll have inside the portable at the end, nonetheless i'll attach 3 pictures with the 3d cad main case, top part with the trigger/buttons and the part with the screen and it's face buttons")
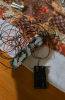
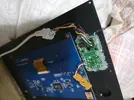
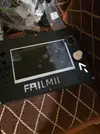
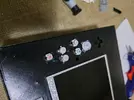
Extra: i'll also attach a picture with the wiimote's individual button rewiring to SW Switches")
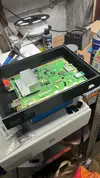
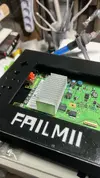
Current situation: i sent the wii family edition motherboard, wiimote, nunchuk and everything else to my 3d printer guy so he can make the holes for the buttons (i'm not that good with making stuff in 3D Cad and since he has experience with this stuff, i gave him this sidequest) ) and overall make some adjustments to the case and etc, i'll give more updates once the case is somewhat done
, in this thread post i'll basically document all my steps for creating my first ever wii portable, for anyone who wants to know what parts i've bought and i'm using, here's a list with them:1x Untrimmed Wii Family Edition Motherboard (it has 4 layer board and low consumption which is exactly what i need for my project, and also i won't trim it due to the risks of it and lack of experience with very micro soldering)
1x DC UPS 5V 9V 12V Output 6x 18650 Battery (to power on the wii, screen and other stuff via 5v usb port and 12v3a port in which the wii power cable will go in)
1x Wii to USB-C cable (for power)
1x Wii to HDMI cable (for source output for the screen)
1x 7 inch Screen with HDMI and powers on via Micro-USB cable
1x 16GB USB Flash Drive (for RVLoader, Games etc)
1x USB-C to 5*5x2.1mm adapter (so i can plug it in my UPS/Power bank)
1x Teared down WiiMote with every single button wired to an individual SW Switch
1x Teared down Nunchuk with the 2 trigger buttons wired to an individual SW Switch
1x 1 USB Male to 3 USB Female cable (to plug most of the USB stuff in that i need)
1x Mini Speaker (for sound ofc)
1x 4K x 2K Video Audio Extractor HDMI with 3.5mm jack port (so my speaker and screen can both work as my screen doesn't have built in speakers)
1x HDMI 90 degree angle adapter (since currently the hdmi cable in the screen hits the micro-usb cable due to it's need for micro-usb power too)
1x 2 in 1 USB Hub (just in case)
i know it sounds like quite a lot of stuff to fit in a case, but trust me, it's not that hard if you plan on how to lay the cables in etc etc, and ofc if you don't care that much about the spaghetti stuff that you'll have inside the portable at the end, nonetheless i'll attach 3 pictures with the 3d cad main case, top part with the trigger/buttons and the part with the screen and it's face buttons
Extra: i'll also attach a picture with the wiimote's individual button rewiring to SW Switches
Current situation: i sent the wii family edition motherboard, wiimote, nunchuk and everything else to my 3d printer guy so he can make the holes for the buttons (i'm not that good with making stuff in 3D Cad and since he has experience with this stuff, i gave him this sidequest
) ) and overall make some adjustments to the case and etc, i'll give more updates once the case is somewhat done