Worklog Cherrii Worklog (wii portable)

Joined
Oct 13, 2024
Messages
13
Likes
39
Portables
1
After researching and learrning cad over the past few months, I think I am ready to start a worklog for the wii portable I've been working on.
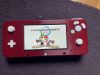
It is nicknamed the Cherrii because I got a spool of nice dark cherry red PLA that I would like to print it in.

Features:
  • OMGWTF trim
  • Full size gamecube buttons with the standard layout
  • Hall effect switch joycon sticks
  • Dual-tact shoulder buttons
  • 4x18650 batteries (1s4p configuration)
  • 5 inch 480p VGA screen
  • HDMI out via Electron Shepherd's VGA switch and ElectronAnalog
  • Standard 4LayerTech boards
  • Bluetooth and MX relocations
  • Built in sensor bar
  • 5-way switch screen controls (same as in Wesk's Aran)
  • External usb port for the Gamecube controller adapter
  • Comfort (hopefully)
So far I have got an almost complete cad for the case, and a working wii trim with bluetooth and MX relocations
IMG_4755.png
IMG_4880.png

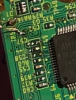
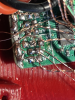
Cut and sanded OMGWTF trim (since this picture I removed the cut component on top right). Successful BT relocation

Screenshot 2025-02-10 at 9.32.08 PM.png
Screenshot 2025-02-10 at 9.33.06 PM.png

Screenshot 2025-02-10 at 10.33.29 PM.png

The shape of the grips allows for good size batteries, big triggers, and more comfort (hopefully) while keeping the rest relatively thin.

I will try to update this worklog the best I can, but my free time is limited.
Any feedback or critique is greatly appreciated, as I am still learning.
 
Last edited:
Wow, nice work! The design looks great. I like how the batteries are grips and the rest is really thin, it will probably make it more comfortable. Pink would be a cool color for the case. Clear would be neat too, just looking from your CAD software.
 
First set of test prints completed!
The color is a bit different than expected, but it still looks nice

Good News:
  • The face buttons and dpad fit and feel nice
  • The joycon sticks fit and have their full range of movement
  • Rumble motors fit nicely
  • All of the ports (USB, HDMI, headphone jack) fit nicely
  • Batteries fit with clips, albeit a bit loosely
  • Both halves fit together
Bad News:
  • The screen does not fit / very very tight
  • The speakers fit in way too tight, and I accidentally broke one because of it
  • Fan does not fit by a millimeter
  • Holes for sync and reset buttons are too small
There will definitely need to be more test prints, but it's not bad for a first attempt
Now, photo time!
IMG_4961.png
IMG_4960.png
IMG_4959.png
IMG_4957.png
IMG_4954.png

I will upate again after the second test print, and feel free to share any critiques or recommendations
 
Looks really neat! I really like this color. What is the case size approximately?
 
The case is 220mm*95mm for the length and width, and the depth is around 25mm in the middle and around 35mm at the grips
 
Hello everyone! It has been a long time without a post, but a lot of progress has been made on the project!
It is currently in a playable state (after replacing a fried PMS), with just a few more bugs to iron out before I can consider it done, but fixing that might take a bit since I have gotten sidetracked with winning every grand prix in MKWii :P

IMG_5029.jpg
IMG_5025.png

Here is most of the components in place, and the spaghetti wiring done. The vga switch especially had a lot of twisted magnet wire attached to it.
IMG_5030.png

Next up, I added the batteries and the battery holder piece, then covered most of the exposed pcbs in kapton tape, to prevent any stray shorts when closing the the halves together.

While closing it up, the blue vga wire came undone, but that was a simple fix. Unfortunately, right as I was screwing the two halves together, I put too much pressure on the front half and cracked a screwpost. Luckily, I still had some of the filament left, and was able to print a new front half in only 4 hours, then transplant the parts without much difficulty.
IMG_5032.png

Here is the almost completed portable:
IMG_5049.png

The ergonomics have worked out great, and it feels mostly great to play, but there are still some lingering problems left to fix:
  • The tolerances on the z button are too tight, causing it to get stuck in the down position sometimes
  • The part that stops the other shoulder buttons from sticking too far out of the case isn't tight enough
  • The reset button doesn't seem to actually reset, it just reboots the console (I am guessing it shorts 3v3 to gnd by accident)
  • The reset and sync buttons stick out a bit too far, and are too easy to accidentally press
  • For some reason, the x button doesn't click as nicely as the others (I may just need to replace the switch)
  • The audio from the headphone jack is louder in one ear (although it looks like someone in the 4Layertech discord figured this out)
The final and most confusing problem is that the video from the hdmi out is tinted red. I am guessing that it is red for both the screen and the hdmi port, but the screen auto-config balances the colors (Whenever I auto-config, it flashes the red tint, then adjusts). One of my monitors has an osd with color balance adjusters, and turning the red all the way down to 0 seems to fix it, but on a tv without that, I can't fix the redness.
IMG_5067.png
IMG_4970.png
(sorry for the bad quality, I had to zoom in on an older picture)
I am guessing that it has something to do with the passives that I accidentally removed next to the ave, but it doesn't look like the ones I killed connect to the color lines, although I could be mistaken. Any advice on fixing this would be appreciated, and if I do need to replace the passives, could someone tell me what size and resistance or capacitance to get? Thanks!

EDIT: It turns out that the 75 ohm resistor on the red color line was broken, so I hand-wired a resistor, and that has fixed the problem. The project has been finished for a month now, I just have not remembered to update the worklog. Expect a cutting edge post soon!
 

Attachments

  • IMG_5049.png
    IMG_5049.png
    13.8 MB · Views: 96
  • IMG_4970.png
    IMG_4970.png
    113.4 KB · Views: 88
  • IMG_5025.png
    IMG_5025.png
    8.8 MB · Views: 100
Last edited:
Back
Top