Worklog Black Ashida

Joined
Apr 12, 2020
Messages
207
Likes
236
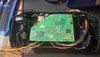
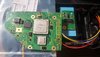
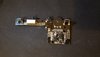
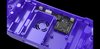
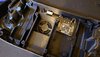
Starting my Ashida worklog. Here we go!

Huge thank you to @Wesk for creating such a cool portable design! And thank you to @Gman for printing again for me! And of course 4layertech for the PCBs! You guys rock.

Original Thread from Wesk:

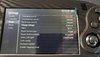
Following the video provided by Wesk found here:


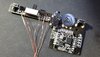
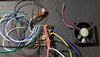
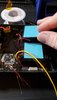
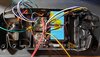
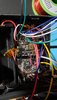
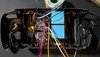
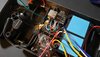
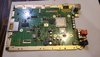
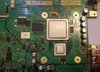
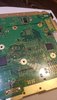
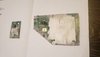
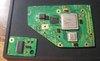
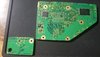
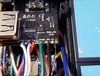
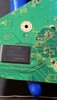
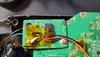
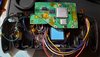
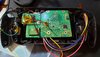
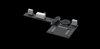
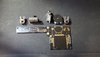
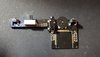
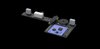
First board populated!

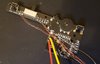
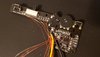
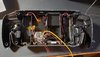
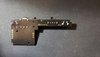
More to come! Cheers everyone!
 

Attachments

  • Screenshot_20220110-174345_YouTube.jpg
    Screenshot_20220110-174345_YouTube.jpg
    166.5 KB · Views: 619
  • 20220110_175339.jpg
    20220110_175339.jpg
    3.2 MB · Views: 620
  • 20220110_185118.jpg
    20220110_185118.jpg
    3.1 MB · Views: 586
  • 20220110_185157.jpg
    20220110_185157.jpg
    2.9 MB · Views: 559
  • Screenshot_20220110-192450_YouTube.jpg
    Screenshot_20220110-192450_YouTube.jpg
    208.8 KB · Views: 548
  • 20220110_192203.jpg
    20220110_192203.jpg
    2.3 MB · Views: 553
  • Screenshot_20220110-192637_YouTube.jpg
    Screenshot_20220110-192637_YouTube.jpg
    955.6 KB · Views: 606
  • 20220110_192711.jpg
    20220110_192711.jpg
    3.7 MB · Views: 666
aww yeah looking forward to another high quality worklog
 
After seeing those pics I kinda want to watch a dodgy stop motion version of my video :XD:

I was thinking the same thing when taking the photos. Like those clay animation dolls but Ashida instead haha!
 
Did some pre-cable soldering! I need to still do the bridge for J3 on the U-AMP before I forget!

Twisted MC & GND nice and tight! Alternated magnet wire color for the each pad to help me differentiate the connections for when I connect them to the Wii!
 

Attachments

  • 20220112_193719.jpg
    20220112_193719.jpg
    1.8 MB · Views: 689
I'm really taking it slow haha. But I'm enjoying it. J3 complete and pre-did up the 3v3, 1v8 (left longer so I wire to Wii 1v8 connection with the PMS Lite I'm using this time), & GND.
 

Attachments

  • 20220114_232336.jpg
    20220114_232336.jpg
    924.7 KB · Views: 644
Do you have a pms2 or pms lite? New BuyDisplay 4layer IPS? Looks great so far! Even did the MC/GND twisty... good plan. Shielded pairs will be your friend on this build...at least they were for me.

I wonder what secret reveal we are in store for here...
 
Do you have a pms2 or pms lite? New BuyDisplay 4layer IPS? Looks great so far! Even did the MC/GND twisty... good plan. Shielded pairs will be your friend on this build...at least they were for me.

I wonder what secret reveal we are in store for here...
So I bought the 4 layer IPS screen. Curious on what control I have and if I need to wire composite then vga or just wire up vga..?

I am also using a PMS Lite
 
IIRC you can change the source on the buydisplay driver without having a signal. (different than the gboy) But its still good to wire up composite to make sure all is good with the build so far. That way you can make sure you're on the right track before too many steps go by.

Also, with PMS lite, you will have to feed the 1v8 line to the PMS and UAMP from the Wii as the PMS Lite does not provide that line..
Okay sweet. So wire up composite and power on? And screen should work, and then later I can wire to VGA/turn on and not have to switch sources? If so that is sweet!

And got ya on the 1v8. I'll try my best to get it working! Had a power outage all day at my house so couldn't work on it further lol!

Sneaky photo edit! Finished my pre-wire on the first Ashida board.
 

Attachments

  • 20220116_180407.jpg
    20220116_180407.jpg
    1,018.6 KB · Views: 587
Last edited:
Finished up the next step (led & PMS Lite install).

Pre-wired the battery connection clips and pushed them into the case.

Pre-wired the LED and placed fan with sticker facing up so air blows into the portable per @Gman instructions (and also found @SparkleBear did this on his worklog). Pushed in the heat sinks to flushed satisfaction. Soldered the fan +/- and soldered the connections left to the PMS which included the 3v3 and Ground from audio board to PMS. Tested for any shorts and so far so good!

Next will be the USB board. This portable is a lot of fun!
 

Attachments

  • Screenshot_20220118-212922_YouTube.jpg
    Screenshot_20220118-212922_YouTube.jpg
    700.4 KB · Views: 562
  • Screenshot_20220118-212941_YouTube.jpg
    Screenshot_20220118-212941_YouTube.jpg
    809 KB · Views: 539
  • Screenshot_20220118-212958_YouTube.jpg
    Screenshot_20220118-212958_YouTube.jpg
    861.7 KB · Views: 585
  • 20220118_193309.jpg
    20220118_193309.jpg
    2.8 MB · Views: 601
  • 20220118_201514.jpg
    20220118_201514.jpg
    3.2 MB · Views: 605
  • 20220118_202553.jpg
    20220118_202553.jpg
    973.6 KB · Views: 602
  • 20220118_204030.jpg
    20220118_204030.jpg
    3 MB · Views: 582
  • 20220118_205028.jpg
    20220118_205028.jpg
    913.5 KB · Views: 583
  • 20220118_211051.jpg
    20220118_211051.jpg
    1.1 MB · Views: 578
  • 20220118_211032.jpg
    20220118_211032.jpg
    2.9 MB · Views: 572
Last edited:
PMS PD step 3 complete! I'll connect the twisted D+/- another day. Good for now though!
 

Attachments

  • Screenshot_20220119-215331_YouTube.jpg
    Screenshot_20220119-215331_YouTube.jpg
    814.5 KB · Views: 563
  • 20220119_215526.jpg
    20220119_215526.jpg
    1.6 MB · Views: 551
Can't wait for the final reveal brother it's going to be super sexy
 
Cut my Wii into peices, this is my last resort!!!

Taped the bad boy up:
RVK-CPU-01 mobo

Cut and snip with diamond wheel. Went from 180 and worked my way up to 1000 sanding edges (angled and straight).

Cleaned up nice and tested resistance with the trusty multimeter. I hand crafted the @Nold provided guide for resistance:

All looking good! This Ashida has sooo much room. I didn't really do the smallest OMGWTF trim either so it was cool that the screws lined up perfect and still had plenty of room top/bottom/sides.
 

Attachments

  • 20220122_183713.jpg
    20220122_183713.jpg
    3 MB · Views: 497
  • 20220122_184512.jpg
    20220122_184512.jpg
    1.5 MB · Views: 480
  • 20220122_194152.jpg
    20220122_194152.jpg
    1.4 MB · Views: 442
  • 20220122_195336.jpg
    20220122_195336.jpg
    2.7 MB · Views: 465
  • 20220122_201159.jpg
    20220122_201159.jpg
    2 MB · Views: 466
  • 20220122_214237.jpg
    20220122_214237.jpg
    1.8 MB · Views: 519
  • 20220122_214255.jpg
    20220122_214255.jpg
    1.7 MB · Views: 466
  • 20220122_215027.jpg
    20220122_215027.jpg
    1.4 MB · Views: 477
  • 20220122_214105.jpg
    20220122_214105.jpg
    368.4 KB · Views: 506
  • 20220122_215455.jpg
    20220122_215455.jpg
    2.9 MB · Views: 520
-Prepped Bluetooth data lines. Made sure nothing was grounding by testing with multimeter.
-Prepped MX chip (with battery)... trying the screw method again to hold the MX in place... making sure nothing is in-between or touching the screw that would cause a short this time around. I'm determined to make it work lol!
-Double checked alignment with wii and dry fit went great.

More to come!
 

Attachments

  • 20220126_191458.jpg
    20220126_191458.jpg
    780.9 KB · Views: 515
  • 20220126_200858.jpg
    20220126_200858.jpg
    909.1 KB · Views: 493
  • 20220126_200923.jpg
    20220126_200923.jpg
    1 MB · Views: 500
  • 20220126_205003.jpg
    20220126_205003.jpg
    2.8 MB · Views: 484
  • 20220126_205748.jpg
    20220126_205748.jpg
    1.7 MB · Views: 507
  • 20220126_205547.jpg
    20220126_205547.jpg
    3 MB · Views: 526
So uhhh yeah.. A whole lot happened between now and the last time I posted. But I basically had to re-do my USB data connection and moved forward to wiring the composite to the screen driver. I was able to get a boot with 1.3 version of RVLoader but was told that PMS Lite is not supported by that version so my Power tab would not show up LOL.

So I just updated to RVLoader 1.5 and fixed my issue. I wired up composite to driver board and wired my controller up/tested and all looking good. I cracked my charging current up all the way and changed the switch settings to work with a flip instead of having to click back and forth.

Got to move my MX chip and Bluetooth because case won't close with them in the old spot and then I have to do the speakers/VGA and then I should pretty much be done after that!

Thanks guys for all the help. You know who you are (and my mobile is being weird when I do the @ symbol...)
 

Attachments

  • 20220222_173205.jpg
    20220222_173205.jpg
    2.8 MB · Views: 492
  • 20220222_173309.jpg
    20220222_173309.jpg
    1.9 MB · Views: 482
  • 20220221_174053.jpg
    20220221_174053.jpg
    2.7 MB · Views: 494
It's recommended to put a bit of insulating tape between the LCD driver board and the controller board as they may touch/short if too much pressure is put on the buttons.
Okay sweet! Thanks Wes. Should I modify the D pad rubber in any way? I did it for the ABXY rubber but wasn't sure for the other. Seemed a little hard to screw through that rubber piece for the D-pad when lining up.
 
Okay sweet! Thanks Wes. Should I modify the D pad rubber in any way? I did it for the ABXY rubber but wasn't sure for the other. Seemed a little hard to screw through that rubber piece for the D-pad when lining up.
D-pad membrane shouldn't need any adjustment.
 
Back
Top