- Joined
- Oct 22, 2018
- Messages
- 8
- Likes
- 38
Hello everyone,
I’m bringing back a Windows 98 handheld I built 5 years ago (see my profile picture hehe), now as a v2 with a different motherboard with working 3D acceleration for the games I played as a kid, plus MS-DOS game support and emulation for some older consoles (N64, SNES, NES, GB, GBA, PSX). This is a last-minute entry with roughly five days to go, so I’m prioritizing realistic, testable progress using parts I already have and I’ll post frequent updates.

I started looking around for nano ITX motherboards and old single board computers, looked into PC/104 and the tinyllama, and what I ultimately came up with was the VIA EPIA nano ITX motherboard NL10000G. It has a really small form factor, excellent driver support for Windows 98 and has somewhat low power consumption (still 24W - which means battery life will be kinda poor but whatever - after all I could still use a PD capable powerbank)
This is an initial case concept to establish placement and spacing of the display, the buttons, the analog stick, the speakers and the touchpad. It is a first version and will evolve as I validate mounting points, airflow, and cable clearances. The priority is clean internal routing and serviceability rather than chasing the absolute thinnest shell.
I thought the board was toast, as even after removing the faulty converter the board had no POST beep(s) and no VGA or composite video output. I was about to give up on the board, when another boot suddenly just worked. I tested DOS games and found out that the PC speaker output is veeery quiet. I figured maybe the broken audio chip caused it to behave this way; I tried different speakers but ultimately just used a PAM8403 audio amp board to amplify the sound. Subsequent boots failed about 80% of the time and at first I could not figure out why. The beep code suggested a RAM issue, so I tried turning down the RAM clocks in the BIOS - which made it work reliably, yey!
This is a picture of me playing Super Mario 64 with Project64 on Windows 98 earlier this year:


I also wrote a custom tray app to show the current battery percentage, temperature and allow me to remap the buttons:


That's all I have for now. I’ve cleared my schedule for the next few days and will focus exclusively on this build. Expect frequent updates, fresh photos, and incremental milestones as I wire up inputs, finalize the USB-C PD power path, and iterate on the case and launcher.

The motherboard is ready to be put into a case! Almost all connections for the front half of the case are connected to a single 20pin ffc breakout board, except for the usbc power in, which needs thicker wires.I also decided on the batteries I want to use, two 5000mah lipo cells and a 3A 2S lipo charger board from aliexpress. I also fixed the issue with the PC speaker being too quiet, turns out the speaker output needs to be connected to +5V instead of GND, which was clarified in a later revision of the motherboards manual I found online.
In the meantime I also finished the case design, right now doing a final test print of the front and the back.
The handheld will be 39mm thick, which is a bit on the high side, but I couldn't make all fit if it were thinner. The motherboard will sit in the back side of the case, in the center with the CPU side facing down to achieve some cooling with an active fan. Left and right of it will be the battery cells as well as the power circuitry on the left and the CompactFlash card on the right. There are also cutouts for an rgb pushbutton and a dual USB port.
The front side has the screen along with its driver board, the buttons, the touchpad, the speakers, the USB-C power input board, the arduino pro micro, the USB sound card and the audio amp board. Also it has cutouts for an external VGA port to connect to a monitor as well as a headphone jack.
Next up is finalizing the power setup to include a reliable charge and play circuit and a soft pushbutton on/off switch, which I will open source once its properly documented, as IIRC I think there is no (good) single port charge and play circuit from off-the-shelf aliexpress boards documented anywhere on the forum.
Also I will start putting everything into the test-printed case once it's ready and hope it all goes to plan. There should be no surprises since I tested each part on its own with the system, but you never know... Wish me luck!
I’m bringing back a Windows 98 handheld I built 5 years ago (see my profile picture hehe), now as a v2 with a different motherboard with working 3D acceleration for the games I played as a kid, plus MS-DOS game support and emulation for some older consoles (N64, SNES, NES, GB, GBA, PSX). This is a last-minute entry with roughly five days to go, so I’m prioritizing realistic, testable progress using parts I already have and I’ll post frequent updates.
Project Aim
A portable Windows 98 SE machine with real 3D acceleration and sensible ergonomics, built from off-the-shelf boards since I'm not knowledgeable enough to design my own PCBs yet. I want Windows 98 to run natively without virtualization or anything, so I had to choose a mainboard that is as small as possible, has 3d graphics support and most importantly driver support for Windows 9x!I started looking around for nano ITX motherboards and old single board computers, looked into PC/104 and the tinyllama, and what I ultimately came up with was the VIA EPIA nano ITX motherboard NL10000G. It has a really small form factor, excellent driver support for Windows 98 and has somewhat low power consumption (still 24W - which means battery life will be kinda poor but whatever - after all I could still use a PD capable powerbank)
Planned Features
- charge and play with USB-C power delivery
- soft latching power button like in a standard laptop
- 7 inch 4:3 VGA display
- analog stick, dpad, 4 action buttons, left and right trigger buttons + a mini touchpad for proper mouse control
- fully remappable controls with an arduino pro micro acting as joystick + keyboard + mouse
- CompactFlash storage (properly just internal as I dont see the point of a removable "hard disk")
- tray app for Windows 98 that shows battery percentage and is able to re-assign the controls
- best possible compatibility for MS-DOS games
Case Design
Early testing
Upon the very first boot, the 12 V to 5 V converter that feeds the onboard audio section of the motherboar released the infamous magic smoke, so I removed it and decided not to pursue the onboard audio any further, as it did not even have proper MS-DOS support. The practical solution is an old USB 1.1 sound card that works under Windows 98. For DOS titles the built in sbemul.sys from Windows 98 emulates a Sound Blaster style interface for all DOS games that run under Windows. There is no OPL/AdLib FM synthesis, but digital SB effects and MIDI work reliably, which covers most of titles I care about.I thought the board was toast, as even after removing the faulty converter the board had no POST beep(s) and no VGA or composite video output. I was about to give up on the board, when another boot suddenly just worked. I tested DOS games and found out that the PC speaker output is veeery quiet. I figured maybe the broken audio chip caused it to behave this way; I tried different speakers but ultimately just used a PAM8403 audio amp board to amplify the sound. Subsequent boots failed about 80% of the time and at first I could not figure out why. The beep code suggested a RAM issue, so I tried turning down the RAM clocks in the BIOS - which made it work reliably, yey!
This is a picture of me playing Super Mario 64 with Project64 on Windows 98 earlier this year:
Power
For the main power path I plan to use a USB-C PD trigger board from aliexpress, which negotiates 12 V, 15 V, or 20 V from a charger or power bank and feeds a picoPSU style DC-DC ATX to provide the board with the proper ATX signals, 3V3, 5V and 12V. I plan to use a Pololu style latching pushbutton board, some ideal diode boards, a 2S lipo charging board together with a Pro Micro in order to provide soft pushbutton on and off, status indication, and battery level monitoring via RS232.Current Status
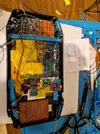
I got the board somewhat slimmed down, but since I only have this one I decided not to do any "risky" desolderings - the mini PCI port on the bottom remains as is, I am not risking the board just to shave off 2mm more. I trimmed down some of the pin headers and relocated the BIOS battery. I soldered the CompactFlash adapter directly to the mainboard with some ribbon cable and put VGA, PC speaker and USB lines onto an FPC cable breakout board. I also did some tests with the screen I am planning to use, as well as the input solution with an Ardino Pro Micro clone. I will update the post later today with a picture of the actual status.Software
For launching games originally I planned to use the Windows 98 Active Desktop features which would allow me to customize the Desktop somewhat and allow single click launching of Applications. But ultimately I decided to quickly code my own launcher, inspired by early emulationstation versions. The first version is almost finished, and games can be configured using json files.I also wrote a custom tray app to show the current battery percentage, temperature and allow me to remap the buttons:
That's all I have for now. I’ve cleared my schedule for the next few days and will focus exclusively on this build. Expect frequent updates, fresh photos, and incremental milestones as I wire up inputs, finalize the USB-C PD power path, and iterate on the case and launcher.
UPDATE
The motherboard is ready to be put into a case! Almost all connections for the front half of the case are connected to a single 20pin ffc breakout board, except for the usbc power in, which needs thicker wires.I also decided on the batteries I want to use, two 5000mah lipo cells and a 3A 2S lipo charger board from aliexpress. I also fixed the issue with the PC speaker being too quiet, turns out the speaker output needs to be connected to +5V instead of GND, which was clarified in a later revision of the motherboards manual I found online.
In the meantime I also finished the case design, right now doing a final test print of the front and the back.
The handheld will be 39mm thick, which is a bit on the high side, but I couldn't make all fit if it were thinner. The motherboard will sit in the back side of the case, in the center with the CPU side facing down to achieve some cooling with an active fan. Left and right of it will be the battery cells as well as the power circuitry on the left and the CompactFlash card on the right. There are also cutouts for an rgb pushbutton and a dual USB port.
The front side has the screen along with its driver board, the buttons, the touchpad, the speakers, the USB-C power input board, the arduino pro micro, the USB sound card and the audio amp board. Also it has cutouts for an external VGA port to connect to a monitor as well as a headphone jack.
Next up is finalizing the power setup to include a reliable charge and play circuit and a soft pushbutton on/off switch, which I will open source once its properly documented, as IIRC I think there is no (good) single port charge and play circuit from off-the-shelf aliexpress boards documented anywhere on the forum.
Also I will start putting everything into the test-printed case once it's ready and hope it all goes to plan. There should be no surprises since I tested each part on its own with the system, but you never know... Wish me luck!
Last edited:

")