Greetings all!
While this is my first entry into the BitBuilt Contest, I have made a GWii Portable and a PS2 Portable thanks to all the great guides and resources available here from the community.
I enjoy playing PS1 games on the PS2P, it isn't quite the same, especially since it requires switching between composite and VGA every time I want to load up a PS1 game.
Because of this, I wanted to tackle making a portable PS1. Unfortunately, there haven't been any official trim guides, and only a handful of builds.
So I thought, why not simultaneously build a PS1 portable for the Contest, and also document as much as possible to make a semi-definitive guide for the community on how to build one themselves!
Taking inspiration from haihaisb's Takara portable, I plan to stick an actual PSOne console into the controller, with an original PSone motherboard, PMS (using a spare PS2PMS I had from my PSP2 project), perhaps the original controller board, and a small display that sits in place of where the spinner used to be!
To replace the optical drive, I'll be using a PSIO, as I don't want to design a custom board like thedrew to use xStation.

I will have to model and print a custom replacement bottom shell, as the controller itself is surprisingly thin.
Immense thanks to both @thedrew and @Daniel Ls81 who have both proven it is possible, and have provided worklogs for their projects, and for @Stitches for the "theoretical trim".
After the project, I plan to release all my diagrams in a port-mortem so that there is more documentation out there for the community!
Project materials:
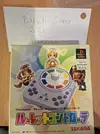
- Takara (Game of Life) PS1 Controller
- LCD from aliexpress (TBC once I have better measurements)
- PSone PM-41 (2) Motherboard (integrated RAM in some of the ICs makes this the most suitable)
- PSIO (from Aliexpress, for obvious reasons)
- PS2 PMS (spare from a prior project since I ordered multiple of everything)
- 18650 Batteries for power (expecting 1S2P configuration)
- 3D Printed custom shell(s)


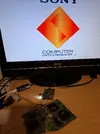
(Ignore the fact I have half of the chips mislabelled)


I had already gotten around to chopping up the board this week prior, and tried to get it running and ran into quite a few snags, so I'll follow up this post with what I've gone through so far.
On top of that, my Takara controller arrived today, so I'll be doing a bunch of measuring and modelling this weekend!
While this is my first entry into the BitBuilt Contest, I have made a GWii Portable and a PS2 Portable thanks to all the great guides and resources available here from the community.
I enjoy playing PS1 games on the PS2P, it isn't quite the same, especially since it requires switching between composite and VGA every time I want to load up a PS1 game.
Because of this, I wanted to tackle making a portable PS1. Unfortunately, there haven't been any official trim guides, and only a handful of builds.
So I thought, why not simultaneously build a PS1 portable for the Contest, and also document as much as possible to make a semi-definitive guide for the community on how to build one themselves!
Taking inspiration from haihaisb's Takara portable, I plan to stick an actual PSOne console into the controller, with an original PSone motherboard, PMS (using a spare PS2PMS I had from my PSP2 project), perhaps the original controller board, and a small display that sits in place of where the spinner used to be!
To replace the optical drive, I'll be using a PSIO, as I don't want to design a custom board like thedrew to use xStation.
I will have to model and print a custom replacement bottom shell, as the controller itself is surprisingly thin.
Immense thanks to both @thedrew and @Daniel Ls81 who have both proven it is possible, and have provided worklogs for their projects, and for @Stitches for the "theoretical trim".
After the project, I plan to release all my diagrams in a port-mortem so that there is more documentation out there for the community!
Project materials:
- Takara (Game of Life) PS1 Controller
- LCD from aliexpress (TBC once I have better measurements)
- PSone PM-41 (2) Motherboard (integrated RAM in some of the ICs makes this the most suitable)
- PSIO (from Aliexpress, for obvious reasons)
- PS2 PMS (spare from a prior project since I ordered multiple of everything)
- 18650 Batteries for power (expecting 1S2P configuration)
- 3D Printed custom shell(s)
(Ignore the fact I have half of the chips mislabelled)
I had already gotten around to chopping up the board this week prior, and tried to get it running and ran into quite a few snags, so I'll follow up this post with what I've gone through so far.
On top of that, my Takara controller arrived today, so I'll be doing a bunch of measuring and modelling this weekend!