
- Joined
- Aug 31, 2024
- Messages
- 2
- Likes
- 8
Hi all, I wanted to share some pics and footage of the Ashida build I made following the community guides. I hope I'm not breaking any rules by posting this here. In case, please notify me before removing this. (This is kind of a worklog but it all happened in the past. More like a "work report".)
Shell from JLC3DP, custom PCBs from 4layertech, miscellanea from Digikey, INR21700-50E cells from an Italian online store and a bunch of wires from a big plastic box I have. Controller bits and bobs from a third party, which of course are sub par compared to OEM ones, but they still kinda work.
Only one tiny nuisance though.
So far it crashed three times (two while RVLoader was loading, one during Sonic Adventure gameplay) and I'm kinda sure it has something to do with USB data transfer. I tried to keep wires as short as possible, used enamel wire scavenged from the secondary of a Game Gear inverter transformer, the thinnest wire I've ever worked with, tightly twisted together as advised many times in many places. Do not get me wrong - the unit works very well but I just wanted to know if some sporadic crashes are somewhat to be expected due to the not-so-official nature of the device, or if it shouldn't crash at all with a reasonable amount of signal insulation or protection practices. Or if I'm just being too pretentious. I've chosen to solder the data lines on CM1 output though, I figured it'd be the solution that gave me the most stability. I've seen projects that tapped D+ and D- from the nearest vias but I'd like to know if is there any difference between the two approaches regarding data stability. I guess there is but I don't know to which extent.
Aside from that, it went unusually very smoothly - with the classic bumps along the road. Not my first portable but hands down this is the more complex and powerful thing I've ever built.
Scariest / saddest part - trimming the Wii (4 layers - OMGWTF, awesome name, fist time actually trimming a working motherboard of anything )
)
Most boring part - waiting for the 4layertech stuff to arrive
Most difficult part - Wire management (rewired some power lines more than once to find a satisfying configuration)
Most fun - actually tore down a Wii for the first time
Most satisfaction - seeing the VGA output working first try
Most confusing part - L and R triggers behaving in apparently opposite ways when set to "digital" rather than "analog" (straightforward if one thinks about how mom pushbuttons work compared to potentiometers. three days ago I was young and naive )
)
This was the candidate. A black Wii with a very ruined shell with missing screws and a less-than-optimal optical reader. €20 shipping included. Was working perfectly fine otherwise.
Softmodded, installed RVLoader, plenty of testing pre trim.

Shell from JLC3DP, white resin. Maybe not the best solution from what I've read here but it turned out pretty well, solid and decently made. I asked 2 to be made just in case I broke something while building. That didn't happen luckily so I still have a spare.

OMGWTF!
Not the best trim by a long shot, but it did work afterwards.
Yes, the LDO is removed because I was confused and thought the PMS Lite had the 1.8reg on board. When I checked it back it didn't, so I had to put it back. Takes plenty of heat to remove it so I feared I could have damaged the board. It bent a little bit because most likely I have a crappy hot air station and I was nervous while doing it.

The fun began when building it. I used a variety of gauges because I have a big box of spare wires. I was only missing the 34AWG ones.

I feared the Wii would not work after the trimming, but I made sure to sand all edges as best as I could. Finest paper was 1500. Composite output worked first try. Used just an RCA connector. Power wires had been relocated while installing the trim in the shell.

Wire management is a critical aspect of portabilizing something. I took this very slowly because I wanted to be sure if all wires would fit and not cause issues with anything else. I used a THICC 16AWG wire for 3V3 (overkill?) and thicc 18AWG for the two main grounds going to the Wii and power wires from batteries. Everything else was 22AWG or thinner.

Dug up some copper on the bottom layer to place power rails. Tried to insulate every suspicious exposed pad or solder joint with kapton to minimize risk.

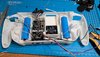
Two halves ready to close. Did not use the C stick board from 4layertech because there was no reason to. Micro SD is a SanDisk 64GB (SXDC IIRC). Works very well.

Looks kinda lame compared to other builds but I'm pretty proud of it. And it works.

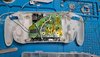
Menu

Display is super crisp. I love it.


Thank you all for all the directions, the infos, the Ashida, and all your work on the Wii or portabilization in general. That is a fascinating topic.
Shell from JLC3DP, custom PCBs from 4layertech, miscellanea from Digikey, INR21700-50E cells from an Italian online store and a bunch of wires from a big plastic box I have. Controller bits and bobs from a third party, which of course are sub par compared to OEM ones, but they still kinda work.
Only one tiny nuisance though.
So far it crashed three times (two while RVLoader was loading, one during Sonic Adventure gameplay) and I'm kinda sure it has something to do with USB data transfer. I tried to keep wires as short as possible, used enamel wire scavenged from the secondary of a Game Gear inverter transformer, the thinnest wire I've ever worked with, tightly twisted together as advised many times in many places. Do not get me wrong - the unit works very well but I just wanted to know if some sporadic crashes are somewhat to be expected due to the not-so-official nature of the device, or if it shouldn't crash at all with a reasonable amount of signal insulation or protection practices. Or if I'm just being too pretentious. I've chosen to solder the data lines on CM1 output though, I figured it'd be the solution that gave me the most stability. I've seen projects that tapped D+ and D- from the nearest vias but I'd like to know if is there any difference between the two approaches regarding data stability. I guess there is but I don't know to which extent.
Aside from that, it went unusually very smoothly - with the classic bumps along the road. Not my first portable but hands down this is the more complex and powerful thing I've ever built.
Scariest / saddest part - trimming the Wii (4 layers - OMGWTF, awesome name, fist time actually trimming a working motherboard of anything
)Most boring part - waiting for the 4layertech stuff to arrive
Most difficult part - Wire management (rewired some power lines more than once to find a satisfying configuration)
Most fun - actually tore down a Wii for the first time
Most satisfaction - seeing the VGA output working first try
Most confusing part - L and R triggers behaving in apparently opposite ways when set to "digital" rather than "analog" (straightforward if one thinks about how mom pushbuttons work compared to potentiometers. three days ago I was young and naive
)This was the candidate. A black Wii with a very ruined shell with missing screws and a less-than-optimal optical reader. €20 shipping included. Was working perfectly fine otherwise.
Softmodded, installed RVLoader, plenty of testing pre trim.
Shell from JLC3DP, white resin. Maybe not the best solution from what I've read here but it turned out pretty well, solid and decently made. I asked 2 to be made just in case I broke something while building. That didn't happen luckily so I still have a spare.
OMGWTF!
Not the best trim by a long shot, but it did work afterwards.
Yes, the LDO is removed because I was confused and thought the PMS Lite had the 1.8reg on board. When I checked it back it didn't, so I had to put it back. Takes plenty of heat to remove it so I feared I could have damaged the board. It bent a little bit because most likely I have a crappy hot air station and I was nervous while doing it.
The fun began when building it. I used a variety of gauges because I have a big box of spare wires. I was only missing the 34AWG ones.
I feared the Wii would not work after the trimming, but I made sure to sand all edges as best as I could. Finest paper was 1500. Composite output worked first try. Used just an RCA connector. Power wires had been relocated while installing the trim in the shell.
Wire management is a critical aspect of portabilizing something. I took this very slowly because I wanted to be sure if all wires would fit and not cause issues with anything else. I used a THICC 16AWG wire for 3V3 (overkill?) and thicc 18AWG for the two main grounds going to the Wii and power wires from batteries. Everything else was 22AWG or thinner.
Dug up some copper on the bottom layer to place power rails. Tried to insulate every suspicious exposed pad or solder joint with kapton to minimize risk.
Two halves ready to close. Did not use the C stick board from 4layertech because there was no reason to. Micro SD is a SanDisk 64GB (SXDC IIRC). Works very well.
Looks kinda lame compared to other builds but I'm pretty proud of it. And it works.
Menu
Display is super crisp. I love it.
Thank you all for all the directions, the infos, the Ashida, and all your work on the Wii or portabilization in general. That is a fascinating topic.
Attachments
-
 2.3 MB Views: 58
 -
 2.7 MB Views: 59
 -
 2.4 MB Views: 62
 -
 2.5 MB Views: 61
 -
 2 MB Views: 64