Soldering check

Joined
May 19, 2020
Messages
24
Likes
6
Location
Naples, FL
Hey everyone,

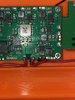
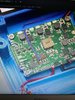
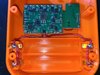
I just finished wiring up the battery clips & pads and would like a spot check if someone would be so kind. I’m brand new to all of this so I know things are rough! Also, if anyone has any tips on how to not heat up the wire shielding that would be great. I know exposed wire isn’t great but I can’t seem to avoid it on the GND pad for some reason. Thanks!
 

Attachments

Last edited:
Joined
Apr 27, 2020
Messages
41
Likes
8
Location
Edge of Space
I've had great results stripping 20-30 AWG with these. Hakko also makes a great pair of flush cutters that I use for trimming the exposed conductor. Strip the wire, tin it with a little paste flux and solder, then use the flush cuts to shorten the tinned wire to about the size of the pad you're soldering to. Strippers leave the wire looking a lot cleaner than melting off the insulation. I usually solder at around 290-300° for smaller boards like these, but you may need more heat when soldering to larger ground planes.

Your joint on B+ looks smooth and shiny. To replicate, make sure you're using flux, pre tin the pad, and let the iron distribute some heat to the joint for about 2 seconds (solder should look nice and wet), then keep your lead pinned to the pad for about a second or two after you remove the heat.

I prefer no clean flux when soldering to PCB and paste flux for wire to wire or tinning, but that's personal preference.
 
Last edited:
Joined
May 19, 2020
Messages
24
Likes
6
Location
Naples, FL
I've had great results stripping 20-30 AWG with these. Hakko also makes a great pair of flush cutters that I use for trimming the exposed conductor. Strip the wire, tin it with a little paste flux and solder, then use the flush cuts to shorten the tinned wire to about the size of the pad you're soldering to. Strippers leave the wire looking a lot cleaner than melting off the insulation. I usually solder at around 290-300° for smaller boards like these, but you may need more heat when soldering to larger ground planes.

Your joint on B+ looks smooth and shiny. To replicate, make sure you're using flux, pre tin the pad, and let the iron distribute some heat to the joint for about 2 seconds (solder should look nice and wet), then keep your lead pinned to the pad for about a second or two after you remove the heat.

I prefer no clean flux when soldering to PCB and paste flux for wire to wire or tinning, but that's personal preference.
I actually have a pair of Klein 22-32AWG strippers (that work really well and infinitely better than the garbage Harbour Freight auto strippers I started with). But based on the temperature you use, it sounds like my iron was just too hot for the shielding. I've been using mine at 550F, and Kester's site shows the melting point is 361F soo o.O
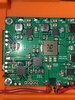
. I do flux and tin the wire before use, but I definitely didn't flux the power board pads before I soldered to them. Do you think I should just remove/wick away and start over or just make sure I flux before I solder from here on? And thanks so much for your help, I really appreciate it!
 
Joined
Apr 27, 2020
Messages
41
Likes
8
Location
Edge of Space
From what I could tell, none of your connections look bad. You could always use a drop of no clean and reflow any connections you're unsure about without additional solder, but it doesn't appear to be necessary. Give the connections a slight tug to make sure they're solid.

My soldering station is set to Celcius, so if yours is Fahrenheit, your working temps are in the same realm.

Same with B- at the board. It looks like you have enough slack to trim the conductor a bit (which I would do personally), but I don't think that leaving it as is, would have any adverse effects because those two connections are pretty isolated.

When you get to wiring up USB-C to the PMS definitely keep the exposed wire minimal as there are several close proximity pads you'll be soldering to.

Another tip, think about wire routing when you continue making the connections, and solder to the pad with the wire heading in the direction you know you want it to go. It makes wire management go a lot smoother in tight spaces.
 
Last edited:
Joined
May 19, 2020
Messages
24
Likes
6
Location
Naples, FL
My connections seem sturdy so far, so I think I’ll leave them for now and be more mindful about my wire routing and use of flux on pads. Speaking of wires, my next step is to wire up the fan to the 3.3v capacitor. I’ve fed the wire through just fine, and I have a smaller tip that I think will help soldering to it really well, but I’m not sure what the best practice is to trim and tin the wire once it’s already in position. Do you have any guidance you could share on this?
 
Joined
Apr 27, 2020
Messages
41
Likes
8
Location
Edge of Space
If it's already cut to the length it needs to be (and don't be afraid of leaving yourself a little slack), pull the wire back out from under the board, trim a couple mm of insulation and tin it. Then feed it back under the PMS and solder to the capacitor.

Flux and load some solder to the capacitor's end before making the connection with the fan lead. Add more flux and make the connection. Keep in mind you're connection is good anywhere the silver is on that end of the capacitor.
 
Joined
May 19, 2020
Messages
24
Likes
6
Location
Naples, FL
If it's already cut to the length it needs to be (and don't be afraid of leaving yourself a little slack), pull the wire back out from under the board, trim a couple mm of insulation and tin it. Then feed it back under the PMS and solder to the capacitor.

Flux and load some solder to the capacitor's end before making the connection with the fan lead. Add more flux and make the connection. Keep in mind you're connection is good anywhere the silver is on that end of the capacitor.
I did exactly as you suggested and I think I did a considerably better job than I did with the battery clips. How you like these apples? B|
 

Attachments

Last edited:
Joined
Apr 27, 2020
Messages
41
Likes
8
Location
Edge of Space
Super clean!! Nice, shiny, and smooth!! Flux really is the "secret" to soldering.
Just be aware that when you clean up with some IPA, it may dull the shine a bit. There's other solutions for cleaning the residual flux, but they tend to be more expensive than isopropyl alcohol.

Even though no clean flux might lead one to believe you don't need to do a little IPA scrub, it's best if you do. I've noticed a white film form on the solder mask if I don't clean after using no clean.
 
Last edited:

waldie

.
Joined
Mar 20, 2020
Messages
22
Likes
49
Joints look good!

The amount of exposed wire on GND is a little sus. But I doubt it's gonna give you problems.
 
Joined
May 19, 2020
Messages
24
Likes
6
Location
Naples, FL
Super clean!! Nice, shiny, and smooth!! Flux really is the "secret" to soldering.
Just be aware that when you clean up with some IPA, it may dull the shine a bit. There's other solutions for cleaning the residual flux, but they tend to be more expensive than isopropyl alcohol.

Even though no clean flux might lead one to believe you don't need to do a little IPA scrub, it's best if you do. I've noticed a white film form on the solder mask if I don't clean after using no clean.
Yeah I also noticed that I didn’t initially clean. No bueno!
 
Joined
May 19, 2020
Messages
24
Likes
6
Location
Naples, FL
Here’s a follow up for y’all. I need to solder the SDA & SCL pads to the PMS, but mine are in a different location than the board in the guides image. Was there a revision? I’ve attached images of both. Seems obvious enough, but I just want to make sure before I go ahead!

Edit: I checked images of other members and it does appear to be a revision. Moving ahead!
 

Attachments

Top