
Le0xFF
.
- Joined
- Sep 13, 2020
- Messages
- 5
- Likes
- 13
Kii
Finally I decided to post a worklog where I hope to include every detail about my first portable project!
The idea is to make a 16:9 GWii-ish portable named Kii and taking inspiration from that design, I decided to design the case myself. I'm learning to make a lot of stuff during this whole portabilizing process
So let's start!
---
THE PARTS
Since i had no experience with soldering before this project, I had to buy every single tool (and do a lot of practice as well).
As stated in the guides here in the forum, I took different wire diameters.
And now the parts I think I'll use in my portable.
---
THE IDEA AND THE WORK
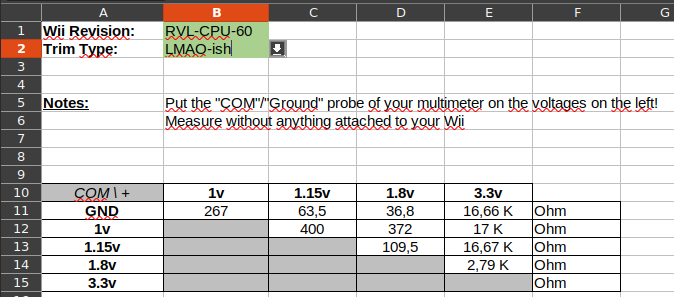
So like a real noob I went ahead and took the hardest path: a LMAO trim.
This thread starts after I already did some steps, like the trim and the NAND relocation, but of course I made some errors during the way.
One of them is that I desolder every port before the NAND relocation, so I still don't know if the relocation was successful or not and I still didn't ordered the batteries due to lack of time and other stuffs I had to do. I guess it'll be a big surprise for everyone.
But for now the trim and the relocation "seem" fine.
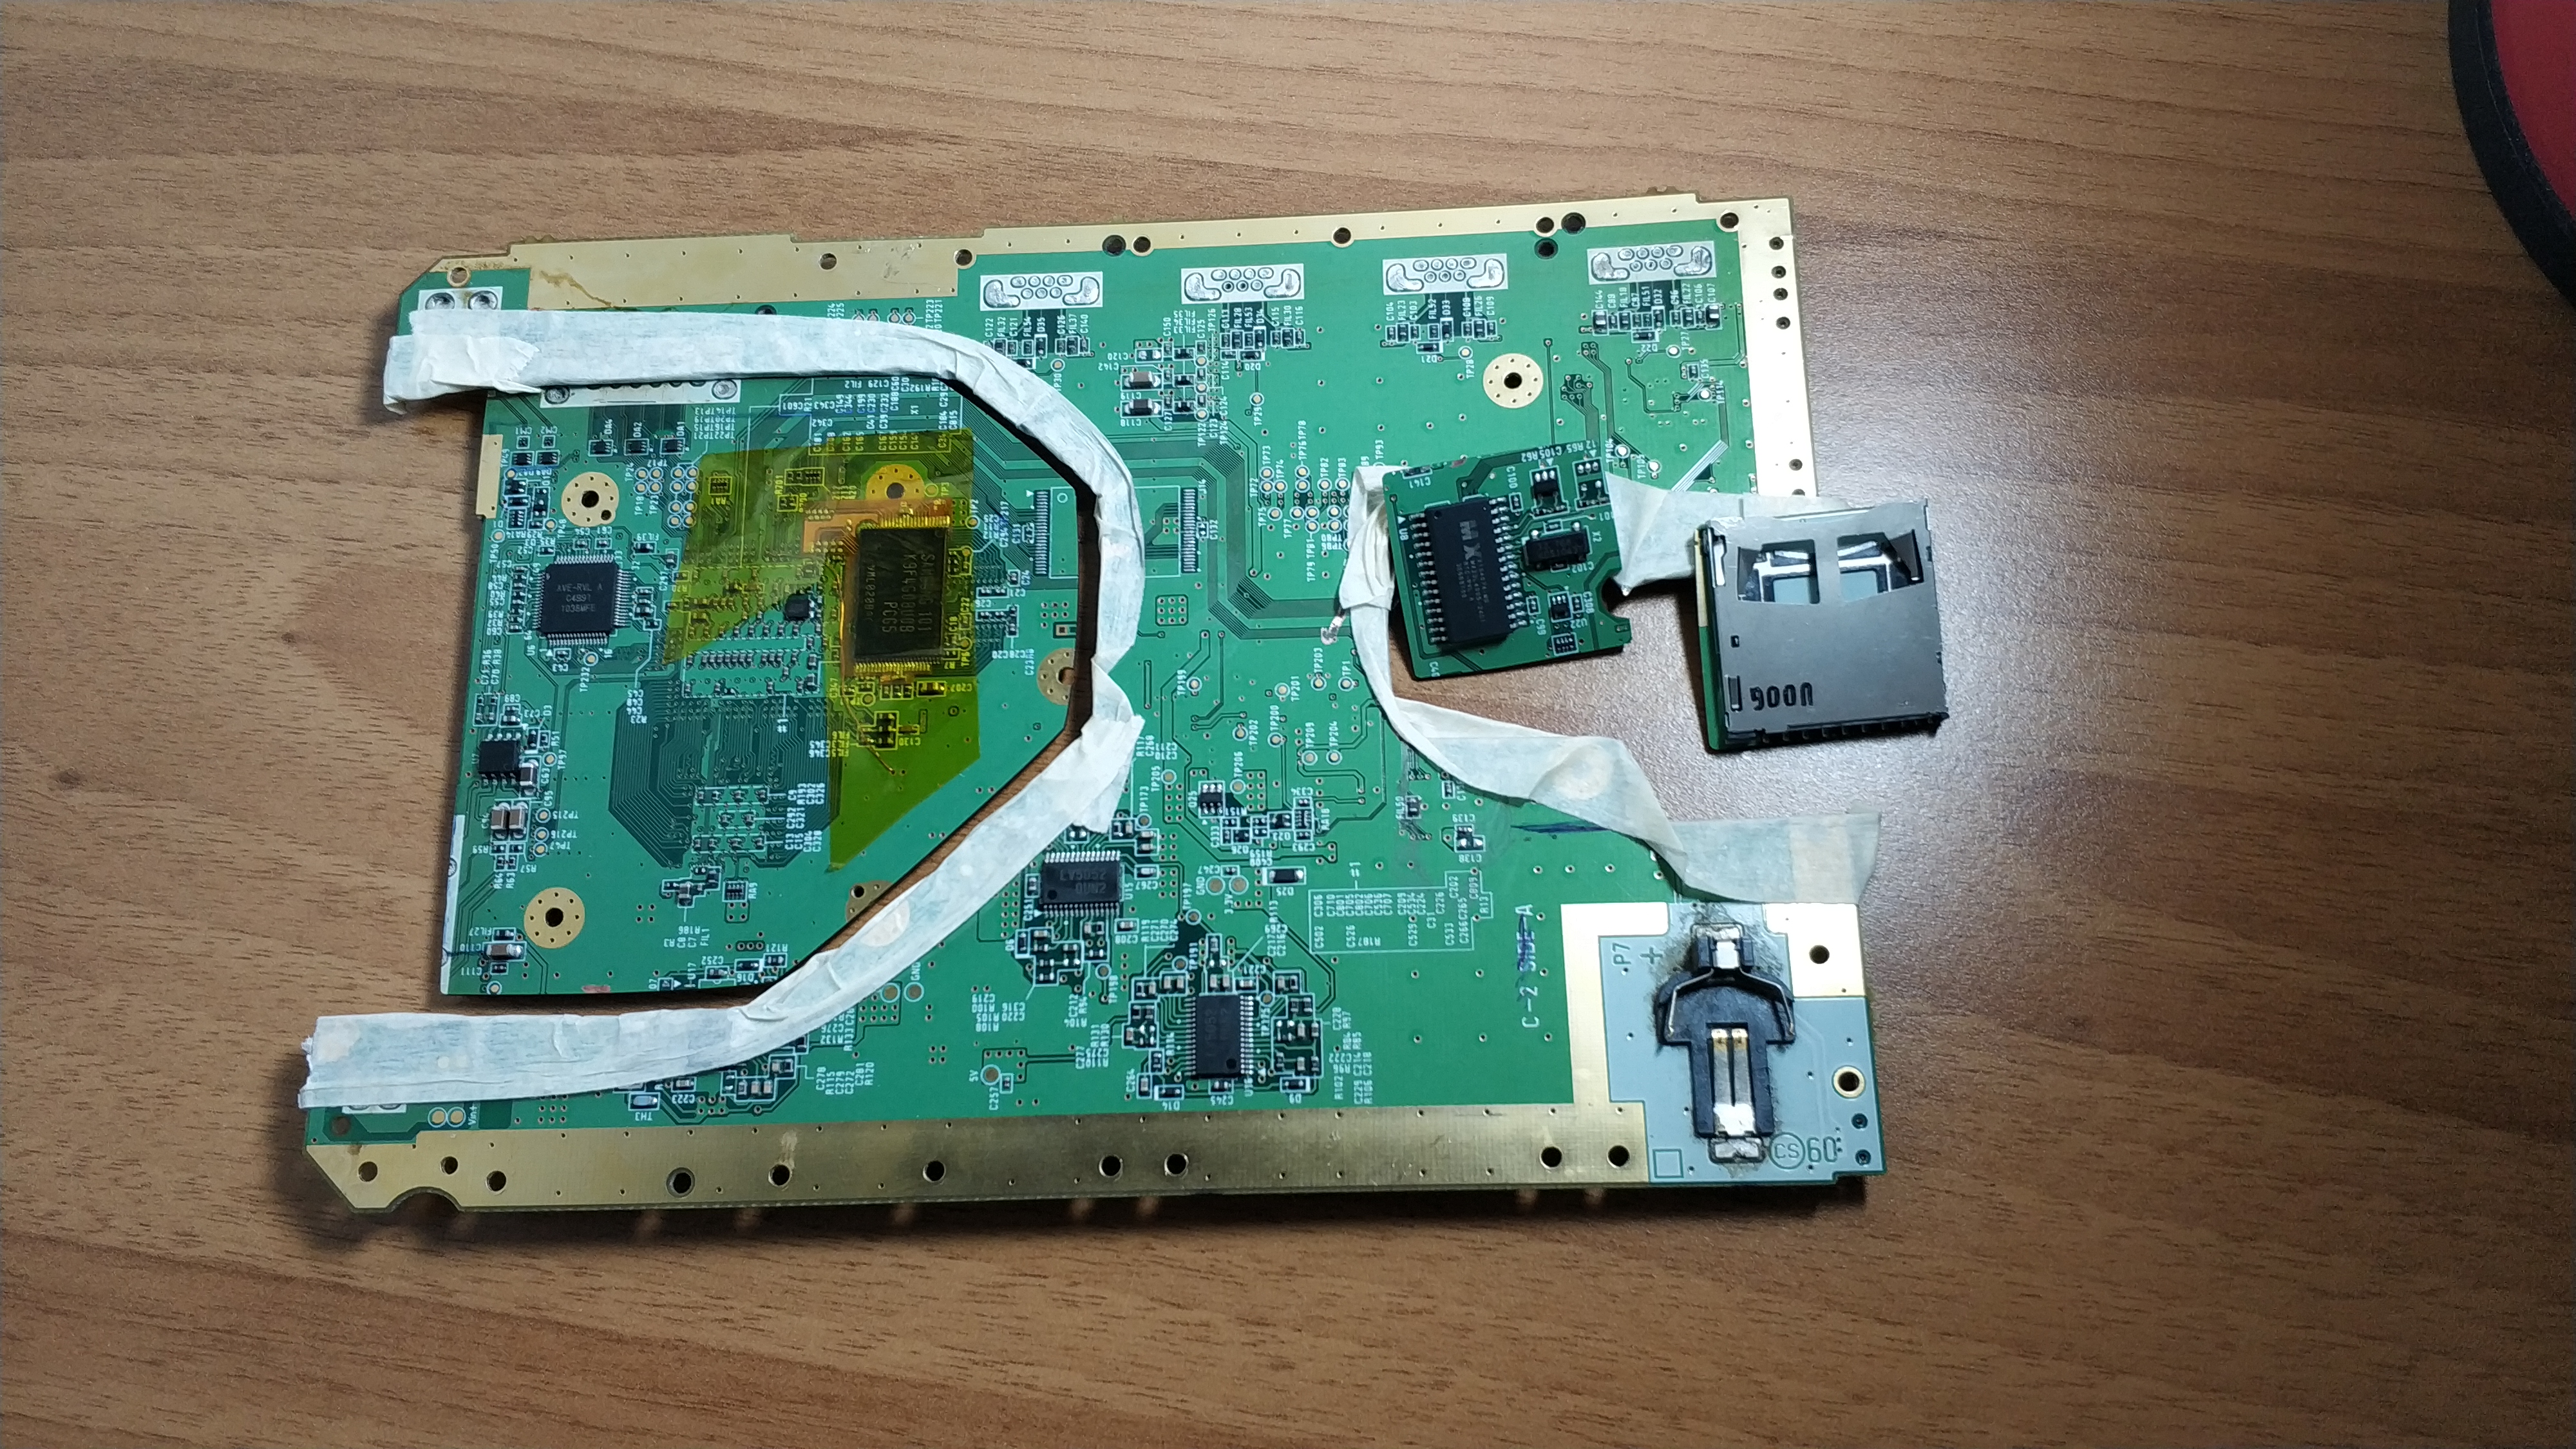
Resistance values also seem fine, so let's hope for the best!
I started this project during October 2020 and during all those months I also learned how to use KiCAD, so I decided to design some PCB: one for the MX Chip for an easier relocation and also a PCB that combine both the USB port and SD card (I used a microSD).
I will link my design once I've tested them and I'll be sure that they'll work!
---
THE CASE
Since I have no experience at all with 3D modeling, at first I was going for this case, that is absolutely an amazing design.
But of course I'd have changed it to my own needs and likings, such as normal 4 buttons instead of GameCube ones and other additional cutots.
Since I learned that modifing a .stl file is not that easy, especially when you want to start with Blender with no past experience, I then decided to learn 3D modeling with Fusion360.
I'm currently using Void Linux and to use Fusion360 I had to install it with wine. Luckily it works well enough, even if it took me a couple of days of troubleshooting to make it work that good.
I made a gist on github that describes the process, so it could be useful for many others!
For the design I hope to make something like the Xbox One controller, as I love that kind of ergonomic, and also because I found the following tutorial that taught me a lot of stuff about Fusion360.
I'll try to keep this post updated with all the parts, links and details I could include, so stay tuned!
Finally I decided to post a worklog where I hope to include every detail about my first portable project!
The idea is to make a 16:9 GWii-ish portable named Kii and taking inspiration from that design, I decided to design the case myself. I'm learning to make a lot of stuff during this whole portabilizing process
So let's start!
---
THE PARTS
Since i had no experience with soldering before this project, I had to buy every single tool (and do a lot of practice as well).
Soldering station
Iron tips
Soldering sponge
Flux
https://www.ebay.it/itm/183023149488
Solder
Third hand
Silicone mat
Kapton tape
ESD tweezers
Heat-shrink sleeves
Dremel
Fiberglass pen
https://www.amazon.it/gp/product/B000UZ8VNS
Iron tips
Soldering sponge
Flux
https://www.ebay.it/itm/183023149488
Solder
Third hand
Silicone mat
Kapton tape
ESD tweezers
Heat-shrink sleeves
Dremel
Fiberglass pen
https://www.amazon.it/gp/product/B000UZ8VNS
As stated in the guides here in the forum, I took different wire diameters.
AWG 20
https://www.amazon.it/gp/product/B081TXC3N7
AWG 22
https://www.amazon.it/gp/product/B07YBGRTS6
AWG 30
https://www.amazon.it/gp/product/B075LTMNHY
AWG 34-35 (0.15 mm)
https://www.amazon.it/gp/product/B07KG3SP1J
https://www.amazon.it/gp/product/B081TXC3N7
AWG 22
https://www.amazon.it/gp/product/B07YBGRTS6
AWG 30
https://www.amazon.it/gp/product/B075LTMNHY
AWG 34-35 (0.15 mm)
https://www.amazon.it/gp/product/B07KG3SP1J
And now the parts I think I'll use in my portable.
Screen 5' 16:9 800x480
https://www.ebay.it/itm/162464690396
NAND Relocation flex PCB
https://store.bitbuilt.net/nand-relocation-flex-pcb-pack-of-2/
DSL Button Breakout PCBs
https://store.bitbuilt.net/dsl-button-breakout-pcbs-pack-of-2/
Switch Button Breakout PCBs
https://store.bitbuilt.net/switch-button-breakout-pcbs-pack-of-2/
GC+ (v2.0)
https://store.bitbuilt.net/gc-v2-0-replacement-controller-board/
RVL-PMS
https://store.bitbuilt.net/rvl-power-management-system/
fpx (USB-C PD)
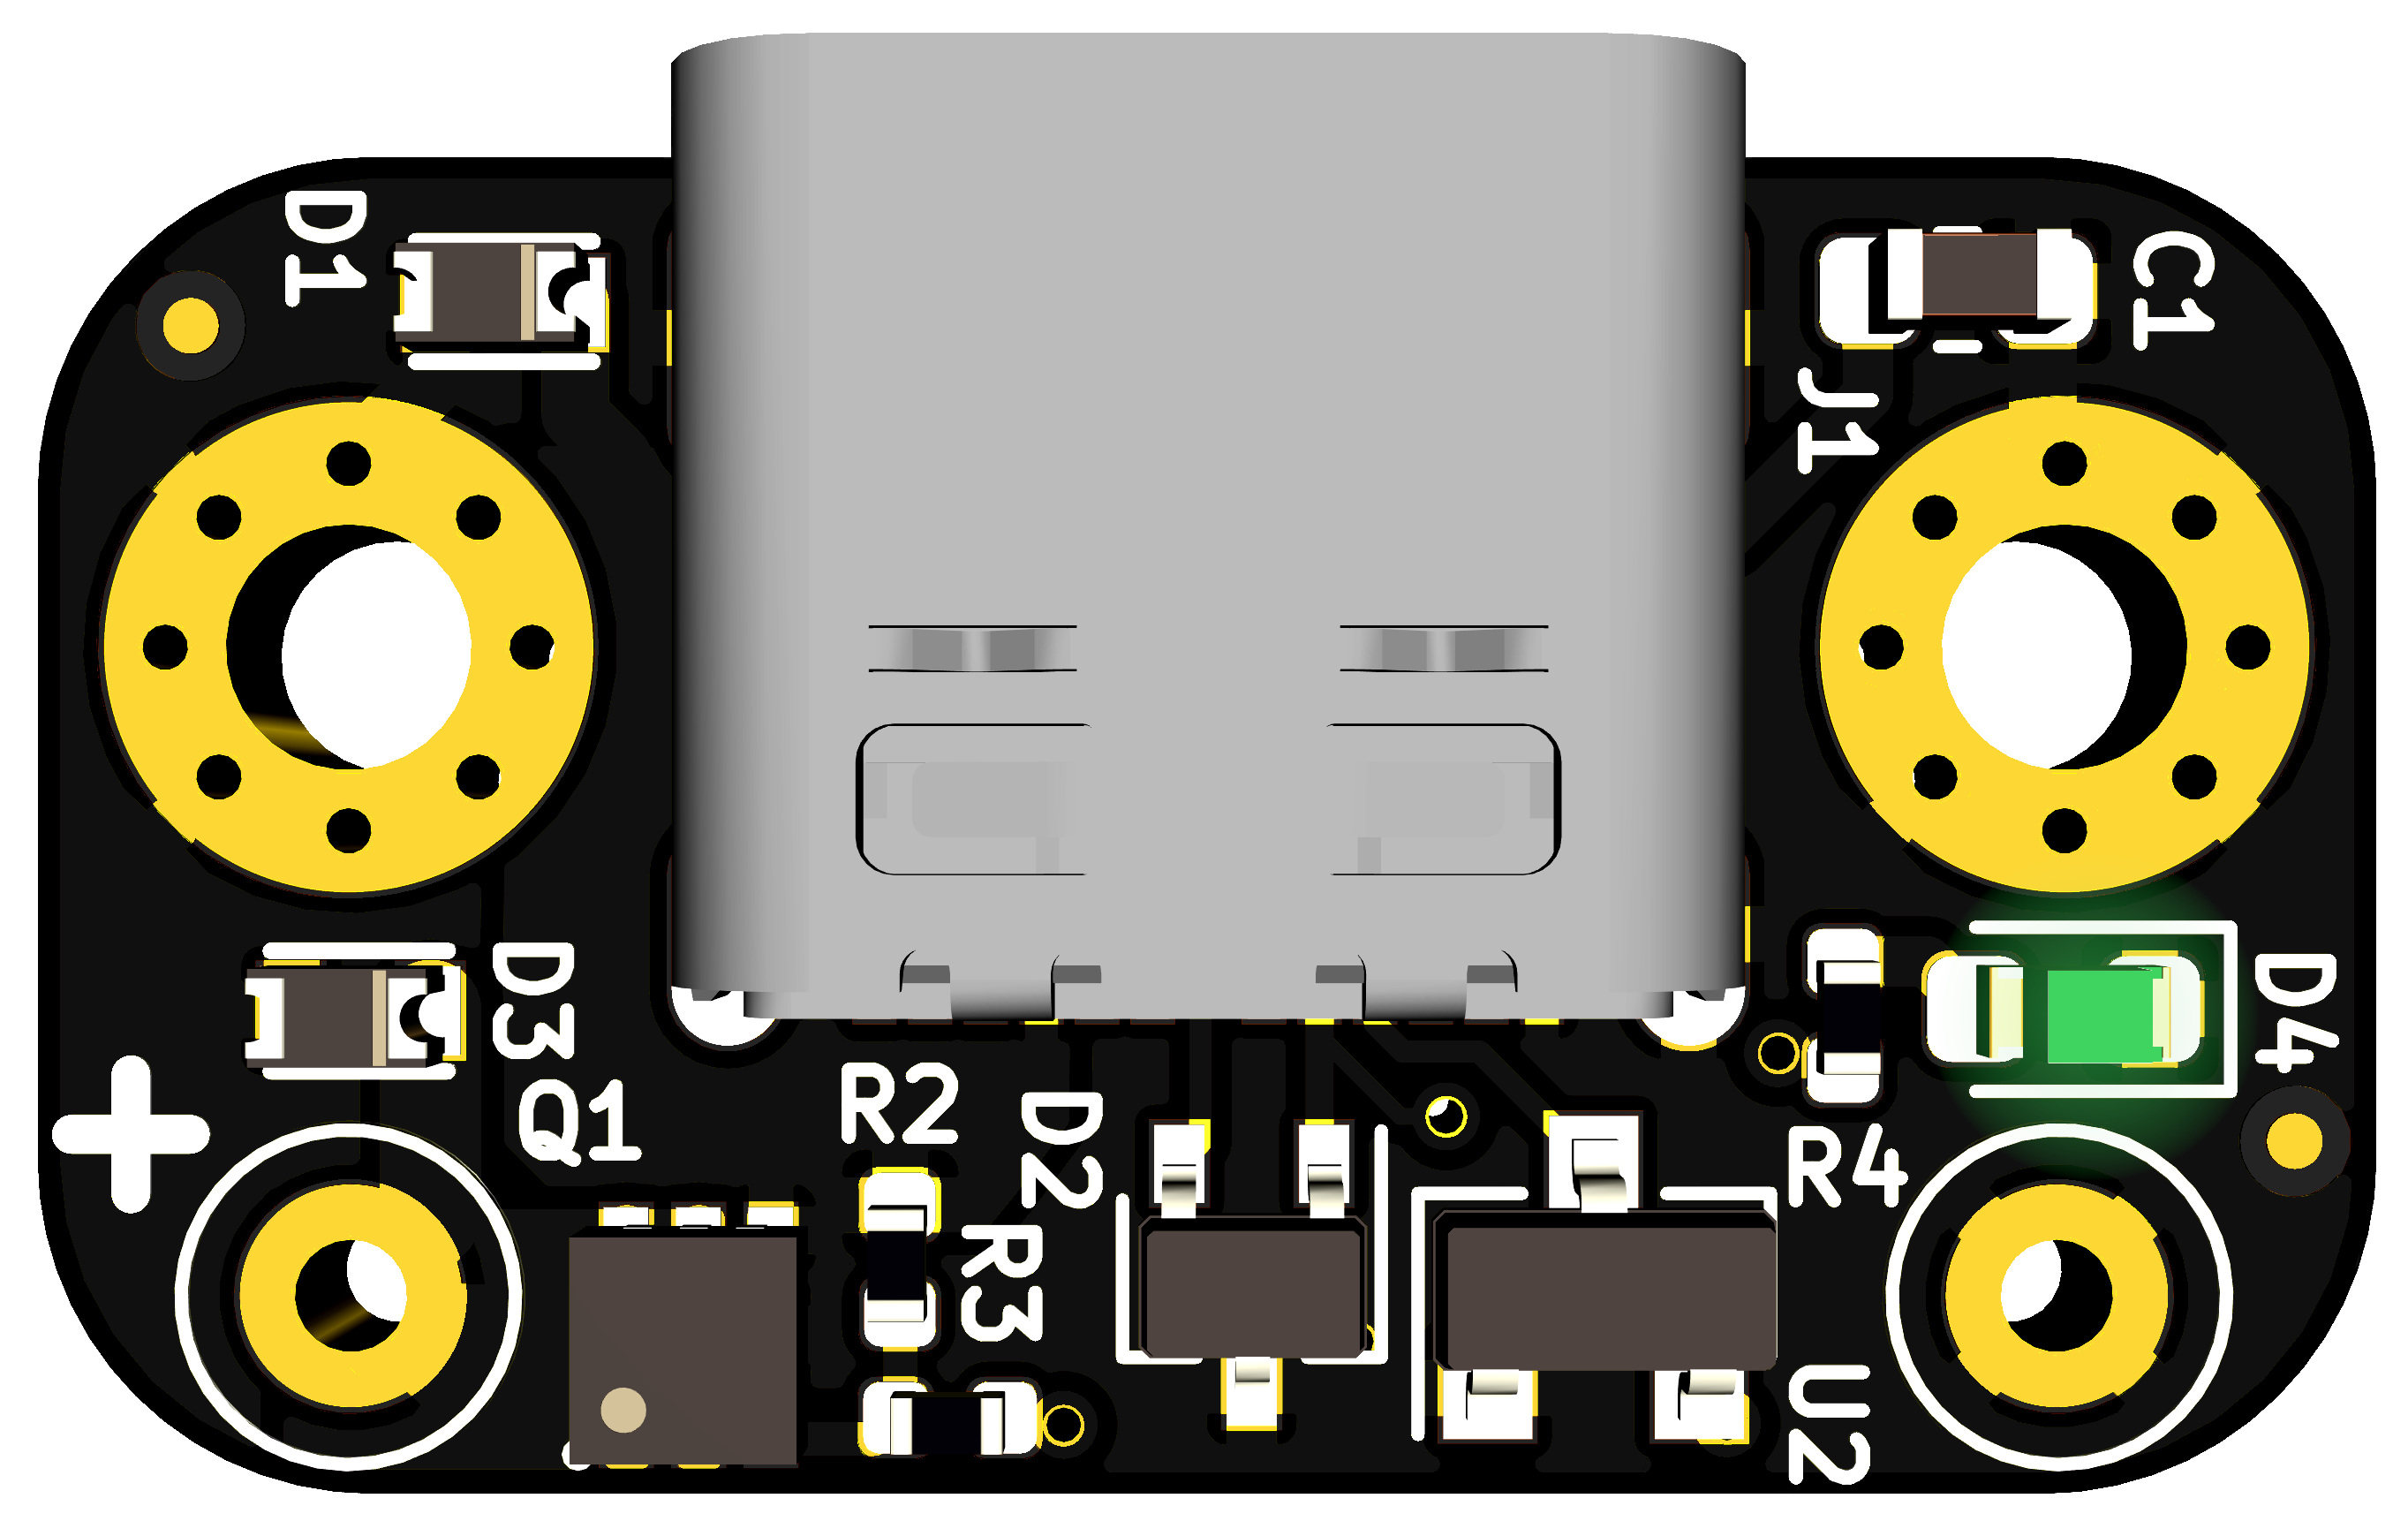
 fpx.oxplot.com
18650 batteries
https://www.blubattery.com/home/bat...co-di-sicurezza-per-la-for.1.7.680.gp.9030.uw
U-AMP
https://store.bitbuilt.net/u-amp/ (Since it was out of stock when I made the order on the store, I will solder it by myself)
Dual Action Tactile Switch
https://store.bitbuilt.net/tmhf07-dual-action-tactile-switch-pack-of-2/
Cooling kit
https://store.bitbuilt.net/cooling-kit/
https://www.ebay.it/itm/162464690396
NAND Relocation flex PCB
https://store.bitbuilt.net/nand-relocation-flex-pcb-pack-of-2/
DSL Button Breakout PCBs
https://store.bitbuilt.net/dsl-button-breakout-pcbs-pack-of-2/
Switch Button Breakout PCBs
https://store.bitbuilt.net/switch-button-breakout-pcbs-pack-of-2/
GC+ (v2.0)
https://store.bitbuilt.net/gc-v2-0-replacement-controller-board/
RVL-PMS
https://store.bitbuilt.net/rvl-power-management-system/
fpx (USB-C PD)
fpx: easy USB‑C power for all your devices
Tiny & easy to configure module that enables use of USB‑C (USB‑PD) chargers, adapters & power banks as power sources.
18650 batteries
https://www.blubattery.com/home/bat...co-di-sicurezza-per-la-for.1.7.680.gp.9030.uw
U-AMP
Dual Action Tactile Switch
https://store.bitbuilt.net/tmhf07-dual-action-tactile-switch-pack-of-2/
Cooling kit
https://store.bitbuilt.net/cooling-kit/
---
THE IDEA AND THE WORK
So like a real noob I went ahead and took the hardest path: a LMAO trim.
This thread starts after I already did some steps, like the trim and the NAND relocation, but of course I made some errors during the way.
One of them is that I desolder every port before the NAND relocation, so I still don't know if the relocation was successful or not and I still didn't ordered the batteries due to lack of time and other stuffs I had to do. I guess it'll be a big surprise for everyone.
But for now the trim and the relocation "seem" fine.
Resistance values also seem fine, so let's hope for the best!
I started this project during October 2020 and during all those months I also learned how to use KiCAD, so I decided to design some PCB: one for the MX Chip for an easier relocation and also a PCB that combine both the USB port and SD card (I used a microSD).
I will link my design once I've tested them and I'll be sure that they'll work!
---
THE CASE
Since I have no experience at all with 3D modeling, at first I was going for this case, that is absolutely an amazing design.
But of course I'd have changed it to my own needs and likings, such as normal 4 buttons instead of GameCube ones and other additional cutots.
Since I learned that modifing a .stl file is not that easy, especially when you want to start with Blender with no past experience, I then decided to learn 3D modeling with Fusion360.
I'm currently using Void Linux and to use Fusion360 I had to install it with wine. Luckily it works well enough, even if it took me a couple of days of troubleshooting to make it work that good.
I made a gist on github that describes the process, so it could be useful for many others!
For the design I hope to make something like the Xbox One controller, as I love that kind of ergonomic, and also because I found the following tutorial that taught me a lot of stuff about Fusion360.
I'll try to keep this post updated with all the parts, links and details I could include, so stay tuned!
Last edited: