
Discussion GC+ Mini contest
- Thread starter Aurelio
- Start date
- Joined
- Nov 10, 2016
- Messages
- 606
- Likes
- 1,625
Couldn't get off my butt to find some paper at home, so an MS Paint drawing will have to suffice.
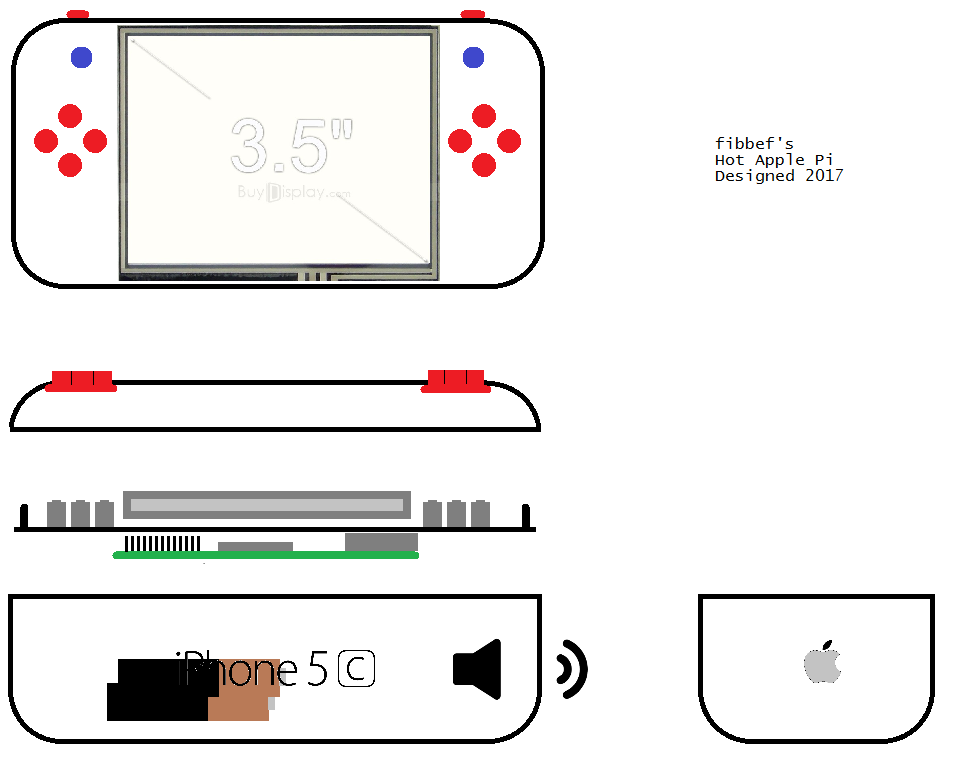
This is my plan for the Hot Apple Pi, a Raspi inside the plastic box that an iPhone 5C came in. I want to keep the box as minimally modified as possible, so I'm not cutting a screen opening since the lid is already clear. Controls are computer mice tacts wired directly to the Pi's GPIO pins. The buttons themselves will be plastic (not necessarily the colors shown) and I plan to attach them to the inside of the lid.
The case comes with a plastic insert that originally held the phone. My goal is to have everything attached to that insert, allowing the lid and base to detach completely for dead simple repair and battery replacement.
A cheap mp3 amp and a speaker pulled from a Samsung Galaxy 4 will provide sound. The Apple logos will be filed out to create holes for audio and volume control. The amp I plan to use has a 3-way switch for volume control: off, on, and loud. (I said it was cheap.) So the switch should be accessible through one of the hollowed out apples.
The Pi and screen will be powered by 4xAA batteries or a single 9volt (battery life be damned). I should be able to pull 5V from a regulator on the screen to power the Pi, but if not I can add a 7805 to the circuit (that's what makes it the Hot Apple Pi). I have an AA battery holder with a 9volt-style connector, so when it's all done I'll be able to switch between battery types at will.
I already have all parts on hand and should be able to start building once I get a couple of other obligations out of the way.
I'll be posting mine soon. It's basically crap in two different parts. Half of a CAD design and the other on a white board haha I've been so busy I haven't had time to finish them but I'll see if I can touch them up and post them before the deadline.
- Joined
- Mar 3, 2016
- Messages
- 2,229
- Likes
- 2,952
- Portables
- 2
White board sketches are fine! If you want you can post your current design and update it later (in this case update the same post so it's easier for me). I will check all of them after the deadlineI'll be posting mine soon. It's basically crap in two different parts. Half of a CAD design and the other on a white board haha I've been so busy I haven't had time to finish them but I'll see if I can touch them up and post them before the deadline.
")
- Joined
- Jan 13, 2017
- Messages
- 78
- Likes
- 232
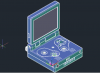
Here is my entry into this contest, the Gamecube Advance SP (GCA-SP) Unfortunately I may never finish it, as it is a Gamecube, and I cannot seem to get the Wasp working again. And by the time I have the extra cash to buy a new one from Aliexpress, they may be gone forever. Never the less, here it is!
Attachments
-
 32.7 KB Views: 271
 -
 31.6 KB Views: 282
 -
 19.3 KB Views: 290
 -
 1.5 MB Views: 294
Last edited:
- Joined
- Mar 3, 2016
- Messages
- 2,229
- Likes
- 2,952
- Portables
- 2
Nice design! No batteries, though?Here is my entry into this contest, the Gamecube Advance SP (GCA-SP) Unfortunately I may never finish it, as it is a Gamecube, and I cannot seem to get the Wasp working again. And by the time I have the extra cash to buy a new one from Aliexpress, they may be gone forever. Never the less, here it is!
Anyway send me a PM after mid-February, I might have a WASP, but I'm not home right now.
- Joined
- Jan 13, 2017
- Messages
- 78
- Likes
- 232
Yeah? That's awesome! Will do. And no, no batteries. If I trim the board I'd definitely have room for them. But at the time of designing this, I wasn't up to the challenge. I have a couple of friends that want me to make them one so I wanted to keep it easy to do so I didn't have to charge them more than $300.Nice design! No batteries, though?
Anyway send me a PM after mid-February, I might have a WASP, but I'm not home right now.
Actually not a joke, you legit could do this (though my great drawing probably says otherwise).
Base TI83 calculator, glue all the buttons in place (except for one to act as a sync button), put a LCD in place of their screen, a wii in the middle, and two (or more, depending on how much space is left) flat cell batteries. Have external controller ports to avoid needing internal controls. Then you could play smash or something in math class

If I win,
A gamecube controller hooked up to a calculator? Nah, teacher would never knowThen you could play smash or something in math class

Not like thatA gamecube controller hooked up to a calculator? Nah, teacher would never know
For stealth, connect wii remotes and hide em under the desk. Make sure to turn down the volume too!
- Joined
- Mar 3, 2016
- Messages
- 2,229
- Likes
- 2,952
- Portables
- 2
It's 4pm of the 31st here, you've almost 32 hours before the deadlineCrap, I have a submission but it's on my laptop at home. I will post it tonight if that's okay?!

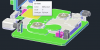
Here is my actual design:


So this uses the SL-68 as a base. It's small enough to be pocket sized but big enough to be comfortable. As you can see, there is no cart slot. Ideally this would utilize a portable 64Drive, but I am not sure if more are going to be produced so we'll just say "a flashcart." The 3.5" LCD is 640x480 and will use UltraVGA for 480P on the display. The buttons used are from a GBA SP since I like how small they are and I like the tactile feel that they give. The darkened areas around the buttons are the recesses found on the SP case, it's just a little hard to portray them in 2D.
On the bottom of the unit, we have the SD card slot, a 3.5mm headphone jack, and an interesting array of pins. Using magnets and pogo pins, I've put together a small docking station that will allow this portable to function a bit like the Nintendo Switch. When you plug the console into the dock, everything inside of the portable with the exception of the console will turn off. The dock itself will have four controller ports on it as well as a few little tricks. As you can see, there are quite a few pins on the array if all I'm going to be using is data, voltage, ground and A/V. That's because the dock supports the N64 video data lines so that something like UltraHDMI can be installed into the dock and it can function as it normally would in a standard home console. The two most outer pins will be for charging the unit, and it does support charge and play through one cable.
On the top, we have a big vent and a single power button. This button will function much like the power button found on the 3DS in that a single press will power the console on, however a single press will reset the unit if the console is already on. Pressing and holding will power the console down. This button will be recessed as to avoid any kind of accidental presses.
And finally, on the back of the unit we have another vent as well as triggers. I haven't decided if the trigger placement will be final as I personally like having the triggers correlate with the D-Pad (e.g. L is closer to the D-Pad) so I may be changing that later on. These buttons are DMG replacement buttons.
So that's the design so far. If I had more time to work on this I would have included pictures of the custom PCBs that go inside such as the front board which has all of the controller and the audio amp built in. Most of the unit will rely on circuit boards to eliminate the majority of wires used in many portables. Even the cartridge slot will be relocated using FFC!
- Joined
- Jan 14, 2017
- Messages
- 18
- Likes
- 6
Damn. So many good ideas in this thread. (This is my first built and I am waiting on regulators and what not to get here). I could put up some sketches though. I would like peoples opinions/feedback.
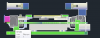
I'm new to this stuff/artistically handicapped, so I drew the front/size to scale, and it all looks doable, but I included the measurements on here for ya'll.
Front
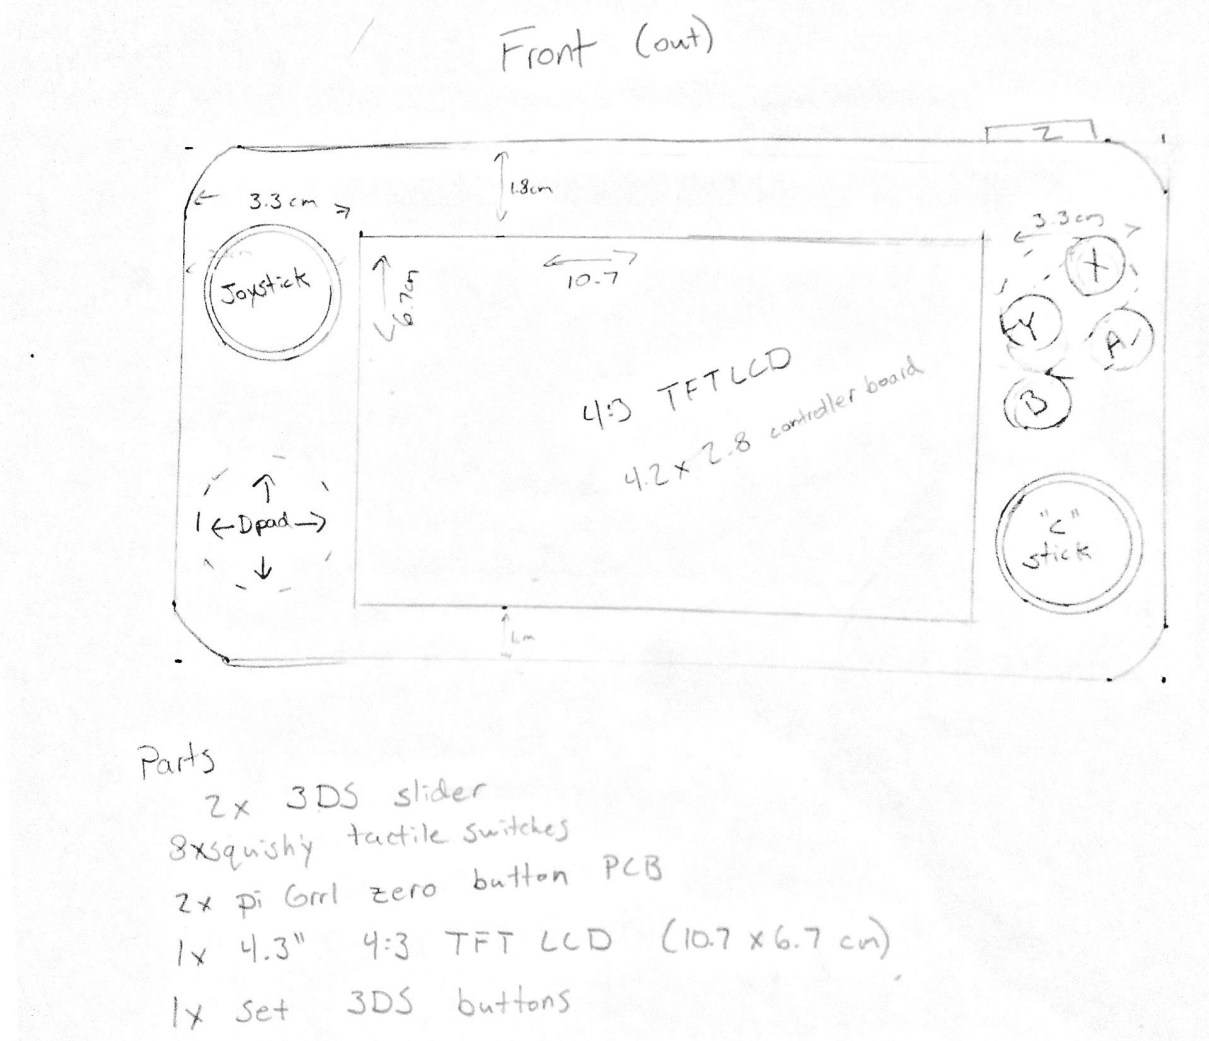
Back/Side
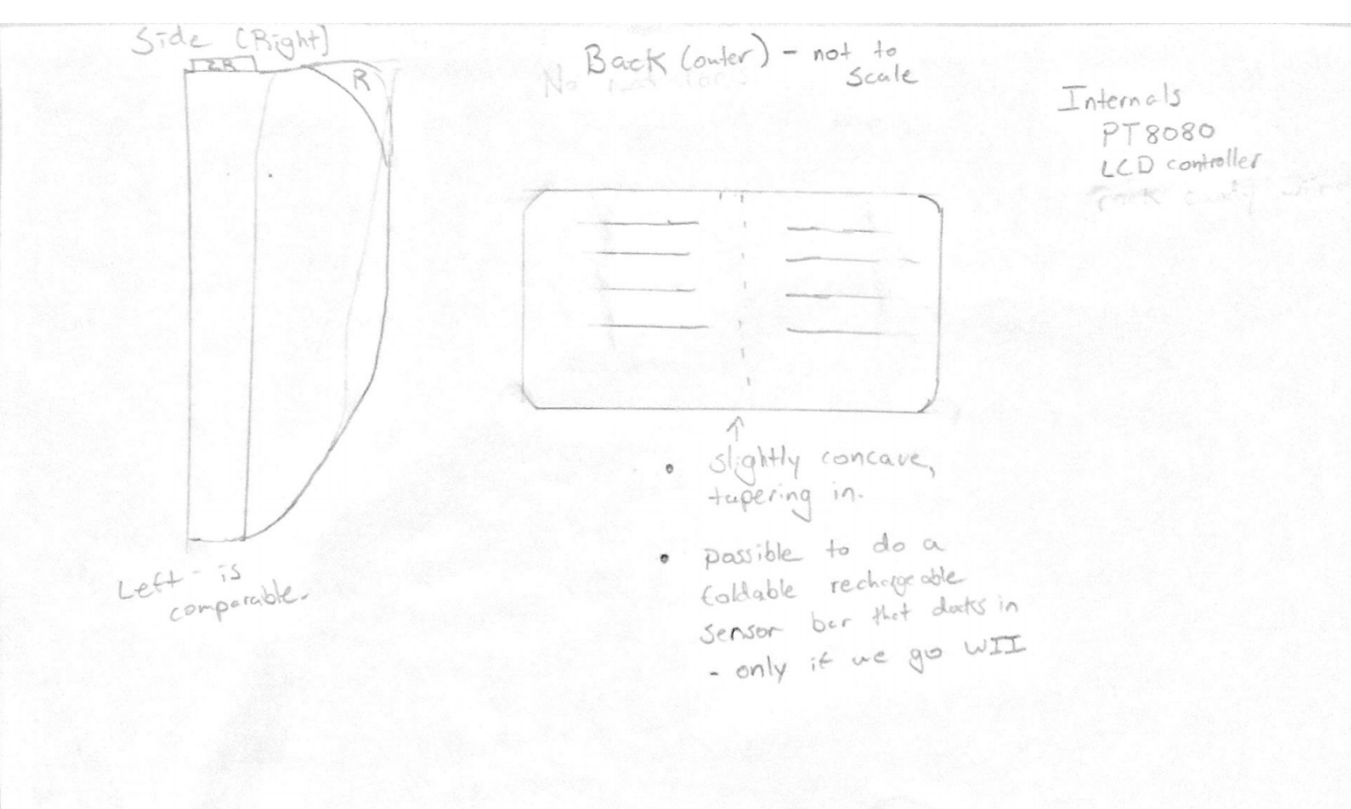
The write up:
Case is a modded circle pad pro. This combined with a Lower ds faceplate and some pieces of plastic frankencased off the circle pad and that is basically it. The circle pad pro came with the triggers and Z buttons intact, so that works well for me.
For buttons, I did not really know what to do, so I ended up picking up 2 of the PiGrrl zero 4 button PCB with common ground.
Adding a second slider and retaining the slider pad triggers/Z and that is basically all the control / outside aspect.
Internally, I am having some difficulties. I am waiting on my regulators/parts so I am working on refining my technique by soldering/desoldering old useless electronics.
If I lack the balls to cut up this wii, I will use a rPI. In that case, I would wire up these PCB to a teensy rather than the IO pins on the PI (easier upgradability in the future).
If I do cut up this wii, I will try wiring the buttons to a classic controller PCB (there are testpoints on the board), so you can basically cut it down to ~3cm by 3cm. Bought a cheap knock off wiimote online in the hope that the traces are more visible and not obscured like the stock one. Optimally the best bet would be to setup a small board like the GC+ that includes a small bluetooth chip and emulates the classic controller connected to a wiimote.
So assuming the ring/middle fingers are for triggers, having your thumb and middle finger on the same level is a bad idea because it doesnt allow the hand to achieve an ergonomic feel. Holding it for a long time would result in pain/stiffness in your thenar eminence (palm near the thumb).
Damnit. Adding this response to your design made me question the feeling of my own...
I'm new to this stuff/artistically handicapped, so I drew the front/size to scale, and it all looks doable, but I included the measurements on here for ya'll.
Front
Back/Side
The write up:
Case is a modded circle pad pro. This combined with a Lower ds faceplate and some pieces of plastic frankencased off the circle pad and that is basically it. The circle pad pro came with the triggers and Z buttons intact, so that works well for me.
For buttons, I did not really know what to do, so I ended up picking up 2 of the PiGrrl zero 4 button PCB with common ground.
Adding a second slider and retaining the slider pad triggers/Z and that is basically all the control / outside aspect.
Internally, I am having some difficulties. I am waiting on my regulators/parts so I am working on refining my technique by soldering/desoldering old useless electronics.
If I lack the balls to cut up this wii, I will use a rPI. In that case, I would wire up these PCB to a teensy rather than the IO pins on the PI (easier upgradability in the future).
If I do cut up this wii, I will try wiring the buttons to a classic controller PCB (there are testpoints on the board), so you can basically cut it down to ~3cm by 3cm. Bought a cheap knock off wiimote online in the hope that the traces are more visible and not obscured like the stock one. Optimally the best bet would be to setup a small board like the GC+ that includes a small bluetooth chip and emulates the classic controller connected to a wiimote.
Looks pretty dope. Regarding the triggers on the back, I think you actually need to raise the buttons on the front or lower the triggers on the back a bit. I think it would be best to raise the front buttons because you primarily use your thumbs for the front, with the index fingers supporting the case and the pinkies resting a little lower.Here is my actual design:
So assuming the ring/middle fingers are for triggers, having your thumb and middle finger on the same level is a bad idea because it doesnt allow the hand to achieve an ergonomic feel. Holding it for a long time would result in pain/stiffness in your thenar eminence (palm near the thumb).
Damnit. Adding this response to your design made me question the feeling of my own...
