Worklog Excited Work Log

Joined
Apr 27, 2023
Messages
91
Likes
54
Location
Michigan
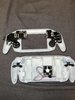
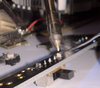
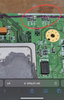
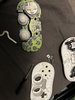
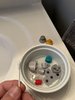
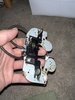
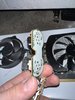
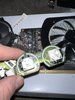
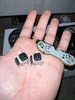
Hey everyone ! figured i would document my process as i’m going along i love the idea of being able to look back at the posts like notes. today i received a gamecube controller and a wii classic controller and quickly got to work desoldering components. i removed all the stick boxes, after looking at them i think i’ll be using the classic ones as they are in better shape overall. i also practiced with the potentiometers on both controllers. i noticed the wii classic controllers potentiometers match the ones in the parts list almost exactly. are they interchangeable ? maybe they can be used for a future protect! anyway i also saved the rumble motor from the gamecube controller. everything was immediately cleaned after removal it was kinda gross from age
 

Attachments

  • E10E977B-DDD0-4457-8D18-FE9E024AEFED.jpeg
    E10E977B-DDD0-4457-8D18-FE9E024AEFED.jpeg
    1.7 MB · Views: 234
  • 6EF7CE83-13CA-4889-A018-AF5DE9E9AFB1.jpeg
    6EF7CE83-13CA-4889-A018-AF5DE9E9AFB1.jpeg
    1.3 MB · Views: 237
  • B12096D9-1C35-40FF-8820-B1CB891B7C28.jpeg
    B12096D9-1C35-40FF-8820-B1CB891B7C28.jpeg
    1.5 MB · Views: 257
  • C7F1C462-5B3E-41FD-891B-B1F8C8EC64E7.jpeg
    C7F1C462-5B3E-41FD-891B-B1F8C8EC64E7.jpeg
    1.5 MB · Views: 244
  • 9CE4F607-550F-4549-A6E0-1F5867FE91C9.jpeg
    9CE4F607-550F-4549-A6E0-1F5867FE91C9.jpeg
    1.3 MB · Views: 252
  • B45C2A1D-0D36-49A9-A1C9-BCFF8B72E0F3.jpeg
    B45C2A1D-0D36-49A9-A1C9-BCFF8B72E0F3.jpeg
    1.3 MB · Views: 240
If you're talking about the joystick pots, yeah they're basically identical. Most conventional joysticks use the same type of 10k potentiometer, so they're pretty much all interchangeable
 
If you're talking about the joystick pots, yeah they're basically identical. Most conventional joysticks use the same type of 10k potentiometer, so they're pretty much all interchangeable
i didn’t take pictures but i meant the analog boxes for the triggers the piece that shows how far you have pressed, i salvaged those as well from the classic board but they seem to look the same as the alpine ones i ordered in the BOM. sorry for the confusion.
 
i didn’t take pictures but i meant the analog boxes for the triggers the piece that shows how far you have pressed, i salvaged those as well from the classic board but they seem to look the same as the alpine ones i ordered in the BOM. sorry for the confusion.
Oh, yeah afaik they're the same as the GC trigger pots
 
Oh, yeah afaik they're the same as the GC trigger pots
awesome good to know, i got those out in good shape so i’ll save them for a second build or for one i do with a friend so they can order less lol every little bit counts (: especially with aging hardware
 
Update 4/28
got my ashida boards and soldered most of the components i had on hand to the boards, got the stick boxes, volume potentiometer, trigger pots, z buttons, trigger boards and slide switch, waiting for buttons and other accessories to show up!
 

Attachments

  • 20EE6053-D3D2-41C4-8AE4-7B83E10F401F.jpeg
    20EE6053-D3D2-41C4-8AE4-7B83E10F401F.jpeg
    2.7 MB · Views: 254
  • 2BDD5F47-F879-44D9-909E-64E151331BB9.jpeg
    2BDD5F47-F879-44D9-909E-64E151331BB9.jpeg
    2.2 MB · Views: 234
  • 8E13BBF8-95FF-4668-86EE-E730C196478E.jpeg
    8E13BBF8-95FF-4668-86EE-E730C196478E.jpeg
    264.8 KB · Views: 228
Questions about the z buttons, after looking at the BOM i noticed the switches that are meant for the z buttons don’t fit right the aren’t 90degrees like the ones on the volume part of the ashida board, this is the ones from the BOM am i missing something? i accidentally soldered the other ones into that slot and had to remove them now im worried i might have damaged the corners where the z buttons sit
image.jpg
image.jpg

please let me know if there is a way to fix this or if i need new boards
image.jpg
 
4/29
update i got rvloader on the wii and patched out the wifi and added the vga patch, broke down the wii to the motherboard and removed most of the components in the way, if anyone has any pics of their fresh trims please post them for reference i have scoured the forum and all the work logs love to see others working trims. i have marked up my lines for the trim, looks much easier to cut from the bottom but correct me if i’m wrong !
note: RV loader was giving me some trouble at first had the right files and my usb formatted correctly as fat32 with 32kb setting however it was giving me error codes until i put the files on my sd card and usb drive then it was no issue.
22A81980-507D-4532-A2D5-F01411FA0474.jpeg
3483EAF8-8CE0-47C0-9559-613BBC02A9DB.jpeg
A79F6D10-0FD0-48E9-9BD3-658CA0018B72.jpeg
 
This is my trim that I just did. It had fine resistances, but I haven't actually tested it working yet. [EDIT: It works now.]

PXL_20230424_232617883.jpg


You'll also need to remove the cap in the very far top right in your picture of your motherboard. Cutting from the bottom is also a good idea, I did that.
 
Last edited:
This is my trim that I just did. It had fine resistances, but I haven't actually tested it working yet.

View attachment 27421

You'll also need to remove the cap in the very far top right in your picture of your motherboard. Cutting from the bottom is also a good idea, I did that.
so out of curiosity i see some people have left these on and others take them off are these neeeded for the board to be functional after the trim??
 

Attachments

  • CAE0F351-D079-4A82-9BE7-31C5B8013424.jpeg
    CAE0F351-D079-4A82-9BE7-31C5B8013424.jpeg
    1.7 MB · Views: 244
so out of curiosity i see some people have left these on and others take them off are these neeeded for the board to be functional after the trim??
The 5 caps on the right are for video stuff, I don't think they are necessary, but I would just leave them on. The one in very top right needs to be removed to do the OMGWTF trim, though.
 
The 5 caps on the right are for video stuff, I don't think they are necessary, but I would just leave them on. The one in very top right needs to be removed to do the OMGWTF trim, though.
awesome well i just went and cut my board here are the results i am currently sanding it as we speak, is this a good start for the trim ?
image.jpg
 
after trimming up the wii and sanding it pretty well these are my resistances some seem a little low but most are in range can anyone confirm these are okay ?
 

Attachments

  • 1FB7E87E-CF63-4686-8890-F366B3692614.jpeg
    1FB7E87E-CF63-4686-8890-F366B3692614.jpeg
    112.1 KB · Views: 228
so out of curiosity i see some people have left these on and others take them off are these neeeded for the board to be functional after the trim??
Those components can be ignored, they aren't needed
 
update 5/5
got the vga bracket and ashida boards assembled again minus the z buttons, i actually found a seller on etsy who sells original gamecube Z tact switches that match the boards perfectly. so test fit everything, still waiting on the PD2 and GC2+ to come back in stock then i’ll be able to test the trim and get the majority of the wiring knocked out. has anyone managed to find a screen protector that works with these 5.5 inch displays? i’d love to have a glass one but even the cheap plastic ones are fine i just don’t want to scuff the hell out of this screen.
IMG_3475.jpeg
IMG_3476.jpeg
 
update 5/5
got the vga bracket and ashida boards assembled again minus the z buttons, i actually found a seller on etsy who sells original gamecube Z tact switches that match the boards perfectly. so test fit everything, still waiting on the PD2 and GC2+ to come back in stock then i’ll be able to test the trim and get the majority of the wiring knocked out. has anyone managed to find a screen protector that works with these 5.5 inch displays? i’d love to have a glass one but even the cheap plastic ones are fine i just don’t want to scuff the hell out of this screen. View attachment 27518View attachment 27519

Just a heads up if those are extreme rate buttons that red will smear.... I had a white Switch Pro Controller that i made to represent the EMMI from Metroid dread and the ABXY buttons wore off onto the white shell. Idk if they have since fixed that issue but just wanted to let ya know.
 
Back
Top