Dinofix
.
- Joined
- May 10, 2021
- Messages
- 14
- Likes
- 35
Hi all, Dino from sweden here.
First time building a portable and I've decided to go for a G-Wii v2.2
I've ordered everything that I need now when 4layertech went live, now I just have to wait for it to arrive
I'll post a link down bellow on my shoppinglist if any other swede want to build a similar portable, I ofc had to import stuff from the US
shoppinglist
what I've done so far:
I've printed out the new files that Gman provided in his thread and testfitted the buttons from a third party controller
I'm gonna try and wet sand the case just to see if I can get it smooth as hell, I'm pretty satisfied with the print though (layer height 0,1 on an ender 3 pro) if it looks like crap after sanding I'll just print another one.
Next up will be to install RVLoader and tear down the wii to make it ready for the OMGWTF trim - first time cutting a mainboard! will be fun

I've also ordered double up on all boards from 4layertech and bitbuild, after this build I want to design my own case and make a fully custom build.
Update #1: - 210915
Update #2: - 211004
First time building a portable and I've decided to go for a G-Wii v2.2
I've ordered everything that I need now when 4layertech went live, now I just have to wait for it to arrive
I'll post a link down bellow on my shoppinglist if any other swede want to build a similar portable, I ofc had to import stuff from the US
shoppinglist
what I've done so far:
I've printed out the new files that Gman provided in his thread and testfitted the buttons from a third party controller
I'm gonna try and wet sand the case just to see if I can get it smooth as hell, I'm pretty satisfied with the print though (layer height 0,1 on an ender 3 pro) if it looks like crap after sanding I'll just print another one.
Next up will be to install RVLoader and tear down the wii to make it ready for the OMGWTF trim - first time cutting a mainboard! will be fun
I've also ordered double up on all boards from 4layertech and bitbuild, after this build I want to design my own case and make a fully custom build.
Update #1: - 210915
Hello again - a long awaited update from me! now Im are up and running again
It turned out to be harder to get the stuff to sweden than I thought it would be!
At first Bitbuilt Store closed down and my fan, heat sink and copper plate disappeared for a long time but in the end the parts found their way to Sweden!
Then it was time for the screen to disappear (ofcourse) and it really disappeared completely, the seller said that it was delivered but I never received anything and my local postoffice never received the package either. A few turns back and forth, ebay paid my money back and I had to buy new screens from another seller and wait again but these luckily showed up!
Summer came, the children were free from school, I was free from work, we were out on adventures and had a good time - but NOW! now it's autumn and I'm finally gonna get this project done.
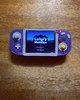
I have since last post printed an updated shell, I found out that there was a remix of the G-Wii where you print the entire front face down on the bed without any support and then you printed the bezel and joystick details separately which let you print these in a completely different color - I wanted to go for a slightly "stock" look, I bought gray filament and my god how nice it turned out.
I'll take a little better picture when Im done wet sanding, but look at this badboy!

I also printed out all the internals in gray, I really love the contrast and look it gives if you have to open it up one day.
Now you are updated to just a few days ago when I really started with this again.
I installed rvloader, it didnt take many minutes and I tried to run GC, Wii and VC games without any problem, now the wii is ready to be disassembled and have its mobo cut!
Before I cut, however, I wanted to get my small 5" screen to show image from the wii and be connected to 5V instead of 12V.
I threw together a small " guide " if someone buys similar screens and needs to modify them.
Success!

The next step is to disassemble the wii and cut the mobo, until then I'll wet sand the shell, I'veve bought 240, 360, 800 and 1200 grit sandpaper but I do not know if I will use all of them in the end - we'll see when I'm satisfied! It takes time and is a slow process but it will be fine in the end.
It turned out to be harder to get the stuff to sweden than I thought it would be!
At first Bitbuilt Store closed down and my fan, heat sink and copper plate disappeared for a long time but in the end the parts found their way to Sweden!
Then it was time for the screen to disappear (ofcourse) and it really disappeared completely, the seller said that it was delivered but I never received anything and my local postoffice never received the package either. A few turns back and forth, ebay paid my money back and I had to buy new screens from another seller and wait again but these luckily showed up!
Summer came, the children were free from school, I was free from work, we were out on adventures and had a good time - but NOW! now it's autumn and I'm finally gonna get this project done.
I have since last post printed an updated shell, I found out that there was a remix of the G-Wii where you print the entire front face down on the bed without any support and then you printed the bezel and joystick details separately which let you print these in a completely different color - I wanted to go for a slightly "stock" look, I bought gray filament and my god how nice it turned out.
I'll take a little better picture when Im done wet sanding, but look at this badboy!
I also printed out all the internals in gray, I really love the contrast and look it gives if you have to open it up one day.
Now you are updated to just a few days ago when I really started with this again.
I installed rvloader, it didnt take many minutes and I tried to run GC, Wii and VC games without any problem, now the wii is ready to be disassembled and have its mobo cut!
Before I cut, however, I wanted to get my small 5" screen to show image from the wii and be connected to 5V instead of 12V.
I threw together a small " guide " if someone buys similar screens and needs to modify them.
Success!
The next step is to disassemble the wii and cut the mobo, until then I'll wet sand the shell, I'veve bought 240, 360, 800 and 1200 grit sandpaper but I do not know if I will use all of them in the end - we'll see when I'm satisfied! It takes time and is a slow process but it will be fine in the end.
Update #2: - 211004
update #2
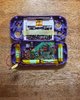
sience the last post I had big problems to get the trimmed wii to even boot... after days and hours spent of troubleshooting I desoldered everything and did another trim, soldered everything with some thicker cables and it booted without problem - leason learned! use correct cables for wiring. - I bet my old trim works but I'll check that for next build!
View attachment 19271
When everything was confirmed to work I then soldered the BT module and MX chip - continued to confirm that the wii wanted to boot after each new module!
View attachment 19272
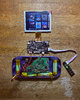
now that everything was working in the back I then started working with the frontpiece - everything is soldered in place and the GWII functions as intended!
View attachment 19273
I've got som tweaking to do with this build - I want to change out the soft tactile buttons in the dpad for more clicky buttons just because I like that more (used to the xbox controllers)
I need to switch out the 3rd party joysticks for some stock gc stickboxes and also rewire everything so I can close up the gwii as intended - theres a presure because of the cables that I used
all in all Im happy with the build so far")
View attachment 19274
thanks to all of you that helped me with troubleshooting on discord!
sience the last post I had big problems to get the trimmed wii to even boot... after days and hours spent of troubleshooting I desoldered everything and did another trim, soldered everything with some thicker cables and it booted without problem - leason learned! use correct cables for wiring. - I bet my old trim works but I'll check that for next build!
View attachment 19271
When everything was confirmed to work I then soldered the BT module and MX chip - continued to confirm that the wii wanted to boot after each new module!
View attachment 19272
now that everything was working in the back I then started working with the frontpiece - everything is soldered in place and the GWII functions as intended!
View attachment 19273
I've got som tweaking to do with this build - I want to change out the soft tactile buttons in the dpad for more clicky buttons just because I like that more (used to the xbox controllers)
I need to switch out the 3rd party joysticks for some stock gc stickboxes and also rewire everything so I can close up the gwii as intended - theres a presure because of the cables that I used
all in all Im happy with the build so far
View attachment 19274
thanks to all of you that helped me with troubleshooting on discord!
Last edited: