- Joined
- Dec 7, 2018
- Messages
- 41
- Likes
- 59
- Portables
- 3
Hello all! this is my first work log and I will certainly do my best!
A bit of background on most online games my name is Red_ so I called this the Rii to nod to that and I thought it was funny sounding. I have built one portable in the past from a raspberry pi but this is a different beast entirely. I built that originally to be able to play ocarina of time because my friends always made fun of me for not playing a Zelda game all the way through before and what better way to show them up than by making a gaming system? from there my goal has been to play every canon Zelda game in the order they came out and I can only go up to N64 on the other emulator and I can play the rest on this! after ocarina of time I played Zelda 1 and I'm on Zelda 2 and its a pain but I made a commitment! anyways, on to the build!
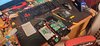
Here is the spec list for this project I had ordered everything in advance to get set and ready to go in preparation.
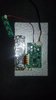
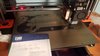
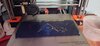
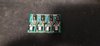
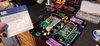
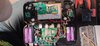
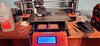
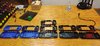
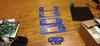
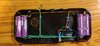
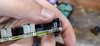
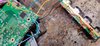
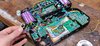
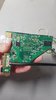
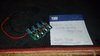
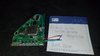
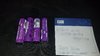
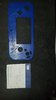
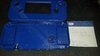
so, from the photos, you can see that I have the Wii all trimmed out with the OMGWTF trim and portableize mii all set up. I will say since I have had limited experience with using an air station I did have quite a difficult time with the relocation of the U10 chip into the proper place. however, while I did destroy one Wii in the process it was probably for the best since that one was a 6 layer board and gave me the perfect excuse to get a 4 layer board for better efficiency overall. I used the destroyed Wii as practice for the hot air station and as soon as I was comfortable enough I moved on to the 4 layer board. Once I relocated the chip as instructed everything powered on perfectly! what a relief. from here I was able to trim the board down to the correct size. I started at 180 grit sandpaper and went all the way down to 2500 which I know is overkill I just liked how smooth it was and it most certainly will not have internal shorts between layers. for testing purposes, I kept the output port on so I can easily connect to a tv. honestly, I was not sure if that would work or not but as I will mention later, with the custom regulators it worked great. I tried my best to make the regulators as neat and compact as possible and I will be changing them a little bit to be even more compact but overall I am very pleased with how well they turned out all wires will be trimmed to fit more appropriately in the case. the outputs worked immediately with these and I was able to test using a bench power supply and once everything is hooked up it pulls about 1 amp in GameCube games and slightly less in the home screen. (thought it would draw more in-game compared to idle but it works so meh).
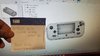
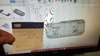
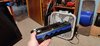
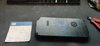
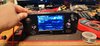
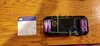
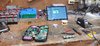
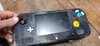
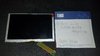
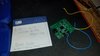
So as mentioned in the list of features for this the screen is 5 inches 16:9 but unfortunately, I couldn't really find a good one so I got a car backup screen which should work fine. definitely not ideal since I need to use a boost converter to get 12v and that takes space but everything should fit in the casing. it also extraordinarily important to have HDMI out on this and my plan for this is to use an av to HDMI converter and use a switch to swap the av input from either the screen or the HDMI. it's a bit bigger than I hoped for and in the modeling process it's being a bit of a pain to know where it will go but I have a few ideas I want to try to make it work. the adapter just takes 5v which I already have from the custom regulators. I always thought it was so cool how on my first ever portable with a raspberry pi I could output to anything so I really want that to be a prime feature. especially with all the controller ports, I will have for future multiplayer sessions with the boys. I will put a photo of my original emulator here as well for reference but I will have a different execution.
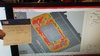
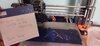
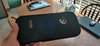
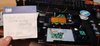
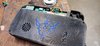
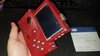
I'm currently on 3D modeling of the case and I can say that trying to copy the Gamecube controller is a major pain. its really hard to get just right but I believe I got it down after a few iterations. I just got to make sure I have the tolerances right so the buttons slide nicely. I got them a little too tight on this iteration. I also accidentally made the guides too tall which doesn't allow for the internal buttons to get pressed but that's easily fixable for the next iteration. From the bitbuilt store, I bought the GC+ board, the audio amp, and a bunch of buttons typically used for dual tact on the triggers but like them a lot, and they aren't obnoxiously loud so I will just tie the two outputs together and just them for everything underneath. the holes on the bottoms of the original buttons for the GameCube are too big though so I will have to cover them up so they can still be used. In terms of overall case design, it's a bit thicker than I wanted but I don't see that getting better and overall I'm still very happy with it. I want to exaggerate the curves more though since I think it will look nice and I should have the internal room to do so.
Stay tuned for more! I'm full steam ahead on this and I'm so excited to play some games on it!
A bit of background on most online games my name is Red_ so I called this the Rii to nod to that and I thought it was funny sounding. I have built one portable in the past from a raspberry pi but this is a different beast entirely. I built that originally to be able to play ocarina of time because my friends always made fun of me for not playing a Zelda game all the way through before and what better way to show them up than by making a gaming system? from there my goal has been to play every canon Zelda game in the order they came out and I can only go up to N64 on the other emulator and I can play the rest on this! after ocarina of time I played Zelda 1 and I'm on Zelda 2 and its a pain but I made a commitment! anyways, on to the build!
Here is the spec list for this project I had ordered everything in advance to get set and ready to go in preparation.
- OMGWTF trim
- 5 inch 16:9 800x480
- original Gamecube button layout including original analog sticks
- homemade 2s2p 2800mah lipo packs
- controller and memory card ports
- internal (possibly external?) 128 GB Kingston USB adapter storage
- Dual speakers
- possible headphone jack?
- dual tact L and R buttons
- GC+ for easier controller connectivity
- IR LEDs for Wii games
- HDMI out for use with modern tv's
- 3D printed case
so, from the photos, you can see that I have the Wii all trimmed out with the OMGWTF trim and portableize mii all set up. I will say since I have had limited experience with using an air station I did have quite a difficult time with the relocation of the U10 chip into the proper place. however, while I did destroy one Wii in the process it was probably for the best since that one was a 6 layer board and gave me the perfect excuse to get a 4 layer board for better efficiency overall. I used the destroyed Wii as practice for the hot air station and as soon as I was comfortable enough I moved on to the 4 layer board. Once I relocated the chip as instructed everything powered on perfectly! what a relief. from here I was able to trim the board down to the correct size. I started at 180 grit sandpaper and went all the way down to 2500 which I know is overkill I just liked how smooth it was and it most certainly will not have internal shorts between layers. for testing purposes, I kept the output port on so I can easily connect to a tv. honestly, I was not sure if that would work or not but as I will mention later, with the custom regulators it worked great. I tried my best to make the regulators as neat and compact as possible and I will be changing them a little bit to be even more compact but overall I am very pleased with how well they turned out all wires will be trimmed to fit more appropriately in the case. the outputs worked immediately with these and I was able to test using a bench power supply and once everything is hooked up it pulls about 1 amp in GameCube games and slightly less in the home screen. (thought it would draw more in-game compared to idle but it works so meh).
So as mentioned in the list of features for this the screen is 5 inches 16:9 but unfortunately, I couldn't really find a good one so I got a car backup screen which should work fine. definitely not ideal since I need to use a boost converter to get 12v and that takes space but everything should fit in the casing. it also extraordinarily important to have HDMI out on this and my plan for this is to use an av to HDMI converter and use a switch to swap the av input from either the screen or the HDMI. it's a bit bigger than I hoped for and in the modeling process it's being a bit of a pain to know where it will go but I have a few ideas I want to try to make it work. the adapter just takes 5v which I already have from the custom regulators. I always thought it was so cool how on my first ever portable with a raspberry pi I could output to anything so I really want that to be a prime feature. especially with all the controller ports, I will have for future multiplayer sessions with the boys. I will put a photo of my original emulator here as well for reference but I will have a different execution.
I'm currently on 3D modeling of the case and I can say that trying to copy the Gamecube controller is a major pain. its really hard to get just right but I believe I got it down after a few iterations. I just got to make sure I have the tolerances right so the buttons slide nicely. I got them a little too tight on this iteration. I also accidentally made the guides too tall which doesn't allow for the internal buttons to get pressed but that's easily fixable for the next iteration. From the bitbuilt store, I bought the GC+ board, the audio amp, and a bunch of buttons typically used for dual tact on the triggers but like them a lot, and they aren't obnoxiously loud so I will just tie the two outputs together and just them for everything underneath. the holes on the bottoms of the original buttons for the GameCube are too big though so I will have to cover them up so they can still be used. In terms of overall case design, it's a bit thicker than I wanted but I don't see that getting better and overall I'm still very happy with it. I want to exaggerate the curves more though since I think it will look nice and I should have the internal room to do so.
Stay tuned for more! I'm full steam ahead on this and I'm so excited to play some games on it!
Attachments
-
 4.5 MB Views: 403
 -
 1 MB Views: 399
 -
 2.7 MB Views: 379
 -
 2.5 MB Views: 383
 -
 2.4 MB Views: 386
 -
 2.6 MB Views: 388
 -
 1.4 MB Views: 379
 -
 2.8 MB Views: 396
 -
 2.6 MB Views: 427
 -
 2.2 MB Views: 433
Last edited: