Worklog Purple Ashida Build

Joined
Oct 5, 2019
Messages
132
Likes
124
Portables
2
Just after finishing my G-Wii I learned so many things I could do better I decided to try out an Ashida build.

So far I have prepped the Wii and painted my case purple. I got the color as close to the right purple as I could with what my local paint shops had on hand. I think it looks pretty good!

IMG-3363.JPG


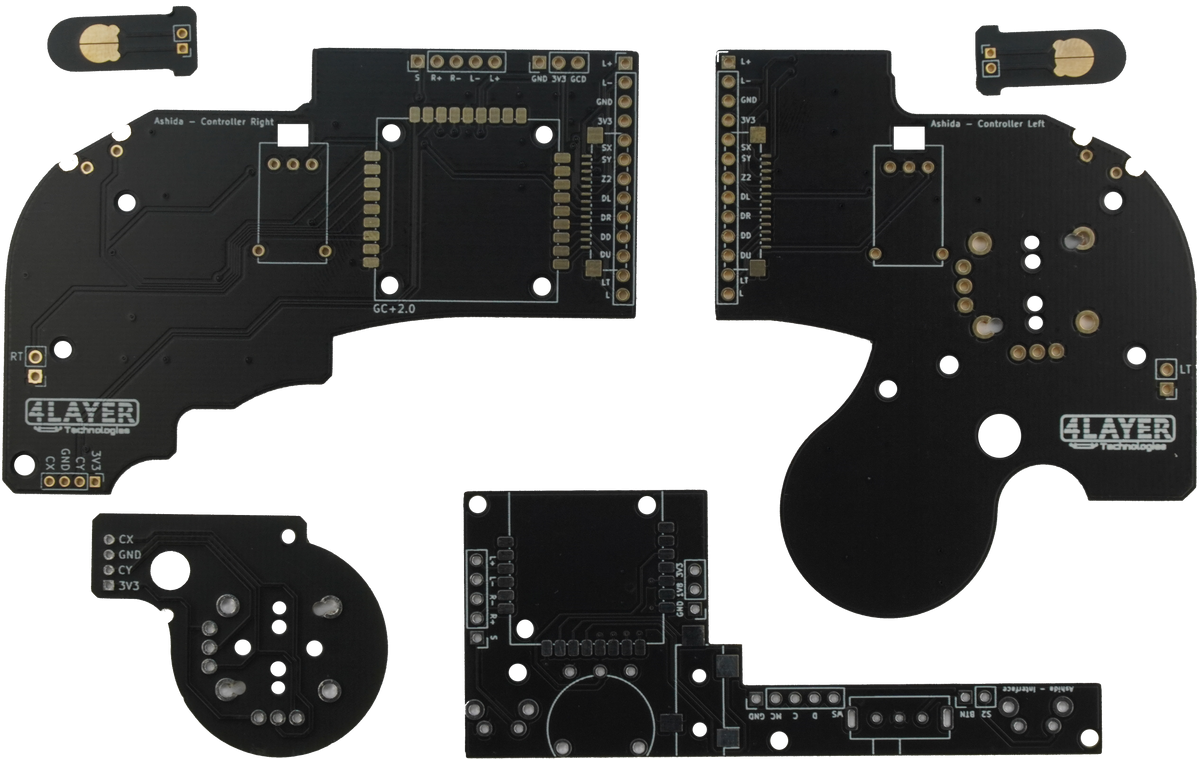
Now that the paint is done I am starting to mount the components. The Ashida is so much better for keeping wiring clean and neat.

IMG-3365.JPG
 
For the Ashida pcb what does the S2 line go to next to the power button?
 
For the Ashida pcb what does the S2 line go to next to the power button?


Diagrams tab, halfway down the page -- Bluetooth module, which is optional. Presumably is for controller sync, but that's a guess.
 

Diagrams tab, halfway down the page -- Bluetooth module, which is optional. Presumably is for controller sync, but that's a guess.
Thank you for the help I should have checked that page again.
 

Diagrams tab, halfway down the page -- Bluetooth module, which is optional. Presumably is for controller sync, but that's a guess.
Yeah that's the pad for the Wiimote bluetooth sync button
 
Quick update I did a ton over the weekend and almost have this finished up.

I got the wiring all done and have the Wii booting up.

IMG-3403.JPG


IMG-3401.JPG


I just have some issues with the current Kingston adapter I am using the filesystem isn't showing up for RVLoader to run. I'm getting a new drive today and hopefully that'll solve the issue. If not, I think I might have gotten the data lines mixed up again like I did on my GWii build.
 
Any tips on sanding down the Z buttons? Once I try to screw everything together they get stuck and jammed.
 
Just got the MX chip all set and finally booted up a game.

I am getting weird color issues any clue what I mixed up?

IMG-3472.jpg
 
Looks like green and blue were swapped. The stars are supposed to be yellow.

red + green = yellow
red + blue = violet
 
Last edited:
Well crap, my audio was working but then I messed with the left speaker and now I don't get anything out of either speaker.

Edit: Rebooted a couple of times and now the audio is working again.

I noticed if I turn the dial all the way down or up the audio stops. Is there a way to set the audio for a slider?
If your speakers misbehave, you can try bending the speaker contacts up a bit further so they push against the PCB pads a bit harder.

For the audio settings, I can't remember if there's a setting in RVLoader for it or if the U-AMP just intelligently knows that the voltage feed in means a wheel is being used. Either way I haven't heard of the audio stopping at max volume. Crackling and sounding shitty certainly, but not completely ceasing.

Also I can't remember which pad is which button, but the K1-K5 pads on the driver board are your screen control buttons. If you solder a wire to a ground spot and poke those pads with the other end, it'll simulate pressing a button and you can bring up the OSD to align the picture.
 
New issue, my console crashes randomly after a little bit of time. It'll either give me a game error crash or it'll outright hard crash and restart RVLoader. Any clues as to why that would be?
 
Sounds like either a cooling issue (system is overheating) or a USB issue. What are your thermals looking like if you power cycle it right after it crashes? And how long are your USB data lines?
 
Sounds like either a cooling issue (system is overheating) or a USB issue. What are your thermals looking like if you power cycle it right after it crashes? And how long are your USB data lines?
The thermals are good. Haven't seen them hit above 60c. The USB lines are about 4 inches long I'd guess.

Edit: Just got home and checked the data lines for the USB is about 6 inches long actually.

Where are the vias on the back of the motherboard for USB? I want to move it from the front of the board to the back and see if that makes a difference.
 
Last edited:
it's very gorgeous. I am absolutely in love with that clear coat. How did you get such fantastic results? what clear coat did you use?

I tried using rust-oleum universal clear coat and it stayed tacky forever, even after letting it dry for a week.
 
it's very gorgeous. I am absolutely in love with that clear coat. How did you get such fantastic results? what clear coat did you use?

I tried using rust-oleum universal clear coat and it stayed tacky forever, even after letting it dry for a week.
Thank you! I had my professional painter uncle paint it for me! It was an automotive clear coat called Upol Clear #1 (Amazon product ASIN B009LHER0M). It only took 24 hours to fully cure. I'd definitely recommend it.
 
Back
Top