Worklog More Ashidas

Joined
Jul 31, 2022
Messages
74
Likes
99
Location
Oregon
Hi Everyone!

I’m starting this thread because I’ve been wanting to get back into making portables and while I’ve already got a project in progress, I figured it’d be a good idea to shake off the dust with something easy and fun. I’d been thinking about building another Ashida with all the bells and whistles, so I thought: why not take this opportunity to make a few for some friends too? That brings me to this thread, which I’ll be using to document the build progress of three Ashidas. Two will be built to the standard spec, including Bluetooth and RTC in the build. The third will hopefully include a DD (if I can get my hands on one) and rumble motors. My main goal with all of them is to build with undeniable quality, to prove to myself that I’ve still got what it takes to make OMEGA-level portables.

What I’ve done so far:

Reassembled the Ashida BOM in Excel so I could tweak it into a parts tracker while updating links and prices.
1754502074019.webp


Lastly I ordered all the parts I’ll need, now we’re just waiting on everything to arrive.

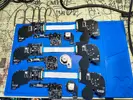
Next on the to do list is to trim and test 3 Wiis so that they can be prepped for install.
 
Can't wait to see what you come up with for these builds! Wii portables are great projects for de-rusting your skill set like you said, so I'm also looking forward to seeing what you do after this too!

By the way, if you want some FDM printed shells for these, I offer a 3d printing service for $40 a shell where I'll 3d print you a shell in any color PLA comes in! If you want me to print you some shells for these, I'd be down to negotiate a deal with you. You can find details about my 3d printing service here. If you're interested, shoot me a dm on either here or discord!

Shameless plug aside, I always love seeing what color schemes people come up and how manage their wiring. Good luck with these!
 
Well, update time!

I finally received all the parts I needed, but I ran into a bit of a twist. One of the 4-layer Wiis I had wasn’t really fit for portablizing, which left me with an extra shell on hand. That got me thinking about my very first portable build; it’s been through a lot, and the shell has broken twice already. So, I decided to retire the old Wii from that build and give it a well-deserved upgrade.

This also felt like the perfect opportunity to add in a direct drive (DD), and I’m happy to say the installation went off without a hitch. While I was at it, I modified the shell just slightly so the glass screen could sit flush. To keep the screen firmly in place, I adhered the bracket directly to the screen and added a bit of hot glue at the bottom of the bracket to keep the screen secure.


Originally, I had my MX chip mounted on top of the trimmed Wii, but thanks to the extra space saved by switching to the DD, I was able to relocate the MX chip onto the screen bracket itself. It’s a cleaner setup overall.


I also moved the rumble motor to the right handle for a more balanced and immersive feel during gameplay.


Lastly, I took the time to populate the remaining Ashida boards to prep for trimming the other Wiis. Progress is rolling again, and I’m excited to see how the next stages turn out!
IMG_20250825_230408463.webpIMG_20250825_230509462.webpIMG_20250825_214036929.webp
By the way, if you want some FDM printed shells for these, I offer a 3d printing service for $40 a shell where I'll 3d print you a shell in any color PLA comes in! If you want me to print you some shells for these, I'd be down to negotiate a deal with you. You can find details about my 3d printing service here. If you're interested, shoot me a dm on either here or discord!
While I do have my own 3D printers trust that I keep this in mind. While I ended up getting my shells from PCBway I do have to get a GBoy built at some point and I could use a service like yours.
 

Attachments

  • IMG_20250817_205607184.webp
    IMG_20250817_205607184.webp
    2.8 MB · Views: 62
  • IMG_20250824_214745339.webp
    IMG_20250824_214745339.webp
    2.6 MB · Views: 60
Second Ashida Done which means it's time for the second update!

Since last update, I cut out two more Wiis. One was a standard OMGWTF trim, while the other got a ThunderVolt (TV) and a NAND relocation, then trimmed just around the PTHs. I know it's not the tightest Omega trim, but it's for practice and definitely overkill for an Ashida.

IMG_20250825_175240472.webpIMG_20250831_185506111.webp

I'm not great at taking photos during the building progress so apologies for the lack of photos. Originally, I was planning on doing a standard Ashida build but I may have jumped directly to my OmegAshida (OA).

Thanks to the TV testing the trim with the Direct Drive (DD) installed was pretty straightforward, and everything checked out fine! (outside of error on line 409)

IMG_20250831_214416209.webp

Next, I wanted to consolidate the jank, so I decided to take the screen from the first build and transplant it to the OA. Which meant that the top shell and MX chip originally from the first build went to the OA. Luckily, that means that I could just take one of the other MX chips I cut out and set it up for the first build.

IMG_20250902_213209237.webpTwoShida2.webp

For the non-glass screen, I also cut a piece of 1mm plexiglass to use as a screen protector between the LCD and the outside world.

I will say, having a smaller trim in the Ashida makes it so much nicer; you can just keep the Wii screwed into the Ashida while testing. That works great unless you need to troubleshoot something on the underside of the board.

The first issue I ran into was the TV "working" but not communicating with the Wii at all. After some troubleshooting and talking to @YveltalGriffin we came to the conclusion that it needs to get a look taken at it through a logic analyzer.

IMG_20250903_024643246.webp

The second issue involved the Bluetooth module which I glued to a very inconvenient spot that required me to desolder it when going to check the TV. When I resoldered the BT module, it wasn't working because the USB data lines broke off on the bottom. Then I discovered a cold solder joint on ground which took me a lot longer to find then I would like to admit.

After working through those issues, the second Ashida is “working” perfectly, except for the TV issue. The first Ashida, however, has started freezing, which seems to be a common problem with Ashida DD builds. I think I need to rewire the first build and clean up some of the excess slack in the wiring. But hey, both of them are looking pretty good!

Feel free to check out the builds!

IMG_20250902_224258735.webpIMG_20250902_224305015.webpIMG_20250902_224314946.webpIMG_20250903_005604105.webpIMG_20250903_005609580.webpTwoShida.webp

looking good! What glass screen are you using?
It looks clean!

The screen I'm using is actually a broken digitizer from Bigtreetech that I had laying around from a different project a while back. It just so happens that the screens are the same size so swapping was a breeze.
 
Last edited:
So unfortunately I didn’t take any progress photos of this last Ashida. To be fair there wasn’t really any issues with building it so it was a very uneventful build. The only really fun/interesting thing I did was to use test pads and the pads for the video caps to make it so no magnet wire stretched across the shell halves. I also adhered the Bluetooth module and the MX chip on the top half of the shell because I hate the idea of glueing them onto the Wii itself. So here are some photos I took after I finished it.

IMG_6654.webpIMG_6653.webpIMG_6651.webpIMG_6650.webpIMG_6649.webpIMG_6648.webpIMG_6647.webp

I will say some updates: I did fix the headphone issues with both my Ashida and the one I just built, but the second still has the audio issue. Also, I installed something to help with SnapBack which is something that has always annoyed me.

I think that’s about it for the Ashidas I was building and honestly could not be happier to not have parts just sitting at my workbench. I think it was a good test for my modifying abilities but once you’ve done one Ashida you’ve really done them all.
 
Back
Top