
stitches is a geniusHave you verified that your USB data wires are in the correct orientation?
You are using an out of date browser. It may not display this or other websites correctly.
You should upgrade or use an alternative browser.
You should upgrade or use an alternative browser.
Worklog Blue G-Wii
- Thread starter atkfromabove
- Start date
- Joined
- Oct 5, 2019
- Messages
- 132
- Likes
- 124
- Portables
- 2
I'm trying to figure out where the GC+ connects to on the Wii motherboard.
I have the original GC+ and I found the documentation (https://bitbuilt.net/forums/index.php?threads/gc-documentation.695/), but I don't know where the + and - lines go. The document just says 3.3v and GND.
I have the original GC+ and I found the documentation (https://bitbuilt.net/forums/index.php?threads/gc-documentation.695/), but I don't know where the + and - lines go. The document just says 3.3v and GND.
Everyone does it once lul, you're one of us now

The GC+ needs to be powered, so you need to run a 3.3v wire from the Wii/PMS to the + pad, and run a ground wire from the Wii/PMS to the - padI'm trying to figure out where the GC+ connects to on the Wii motherboard.
I have the original GC+ and I found the documentation (https://bitbuilt.net/forums/index.php?threads/gc-documentation.695/), but I don't know where the + and - lines go. The document just says 3.3v and GND.
- Joined
- Oct 5, 2019
- Messages
- 132
- Likes
- 124
- Portables
- 2
Once the GC+ has power how does it communicate with the wii exactly? Are there data pins that I need to connect to the wii motherboard?Everyone does it once lul, you're one of us now
The GC+ needs to be powered, so you need to run a 3.3v wire from the Wii/PMS to the + pad, and run a ground wire from the Wii/PMS to the - pad
The D pin on the GC+ needs to be wired to the controller 1 data line, which is hereOnce the GC+ has power how does it communicate with the wii exactly? Are there data pins that I need to connect to the wii motherboard?
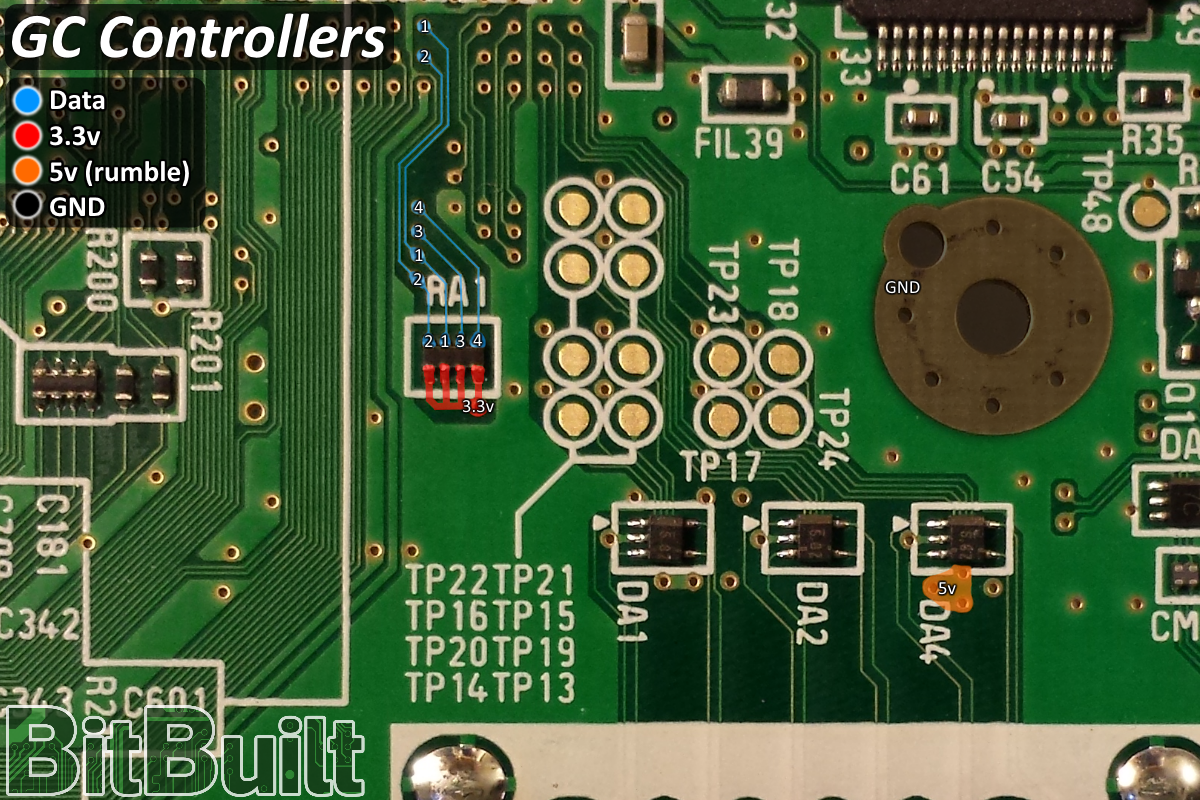
The wire doesn't need to be shielded, but don't make it excessively long
- Joined
- Oct 5, 2019
- Messages
- 132
- Likes
- 124
- Portables
- 2
Just got done wiring up all the buttons but my sticks both aren't working properly.The D pin on the GC+ needs to be wired to the controller 1 data line, which is here
The wire doesn't need to be shielded, but don't make it excessively long
The C-Stick will sometimes register but it is stuck to the right. The Joystick won't recognize at all.
I wired up the 3.3v lines on the joysticks to each other. Is that okay or do they need their own 3.3v lines for X and Y?
Edit: I might not have any 3.3v going to the joysticks at all. Where is the best place to get 3.3v from for the joysticks?
Edit #2: It was for sure the 3.3v issue. I connected up 3.3v and both joysticks now work!!!!!
Last edited:
- Joined
- Oct 5, 2019
- Messages
- 132
- Likes
- 124
- Portables
- 2
Now that the buttons are in I decided to test out a Gamecube game and the screen went all funky and put the game to the left side for some reason.
Any clue what to do to fix the screen issue?
It is fine when I boot into RVLoader but when I entered the game I got an auto adjust to the weird screen size.

Any clue what to do to fix the screen issue?
It is fine when I boot into RVLoader but when I entered the game I got an auto adjust to the weird screen size.
To shift the picture, you'll need to use the screen buttons board. There's a display offset in the OSD settings panelNow that the buttons are in I decided to test out a Gamecube game and the screen went all funky and put the game to the left side for some reason.
Any clue what to do to fix the screen issue?
It is fine when I boot into RVLoader but when I entered the game I got an auto adjust to the weird screen size.
View attachment 27524
- Joined
- Oct 5, 2019
- Messages
- 132
- Likes
- 124
- Portables
- 2
I am not seeing any power options inside of RVLoader. I was wanting to test my addressable led but I only have 4 options inside of settings.
Have you wired SCW and SDW on the PMS to the correct i2c vias on the Wii?I am not seeing any power options inside of RVLoader. I was wanting to test my addressable led but I only have 4 options inside of settings.
- Joined
- Oct 5, 2019
- Messages
- 132
- Likes
- 124
- Portables
- 2
That was the issue SDW wasn't connected properly, but I still cannot get the addressable LED to light up. I've checked to make sure the line are okay and they look good.Have you wired SCW and SDW on the PMS to the correct i2c vias on the Wii?
- Joined
- Oct 5, 2019
- Messages
- 132
- Likes
- 124
- Portables
- 2
I'm getting ready to wire up the audio now. I am not familiar with speakers.
Do they have a polarity on + and - or does it not matter?
I have these speakers https://www.digikey.com/en/products/detail/soberton-inc/SP-1511S-3/6099101
The datasheet doesn't seem to reference the pins on the back of the speakers for any kind of polarity.
Additional question: If I don't plan on using a headphone jack can I just use the right and left analog audio or should I use the I2S audio?
No polarity, you just need both terminals to be properly connected. Some people have had an issue where the speaker tabs don't make good contact with the PCB, so if that happens, you can fix it by either bending the contacts out or soldering a wire between the board and the speaker contacts.I'm getting ready to wire up the audio now. I am not familiar with speakers.
Do they have a polarity on + and - or does it not matter?
I have these speakers https://www.digikey.com/en/products/detail/soberton-inc/SP-1511S-3/6099101
The datasheet doesn't seem to reference the pins on the back of the speakers for any kind of polarity.
Additional question: If I don't plan on using a headphone jack can I just use the right and left analog audio or should I use the I2S audio?
i2s audio is higher quality and has less noise, but ultimately it's up to you whether to use it or not. It'll all work the same in the end
- Joined
- Oct 5, 2019
- Messages
- 132
- Likes
- 124
- Portables
- 2
Decided to hook up i2s instead.No polarity, you just need both terminals to be properly connected. Some people have had an issue where the speaker tabs don't make good contact with the PCB, so if that happens, you can fix it by either bending the contacts out or soldering a wire between the board and the speaker contacts.
i2s audio is higher quality and has less noise, but ultimately it's up to you whether to use it or not. It'll all work the same in the end
Does the audio by default set to 0?
I am wanting to test if I got it working but I haven't hooked up my + and - volume buttons yet.
I don't know the default volume setting, but you can poke the +- pads with a ground wire to simulate pressing a button to find out
- Joined
- Oct 5, 2019
- Messages
- 132
- Likes
- 124
- Portables
- 2
I am needing to now wire up my screen control board to the bottom buttons.
I have the same board as the person in this thread (https://bitbuilt.net/forums/index.php?threads/g-wii-yellow.4453/page-2#lg=thread-4453&slide=92) but they wired up each of the positive points together. I'm a bit confused how they wired them up to work.
Shouldn't I be wiring up each of the ground wires together and not the positives?
- Joined
- Oct 5, 2019
- Messages
- 132
- Likes
- 124
- Portables
- 2
Guys,.... I think I am DONE!!!
I just got audio and screen controls finished up.
The only thing still not working is my addressable LED but I don't think I care about it.
Here is a shot of the inside and working!


I just got audio and screen controls finished up.
The only thing still not working is my addressable LED but I don't think I care about it.
Here is a shot of the inside and working!
- Joined
- Oct 5, 2019
- Messages
- 132
- Likes
- 124
- Portables
- 2
Well after some more testing I am getting weird phantom presses on my R and L buttons. I've checked the lines multiple times and they seem okay. Not sure what the problem is.
I'm a bit worried about them since they are going to be a pain in the ass to work on given their position next to the batteries.
Edit: Got some info from people on discord, I think I need to solder 3.3v to the - leg on the button for L and R instead of ground. I'll try this when I get home and I'll update if it works or not.
Last edited: