drum6789
.
TL;DR was working on a similar Wii project, broke my first board and I won't be able to trim for a while (the maker space where I would is under renovation). So I did some smaller projects to improve my soldering. Word of advice if you're a beginner like me - use leaded solder and make sure you have the right thickness wire. Soldering got _dramatically_ easier when I wasn't trying to use lead-free solder to connect thick wire to a via.
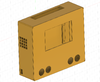
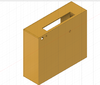
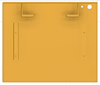
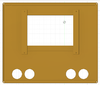
After the magic of going on eBay after a few beers*, an N64 arrived on my doorstep and a new project started. In summary, the goal is to make a 6x6 battery powered arcade cabinet with an N64 inside. Not going for any size records, I just want to see this project from start to finish. It'll use controller ports rather than an integrated controller since a big goal of this is multiplayer. I hope to design the case such that I could swap out the arcade "faceplate" with an integrated controller eventually.
So far, was able to get the system and screen running on battery power, and finally got the cartridge reloaction working. If you're reading this, and you're considering your own N64 project, note that the catridge ports you want to connect to are NOT the through holes the cartridge holder pokes through. Found that one out the hard way only after wiring it all up and debugging for longer than I'd want to admit. But that doesn't matter because I got it all working today!
Attached a photo, forgive the cord mess - I plan on redoing some of the rougher soldering points now that I know everything works, and I'll finalize the cord placement once I have the case planned out. Probably not doing a relocation of the expansion pack, since the arcade design will actually let me hide this.
*I cannot endorse this as a smart idea
Attachments
-
 1.2 MB Views: 8