
- Joined
- Apr 22, 2020
- Messages
- 2
- Likes
- 9
Hey guys, after being registered here for a bit, and saying hello in the forums, I thought I’d share a project I’ve been planning and working on over the last few months that’s nearing completion.
I generally have really gotten into the gameboy macro scene - you can see what I’ve been doing over on Instagram @Jamesyplays
but I knew I could push myself further!
So I’ve been creating a ds lite inside a gameboy pocket, the smallest and most ridiculous way of doing this, because it’s form factor is so small it is very limiting, but hey go hard or go home right?
I started by taking a ds lite motherboard that I’d used for parts harvest that still booted, and began looking at how I could remove at least 5mm to fit inside the pocket, after hours of hairline sanding and constant testing I got to the perfect trim to fit without losing function.
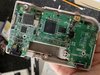
It fitted perfectly, but this in turn threw up some issues, I didn’t want to get into moving components, and I didnt take into account some of the limitations, such as the WiFi module has to stay in place, the screen (which I have a ribbon extender for) wouldn’t reach where I wanted it to etc. Now I could use magnet wire and solder the ribbon to the board to extend, but one, I’m still learning when it comes to that, and two, I can barely see through my right eye after an accident so it’s incredibly difficult for me to focus properly on such fine soldering at the moment.
so I had two choices, scrap the project or rethink - I chose rethink! I flipped the board 180 so the battery was at the top, and crucially so was the screen connector. By a happy coincidence, the battery was a perfect fit for the cart slot, and whilst I’d love to have moved the gba cart slot to its original position in a pocket, the aforementioned soldering process difficulty put pay to that, I tried three times, but you have to know when to give up! As my plan was to use an R4 card, to basically allow this to play GB and GBC games, I fell on my sword and decided that this was the best way forward to progress the project.
As you can see - perfect fit!
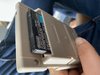
then it was a case of trimming the inside of the shell, which to be honest, it’s totally gutted, which brings about other issues, but more on that later!
Using a controller PCB from a fellow modder who was kind enough to share with me, and an 8 week wait for the PCBs to arrive I set about getting this all working.
first up was making sure that the ds lite worked inside the case - and it did!
I then set about installing the buttons and hooking them up to test if they were going to work
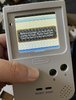
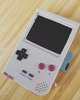
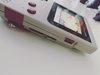
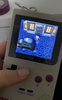
Then I wanted to see how the software would work, and to see how much of the screen surround I was going to have to remove, which turned out to be a lot! But the great thing is the emulator I use gives you the option of using custom made borders, which I did using illustrator and photoshop, to leave it at a normal aspect ratio, or a scaled up aspect ratio as seen here
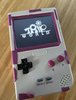
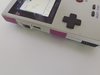
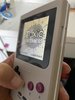
as you can tell, one of my biggest problems I have been facing is how to close the shell up, everything is super tight in there, and all the original screw posts are defunct now, so for a while you’re just seeing it closed together with some lovely purple electrical tape! But bear with me as I’ve got a solution planned!
I also wanted to allow a space for access to the micro SD card for the R4 card, but where this fell in the shell space it was unfeasible, so I actually created an entire DS slot, which actually doesn’t interfere with where you hold it, and you wouldn’t notice until you see it. I also installed an R button (you can see it hanging out on the red wire) I mainly did this because you need that button to access the menu in the emulator, I will put in an L button too, just for balance - these are going in the back of the shell.
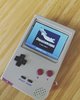
(Dragonborne is a homebrew game made by Spacebot Interactive - it’s a fantastic game so please check it out!)
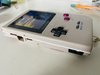
Although you can see in the following pictures it would close up, like I said, it was super tight, and to be honest if I left it that way it would work, but I wouldn’t know for how long - probably one bump and something may get dislodged.
So I got thinking, and testing, I knew what I needed to do - I was just hesitant because I didn’t want to feel like I was cheating the project, but I knew that for the sake of getting it to work, I needed slightly more depth in the pocket. So I set about crudely testing this using some styrene I had lying about.
No this builds it up about 2mm, and doesn’t affect the profile too much, so with this in mind, I’m currently designing a bracket that is sandwiched between the two shells, which will be laser cut using 3mm acrylic and 2mm HIPs to gauge which is better, which will also give me elements needed to screw the shell together.
The battery will be encased in a GB reproduction cartridge shell, and will inevitably all be painted up and decals added to finish off the project. I’m super happy with where it is at this stage, with still some left to do, but the principle and projects works - again I have videos of more of the process on Instagram (I just didn’t know if I could put videos here!)
please keep an eye out on this, as I will update as the project continues, and if you have any questions I’ll do my best to answer them!
Oh and by the way, there are still some DS games that can be played on one screen without touch - animal crossing being one!
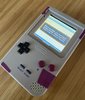
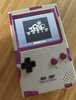
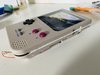
And where I am at the minute:
And the hopefully eventual look of the handheld (but with some secrets not yet seen!)

I generally have really gotten into the gameboy macro scene - you can see what I’ve been doing over on Instagram @Jamesyplays
but I knew I could push myself further!
So I’ve been creating a ds lite inside a gameboy pocket, the smallest and most ridiculous way of doing this, because it’s form factor is so small it is very limiting, but hey go hard or go home right?
I started by taking a ds lite motherboard that I’d used for parts harvest that still booted, and began looking at how I could remove at least 5mm to fit inside the pocket, after hours of hairline sanding and constant testing I got to the perfect trim to fit without losing function.
It fitted perfectly, but this in turn threw up some issues, I didn’t want to get into moving components, and I didnt take into account some of the limitations, such as the WiFi module has to stay in place, the screen (which I have a ribbon extender for) wouldn’t reach where I wanted it to etc. Now I could use magnet wire and solder the ribbon to the board to extend, but one, I’m still learning when it comes to that, and two, I can barely see through my right eye after an accident so it’s incredibly difficult for me to focus properly on such fine soldering at the moment.
so I had two choices, scrap the project or rethink - I chose rethink! I flipped the board 180 so the battery was at the top, and crucially so was the screen connector. By a happy coincidence, the battery was a perfect fit for the cart slot, and whilst I’d love to have moved the gba cart slot to its original position in a pocket, the aforementioned soldering process difficulty put pay to that, I tried three times, but you have to know when to give up! As my plan was to use an R4 card, to basically allow this to play GB and GBC games, I fell on my sword and decided that this was the best way forward to progress the project.
As you can see - perfect fit!
then it was a case of trimming the inside of the shell, which to be honest, it’s totally gutted, which brings about other issues, but more on that later!
Using a controller PCB from a fellow modder who was kind enough to share with me, and an 8 week wait for the PCBs to arrive I set about getting this all working.
first up was making sure that the ds lite worked inside the case - and it did!
I then set about installing the buttons and hooking them up to test if they were going to work
Then I wanted to see how the software would work, and to see how much of the screen surround I was going to have to remove, which turned out to be a lot! But the great thing is the emulator I use gives you the option of using custom made borders, which I did using illustrator and photoshop, to leave it at a normal aspect ratio, or a scaled up aspect ratio as seen here
as you can tell, one of my biggest problems I have been facing is how to close the shell up, everything is super tight in there, and all the original screw posts are defunct now, so for a while you’re just seeing it closed together with some lovely purple electrical tape! But bear with me as I’ve got a solution planned!
I also wanted to allow a space for access to the micro SD card for the R4 card, but where this fell in the shell space it was unfeasible, so I actually created an entire DS slot, which actually doesn’t interfere with where you hold it, and you wouldn’t notice until you see it. I also installed an R button (you can see it hanging out on the red wire) I mainly did this because you need that button to access the menu in the emulator, I will put in an L button too, just for balance - these are going in the back of the shell.
(Dragonborne is a homebrew game made by Spacebot Interactive - it’s a fantastic game so please check it out!)
Although you can see in the following pictures it would close up, like I said, it was super tight, and to be honest if I left it that way it would work, but I wouldn’t know for how long - probably one bump and something may get dislodged.
So I got thinking, and testing, I knew what I needed to do - I was just hesitant because I didn’t want to feel like I was cheating the project, but I knew that for the sake of getting it to work, I needed slightly more depth in the pocket. So I set about crudely testing this using some styrene I had lying about.
No this builds it up about 2mm, and doesn’t affect the profile too much, so with this in mind, I’m currently designing a bracket that is sandwiched between the two shells, which will be laser cut using 3mm acrylic and 2mm HIPs to gauge which is better, which will also give me elements needed to screw the shell together.
The battery will be encased in a GB reproduction cartridge shell, and will inevitably all be painted up and decals added to finish off the project. I’m super happy with where it is at this stage, with still some left to do, but the principle and projects works - again I have videos of more of the process on Instagram (I just didn’t know if I could put videos here!)
please keep an eye out on this, as I will update as the project continues, and if you have any questions I’ll do my best to answer them!
Oh and by the way, there are still some DS games that can be played on one screen without touch - animal crossing being one!
And where I am at the minute:
And the hopefully eventual look of the handheld (but with some secrets not yet seen!)
Attachments
-
 2.5 MB Views: 916