- Joined
- Sep 27, 2025
- Messages
- 74
- Likes
- 50
Here goes nothing.
So about just over a year ago, I found a YouTube video by stop skeletons from fighting, about how he had accuired two N64 controllers that had been smashed together, creating a "dual analog controller". I wanted one, and checked all of the articles I could find, but no one had any info on how to do so. So after figuring it out by myself, I thought I'd post a tutorial here so you don't have to go insane trying to make your own.
Step 1:
You need to buy 2 N64 controllers that you won't mind absolutely destroying. I planned to replace the joysticks in mine so it didn't matter to me what condition they were in. You need to then take apart both controllers and clean them.
Then get a Dremel or hacksaw.
Step 2:
Cut the controllers as shown, making sure the cut is not diagonal. Then sand smooth.


Step 3:
Making sure the parts are aligned, tape the joint from underneath, sand and clean the areas to be glued, and use jb weld 15 min. plastic bonder to fuse the parts.

Try to make sure that the epoxy doesn't block where the circuit boards go latter, or more sanding will be required.
Step 4:
Once the bottom half is dried, place the top halves on top, with tape underneath to keep the epoxy from leaking. Repeat the process from step 3.

It is important to note here that the right start button needs to be filled in. This is because in game, in the pause menu, the only exit is from the controller that paused to begin with. The player 2 side of the controller has only the joystick and z button, so removing the right start button keeps us from getting trapped in game.
Step 5:
Sanding, lots of sanding. Breathing mask required for this part.
Sand the joint flush with the controller without damaging the rest of the shell.
 You may want to lightly sand the rest of the shell now for painting latter.
Step 6:
You now need to fill in the gap in the area where the center l and r buttons were. Do NOT use bondo. Use jb weld epoxy putty. Give it several hours before sanding. I personally used a metal file for a flat finish.

Make sure no epoxy is blocking where the circuit boards need to go for the next step.
Step 7:
Get some wire, (I used 0.01 mm) and then cut the circuit boards as shown.
 Isolate the contacts for the r and face buttons, then wire power and outputs to the left side. The right joystick and z button should remain connected to the right controller side, and stay functional.
Step 8:
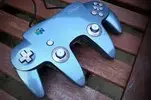
Paint the shell any color. I used Rust-Oleum 2x primer, paint, and gloss clear coat.

Step 9:
Reassemble controller and test.


Congratulations, you can now play dual analog GoldenEye and podracer.
As far as I know, only three people have built this before me, and only two of those used OEM controllers. The major difference is that I used only epoxy, and left the controller pak slots operational.
Hope this thread is useful. Feel free to ask questions.
So about just over a year ago, I found a YouTube video by stop skeletons from fighting, about how he had accuired two N64 controllers that had been smashed together, creating a "dual analog controller". I wanted one, and checked all of the articles I could find, but no one had any info on how to do so. So after figuring it out by myself, I thought I'd post a tutorial here so you don't have to go insane trying to make your own.
Step 1:
You need to buy 2 N64 controllers that you won't mind absolutely destroying. I planned to replace the joysticks in mine so it didn't matter to me what condition they were in. You need to then take apart both controllers and clean them.
Then get a Dremel or hacksaw.
Step 2:
Cut the controllers as shown, making sure the cut is not diagonal. Then sand smooth.
Step 3:
Making sure the parts are aligned, tape the joint from underneath, sand and clean the areas to be glued, and use jb weld 15 min. plastic bonder to fuse the parts.
Try to make sure that the epoxy doesn't block where the circuit boards go latter, or more sanding will be required.
Step 4:
Once the bottom half is dried, place the top halves on top, with tape underneath to keep the epoxy from leaking. Repeat the process from step 3.
It is important to note here that the right start button needs to be filled in. This is because in game, in the pause menu, the only exit is from the controller that paused to begin with. The player 2 side of the controller has only the joystick and z button, so removing the right start button keeps us from getting trapped in game.
Step 5:
Sanding, lots of sanding. Breathing mask required for this part.
Sand the joint flush with the controller without damaging the rest of the shell.
Step 6:
You now need to fill in the gap in the area where the center l and r buttons were. Do NOT use bondo. Use jb weld epoxy putty. Give it several hours before sanding. I personally used a metal file for a flat finish.
Make sure no epoxy is blocking where the circuit boards need to go for the next step.
Step 7:
Get some wire, (I used 0.01 mm) and then cut the circuit boards as shown.
Step 8:
Paint the shell any color. I used Rust-Oleum 2x primer, paint, and gloss clear coat.
Step 9:
Reassemble controller and test.
Congratulations, you can now play dual analog GoldenEye and podracer.
As far as I know, only three people have built this before me, and only two of those used OEM controllers. The major difference is that I used only epoxy, and left the controller pak slots operational.
Hope this thread is useful. Feel free to ask questions.
")