- Joined
- Sep 3, 2020
- Messages
- 406
- Likes
- 929
- Portables
- 8
Now that OpeN64 is finished, it's time for the fun part: Making cool stuff with it!
After much deliberation, I settled on making a second revision of Cyxty Four for my first N64 AIO project. Cyxty Four rev 1's internals were okay at best, and downright unacceptable for modern standards at worst... Here's what I'm talking about:

Under the motherboard, it's looking a bit like the G-Wii almost. Some things are like the charging board, PMS, U-Amp, and RGB LED are okay. Other things like the Volume wheel, USB port, and tact switches have a ton of room for improvement though.
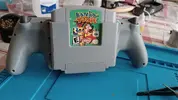
And then we have the front internals...

This is just sad... Trimmed controller PCBs with a magnet wire for every button? And what the hell is going on with that joystick PCB being stacked over the trimmed controller? Yeah... This project was rushed and the internals show it...
As a proof of concept, and a lazy "I just want an N64 portable" type system, Cyxty Four does it's job. And that's fine, because that's exactly what Cyxty Four is! But it's not a good portable for modern day portablizing standards. Cyxty Four Rev 2 is setting out to fix this first and foremost!
Next up, Cyxty Four is REALLY large, and kind of heavy... Let's analyze why this is...


Okay, so we're actually doing extremely well on the Y axis! The console isn't any taller than the original controller or the screen which is great! I'd dare to say there isn't any room for improvement here!
On the Z axis, the Cyxty Four is also around the same thickness as the N64HH, we can replace the 21700 with an 18650 though and we can actually gain battery life in the process of doing so thanks battery advancements! This will also lead to us reducing the overall thickness by a few millimeters, and the weight will also be reduced!
Finally, let's look at the X axis... Oh wow... There's actually a lot of room for improvement it seems. What can we improve though? There's a decent bit of wasted space on the inside, so there's no reason we can't make this design a bit tighter from an internal perspective - especially with an AIO motherboard!
What about on the outside? Well, I learned during the process of iterative design that the grips need to come out quite a ways in order to ensure this portable is comfortable. So lest we make the console uncomfortable, reducing how far the grips come out isn't really on the table. So what about the center body? Well, the center needs to be decently long here in order to accommodate the cartridge slot...
So is all hope lost? Well... Not just yet. After a ton of brainstorming, I came up with a way to save up to 20mm of space along the X axis! This should reduce the console's overall weight, and will hopefully improve portability on the console's most offending axis... I'll get to how we'll be saving all this space in a bit though.
Before we move on, let's also compare Cyxty Four to the Ashida, this should benchmark Cyxty Four a bit allowing us to see if Cyxty Four is even a good portable by comparing it with a console that is widely accepted to be good by the community. Cyxty Four is quite a bit longer than the Ashida, but the N64 is notoriously difficult to make small, so maybe this is due to the mid section of the Cyxty Four? Let's have a closer look...

Wait what? This can't be right?! The Cyxty Four's mid section is actually around the same size as the Ashida's mid section?! One could even say that it's smaller... So are the grips on this console (the only non-negotiable) really holding it back that much? It looks like maybe they are! But there isn't a ton I can do about this without completely redesigning this project and arguably turning it into something it's not supposed to be.
So to answer my original question here, "is Cyxty Four even a good portable?!" ehh, it's okay, It feels great in the hands! I've spent many many hours enjoying N64 games on it and from my experience of using it extensively, the length of the console is what holds it back more than anything else. The console is also a bit heavy which is a little annoying, but it's weight feels very similar to the Ashida, so it isn't that bad. The grips will be a huge challenge to work with though, and it's length needs to be reduced by quite a bit (which will be a HUGE uphill battle) if we want to end up with something good. So I'll see what I can do with that...
Another feature that would be nice to add would be full screen control support to adjust things like contrast and brightness without needing to open the unit. Let's add that to the list.
Finally, Cyxty Four rev 1 featured composite video out, and 4 player multiplayer support over USB 3.0 with a breakout box. This is an extremely cool feature, but it isn't at all necessary to make Cyxty Four a good portable overall. I don't want to remove this feature if I don't have to, but removing it is definitely on the table if it'll help cut down on internals. For now, the goal will be to keep these awesome features. If this goal can't be met however, it's not that big of a deal.
So for right now, my checklist for improving this build is as follows:
- Streamline internals (like REALLY streamline the ever living crap out of them...)
- Thin out the cartridge slot and battery holding area by a few millimeters to fit the new battery cell
- Replace the 21700 with an 18650 to reduce weight and increase battery life (yes seriously!)
- Somehow shorten the length of the portable by 20mm?! (Even I'm doubting my ability to pull this one off despite having figured it out already)
- Add extra buttons for screen control support
- Keep video out, and 4 player multiplayer support if possible
I've already done quite a bit of work on this project, so let's go over that:

By comparison, this is the original front:

As you can see, I'm still trying to figure out how to handle where the speakers will go. But hopefully this drives home the difference between how rev 2 is looking compared to rev 1. I think this is going to be a lot more comfortable in the hands!
Now for the back on rev 2:

This doesn't look too different at a glance, but it is shorter. The cartridge slot housing can't be reduced which is really going to make this difficult. As you can tell by the floating screw posts, I also need to rework how it'll mount on the back. I have a few ideas on how I can reduce the size of the cart slot housing by a bit though.
Now for the star of the show, the AIO:


This is very very much a WIP and numerous things on this board are subject to change. I only just finished getting the edge cuts set up, and I'm expecting those will be changing to better make use of internal space.
Meeting the goals of Cyxty Four rev2 is going to be a HUGE challenge. This AIO is the one ace I have up my sleeve though, and if I do everything correctly, I should be able to achieve the goals I've set up here. Video out and 4 player multiplayer will be very difficult to work in too. I might end up designing a daughter board to go under the motherboard if I'm unable to fit everything on it. I'd prefer to avoid this if possible though since it'll increase the number of wires in the end.
After much deliberation, I settled on making a second revision of Cyxty Four for my first N64 AIO project. Cyxty Four rev 1's internals were okay at best, and downright unacceptable for modern standards at worst... Here's what I'm talking about:
Under the motherboard, it's looking a bit like the G-Wii almost. Some things are like the charging board, PMS, U-Amp, and RGB LED are okay. Other things like the Volume wheel, USB port, and tact switches have a ton of room for improvement though.
And then we have the front internals...
This is just sad... Trimmed controller PCBs with a magnet wire for every button? And what the hell is going on with that joystick PCB being stacked over the trimmed controller? Yeah... This project was rushed and the internals show it...
As a proof of concept, and a lazy "I just want an N64 portable" type system, Cyxty Four does it's job. And that's fine, because that's exactly what Cyxty Four is! But it's not a good portable for modern day portablizing standards. Cyxty Four Rev 2 is setting out to fix this first and foremost!
Next up, Cyxty Four is REALLY large, and kind of heavy... Let's analyze why this is...
Okay, so we're actually doing extremely well on the Y axis! The console isn't any taller than the original controller or the screen which is great! I'd dare to say there isn't any room for improvement here!
On the Z axis, the Cyxty Four is also around the same thickness as the N64HH, we can replace the 21700 with an 18650 though and we can actually gain battery life in the process of doing so thanks battery advancements! This will also lead to us reducing the overall thickness by a few millimeters, and the weight will also be reduced!
Finally, let's look at the X axis... Oh wow... There's actually a lot of room for improvement it seems. What can we improve though? There's a decent bit of wasted space on the inside, so there's no reason we can't make this design a bit tighter from an internal perspective - especially with an AIO motherboard!
What about on the outside? Well, I learned during the process of iterative design that the grips need to come out quite a ways in order to ensure this portable is comfortable. So lest we make the console uncomfortable, reducing how far the grips come out isn't really on the table. So what about the center body? Well, the center needs to be decently long here in order to accommodate the cartridge slot...
So is all hope lost? Well... Not just yet. After a ton of brainstorming, I came up with a way to save up to 20mm of space along the X axis! This should reduce the console's overall weight, and will hopefully improve portability on the console's most offending axis... I'll get to how we'll be saving all this space in a bit though.
Before we move on, let's also compare Cyxty Four to the Ashida, this should benchmark Cyxty Four a bit allowing us to see if Cyxty Four is even a good portable by comparing it with a console that is widely accepted to be good by the community. Cyxty Four is quite a bit longer than the Ashida, but the N64 is notoriously difficult to make small, so maybe this is due to the mid section of the Cyxty Four? Let's have a closer look...
Wait what? This can't be right?! The Cyxty Four's mid section is actually around the same size as the Ashida's mid section?! One could even say that it's smaller... So are the grips on this console (the only non-negotiable) really holding it back that much? It looks like maybe they are! But there isn't a ton I can do about this without completely redesigning this project and arguably turning it into something it's not supposed to be.
So to answer my original question here, "is Cyxty Four even a good portable?!" ehh, it's okay, It feels great in the hands! I've spent many many hours enjoying N64 games on it and from my experience of using it extensively, the length of the console is what holds it back more than anything else. The console is also a bit heavy which is a little annoying, but it's weight feels very similar to the Ashida, so it isn't that bad. The grips will be a huge challenge to work with though, and it's length needs to be reduced by quite a bit (which will be a HUGE uphill battle) if we want to end up with something good. So I'll see what I can do with that...
Another feature that would be nice to add would be full screen control support to adjust things like contrast and brightness without needing to open the unit. Let's add that to the list.
Finally, Cyxty Four rev 1 featured composite video out, and 4 player multiplayer support over USB 3.0 with a breakout box. This is an extremely cool feature, but it isn't at all necessary to make Cyxty Four a good portable overall. I don't want to remove this feature if I don't have to, but removing it is definitely on the table if it'll help cut down on internals. For now, the goal will be to keep these awesome features. If this goal can't be met however, it's not that big of a deal.
So for right now, my checklist for improving this build is as follows:
- Streamline internals (like REALLY streamline the ever living crap out of them...)
- Thin out the cartridge slot and battery holding area by a few millimeters to fit the new battery cell
- Replace the 21700 with an 18650 to reduce weight and increase battery life (yes seriously!)
- Somehow shorten the length of the portable by 20mm?! (Even I'm doubting my ability to pull this one off despite having figured it out already)
- Add extra buttons for screen control support
- Keep video out, and 4 player multiplayer support if possible
I've already done quite a bit of work on this project, so let's go over that:
By comparison, this is the original front:
As you can see, I'm still trying to figure out how to handle where the speakers will go. But hopefully this drives home the difference between how rev 2 is looking compared to rev 1. I think this is going to be a lot more comfortable in the hands!
Now for the back on rev 2:
This doesn't look too different at a glance, but it is shorter. The cartridge slot housing can't be reduced which is really going to make this difficult. As you can tell by the floating screw posts, I also need to rework how it'll mount on the back. I have a few ideas on how I can reduce the size of the cart slot housing by a bit though.
Now for the star of the show, the AIO:
This is very very much a WIP and numerous things on this board are subject to change. I only just finished getting the edge cuts set up, and I'm expecting those will be changing to better make use of internal space.
Meeting the goals of Cyxty Four rev2 is going to be a HUGE challenge. This AIO is the one ace I have up my sleeve though, and if I do everything correctly, I should be able to achieve the goals I've set up here. Video out and 4 player multiplayer will be very difficult to work in too. I might end up designing a daughter board to go under the motherboard if I'm unable to fit everything on it. I'd prefer to avoid this if possible though since it'll increase the number of wires in the end.