
- Joined
- Dec 10, 2016
- Messages
- 578
- Likes
- 663
- Location
- Constant Fear
- Portables
- sin^2(x) + cos^2(x) +e^(i*pi)
I’m not too entirely sure what I’m going to be doing for this Contest, most likely a portable, and wii. This first worklog will be for me going through Idea’s, and what’s done.
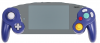
So far I haven’t gotten too far in anything, I have a couple of Case Idea’s, I have this one, Pretty much done, The only problem is that it doesn’t look nice, Sanding it is kind of hard, because it’s rubber, The Gamecube controller is all wired up though, just need to wait for my Solder braid to come in, so I can un short a short.
It was my first/second-ish time franken casing, It looks ugly, but I honestly love it, it’s comfortable in the hands, and surprisingly sturdy. The Epoxy I used, when dried/cured is rubbery, which doesn’t fare well for sanding. I wet sanded it a little bit, but it’s gonna take up a lot of sand paper. It’s pretty much a back up, incase I don’t get my other case 3d printed, but last resort, is still last resort. (there's a worklog for it somewhere)
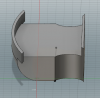
I had thought about modelling it in cad, and then gluing it to another gamecube controller, but that was harder than it sounded, atleast for me, because it didn’t turn out the way I wanted it to. The faceplate is okay, but the back was no fun, and no work. But the Concept I did in MSpaint doesn’t look too shabby.
This second one is from my Squiifer worklog, I wouldn’t mind finishing it for the contest, would look hella nice. I would have a couple Revisions for it though.
First; Usb C Implementation. This at first seemed very daunting(but a feature I’ve always wanted since before the switch) but using a chip(STUSB4500) Gman and Aurelio suggested, intergrating usb c into Gman’s battery board is litterally just two wires lol. And I already have Schematics and notes for using a usb drive with the usb c port aswell, so it already takes out the need for another slot. Here’s pictures of Progress, it’s from a couple days ago,
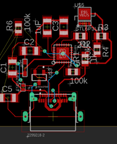
I’m at the point of adding components for the Usb Switching.
The Case itself is going to need a rework I think, because I want my usb c port at the bottom of the case, makes it look a little bit more official. Only problem is that the wii ventilation is there, so I’ll need to flip it pretty much, Haven’t looked into placement much yet, so I don’t know, I might be able to cram it ontop of it.
Here’s pics for anyone who forgot it, there’s a few updates since my last post on the thread
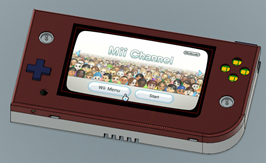
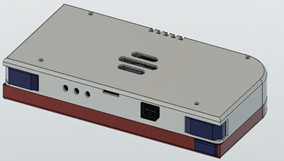
The most prominint change is that the fan vent is in the middle, instead of off of the side, which made it seem lop sided. Oh, also better Shoulder buttons.
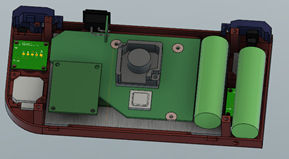
The second main thing that I can thing of to change is the audio, I want to use Aurelio’s Amp, because it’s super cool, and it does cool stuff. Instead of using a boring old regular amp, that can blow up my headphones and make me sad. I’d also like to find a better place for the Speakers(the two little holes in the front bottom of the case), I think they are fine there, but I’d rather a spot that looks a little better, and sounds better.
Here’s the planned internals if anyone’s curious.
The store ran out of about everything I needed, so I ordered stuff for some GC+’es, I also ordered a programmer, might aswell bite the bullet now I guess. Hoping to sell the other two if I can find anyone interested.
If I do find people interested, I’ll use the money to print my case, and some more PCB’s. (or maybe I’ll get more comissions :eyes: )I’m hoping my Heat gun gets replaced eventually, they sent me some more parts to replace it, if it doesn’t work this time I’m going to ask for a refund. This has been going on since the end of March lol.
Okay, last part of this work log.
Color schemes, and theme in general.
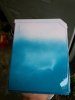
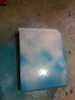
I’m aiming for a vaporwave / Lo fi, because I’m addicted to that stuff. My main plan for right now, is make a vaporwave theme, or just a lofi one, and use a cool color scheme I found on twitter, go check their stuff out, it’s really cool
I test painted today, and here they are (still wet, they will look better when dried)
That’s it for now, did you enjoy the text? And reading? Or should I do shorter work logs with more pictures? Don’t be afraid to let me know :3
So far I haven’t gotten too far in anything, I have a couple of Case Idea’s, I have this one, Pretty much done, The only problem is that it doesn’t look nice, Sanding it is kind of hard, because it’s rubber, The Gamecube controller is all wired up though, just need to wait for my Solder braid to come in, so I can un short a short.
It was my first/second-ish time franken casing, It looks ugly, but I honestly love it, it’s comfortable in the hands, and surprisingly sturdy. The Epoxy I used, when dried/cured is rubbery, which doesn’t fare well for sanding. I wet sanded it a little bit, but it’s gonna take up a lot of sand paper. It’s pretty much a back up, incase I don’t get my other case 3d printed, but last resort, is still last resort. (there's a worklog for it somewhere)
I had thought about modelling it in cad, and then gluing it to another gamecube controller, but that was harder than it sounded, atleast for me, because it didn’t turn out the way I wanted it to. The faceplate is okay, but the back was no fun, and no work. But the Concept I did in MSpaint doesn’t look too shabby.
This second one is from my Squiifer worklog, I wouldn’t mind finishing it for the contest, would look hella nice. I would have a couple Revisions for it though.
First; Usb C Implementation. This at first seemed very daunting(but a feature I’ve always wanted since before the switch) but using a chip(STUSB4500) Gman and Aurelio suggested, intergrating usb c into Gman’s battery board is litterally just two wires lol. And I already have Schematics and notes for using a usb drive with the usb c port aswell, so it already takes out the need for another slot. Here’s pictures of Progress, it’s from a couple days ago,
I’m at the point of adding components for the Usb Switching.
The Case itself is going to need a rework I think, because I want my usb c port at the bottom of the case, makes it look a little bit more official. Only problem is that the wii ventilation is there, so I’ll need to flip it pretty much, Haven’t looked into placement much yet, so I don’t know, I might be able to cram it ontop of it.
Here’s pics for anyone who forgot it, there’s a few updates since my last post on the thread
The most prominint change is that the fan vent is in the middle, instead of off of the side, which made it seem lop sided. Oh, also better Shoulder buttons.
The second main thing that I can thing of to change is the audio, I want to use Aurelio’s Amp, because it’s super cool, and it does cool stuff. Instead of using a boring old regular amp, that can blow up my headphones and make me sad. I’d also like to find a better place for the Speakers(the two little holes in the front bottom of the case), I think they are fine there, but I’d rather a spot that looks a little better, and sounds better.
Here’s the planned internals if anyone’s curious.
The store ran out of about everything I needed, so I ordered stuff for some GC+’es, I also ordered a programmer, might aswell bite the bullet now I guess. Hoping to sell the other two if I can find anyone interested.
If I do find people interested, I’ll use the money to print my case, and some more PCB’s. (or maybe I’ll get more comissions :eyes: )I’m hoping my Heat gun gets replaced eventually, they sent me some more parts to replace it, if it doesn’t work this time I’m going to ask for a refund. This has been going on since the end of March lol.
Okay, last part of this work log.
Color schemes, and theme in general.
I’m aiming for a vaporwave / Lo fi, because I’m addicted to that stuff. My main plan for right now, is make a vaporwave theme, or just a lofi one, and use a cool color scheme I found on twitter, go check their stuff out, it’s really cool
I test painted today, and here they are (still wet, they will look better when dried)
That’s it for now, did you enjoy the text? And reading? Or should I do shorter work logs with more pictures? Don’t be afraid to let me know :3