Worklog Wii in a 3D Printed DMG: The DMGii

StonedEdge

a.k.a. ClonedEdge
.
.
Joined
Nov 16, 2018
Messages
365
Likes
1,495
Location
Japan, Tokyo
Portables
2
After finishing my first portable, I have an itch to make another and this time I plan on 3D printing my own case! It is funny, I thought I would enjoy playing games but, ironically I think I am enjoying the design/building process more than playing the actual games themselves which is a good thing.... I guess?

I did not want to label this as being a "WiiBoy" as I do not think it will deserve that title, but I have decided to make a portable that is 3D printed. I am basing my design off of the original DMG GameBoy Classic since it's the fattest of all GameBoy's. I like the idea of learning Fusion because I can make the portable exactly how I want it to be.

I was tempted to Frankencase, but given the amount of time it takes to learn CAD compared to that, I ended up going for the easier option.

I am planning on using an OMGWTF trim with 2 battery cells (very similar to Gman's rev3 WiiBoy) that will be removable (I am going to retain the original DMG battery cover that will be removable). I plan on making my own little 3D printed mounts for mounting the ABXY and D-PAD. I also decided to go with Fusion instead of SolidWorks since its free for students and I can make sure of the great 3D models from Jeff to make sure everything fits before I print. The WiiBoy will be a hard build for me but I am up for the challenge. I plan to make use of screwposts for everything, including things that I hot glued in my last portable (BMS, regulators etc).

I plan to take my time for this build to make it something I can be proud of. The G-Wii is great but I was disappointed with the final internals and hope that this project will go a little smoother.

As for internals, I do not plan on using many custom PCBs except for maybe designing my own BMS using the BQ24123 package. Otherwise, here is what I was thinking for this build:

  • 2 x NCR18650B Panasonic 3.7v Cells in Series
  • Internal USB drive with Micro-USB switching
  • DC 12V Charging Jack w/ Charge & Play
  • Battery Clips allowing for easy exchange of cells
  • GC+
  • JacksonS Audio Amp
  • 3.5" VGA Screen
  • DS Lite D-Pad
  • DS Lite ABXY Buttons
  • 3DS Sliders
  • Black/White Finish
  • PowerMii Lite/Custom Regulator Board/PowerMii/Design my own
  • OMGWTF trim
  • 2 x DS Lite Speakers
I started to learn Fusion 360 and I am really enjoying it, although I have a lot to learn. I am sure I will have heaps of questions for the veterans here when I get stuck and can't figure out what the hell I am doing. I would like to attempt a LMAO trim but after killing 5 Wii's just trying to get the G-Wii to work, I think I'll stick to two cells and an OMGWTF so I don't lose my sanity.

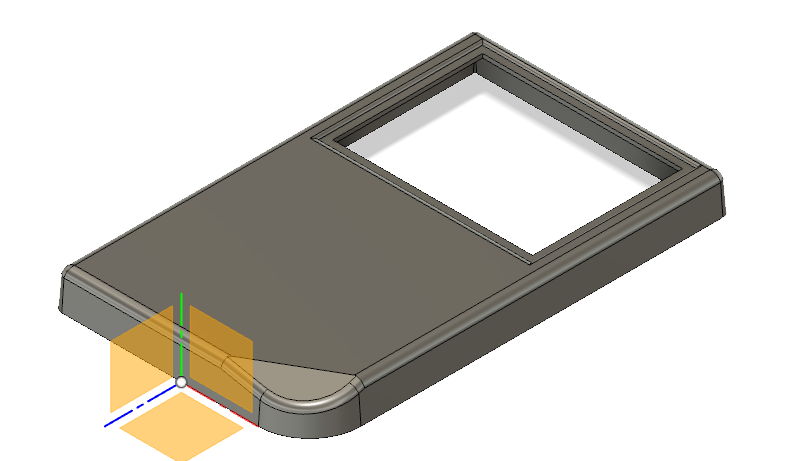
Here is my progress so far. Again, nothing too impressive but will continue to work on this and update this thread!

upload_2019-2-26_23-30-39.png
 

Gman

RTFDS
Staff member
.
.
.
.
.
Joined
Feb 25, 2016
Messages
1,437
Likes
2,887
After finishing my first portable, I have an itch to make another and this time I plan on 3D printing my own case! It is funny, I thought I would enjoy playing games but, ironically I think I am enjoying the design/building process more than playing the actual games themselves which is a good thing.... I guess?
Now you're a real portablizer
 

StonedEdge

a.k.a. ClonedEdge
.
.
Joined
Nov 16, 2018
Messages
365
Likes
1,495
Location
Japan, Tokyo
Portables
2
What 3.5" Vga screen is everyone talking about? can you please link it, because I haven't found it(probably just missed it I think)

Here's a 3d model of dmg https://grabcad.com/library/1989-nintendo-gameboy-1
For reference and what not, there's more online if that one doesn't work for whatever reason
Sure. This is the screen I'm going to use. I based my cut out on the actual visible image of the screen so I can hide the grey bezel. It's this one from Alibaba.

https://m.aliexpress.com/item/32326...lgo_pvid=4ceb2c4f-791c-41d2-85f1-6a7e6a8da10b
 

Stitches

2 and a Half Dollarydoos
Staff member
.
.
Joined
Feb 5, 2017
Messages
3,817
Likes
3,011
Location
Banana Bender Land, Australia
Portables
6

StonedEdge

a.k.a. ClonedEdge
.
.
Joined
Nov 16, 2018
Messages
365
Likes
1,495
Location
Japan, Tokyo
Portables
2
I am making decent progress on my case in Fusion 360. Being able to use a lot of pre-sketched components thanks to jefflongo and other members really helps save a bit of time!! A lot of inspiration for this portable is coming from Gman's WiiBoy which is making the placement of everything a little easier from the design perspective.

Here is the front half, both back and front panels. Still quite primitive, but I am happy with the result so far after only a few weeks of learning CAD and watching Lars Christensen's videos (would highly recommend for CAD noobs). I probably whipped this up in about a week of learning fusion so to make a case it wasn't too difficult once I followed some examples of DMG cases online. Google is your best friend for learning CAD lol.

DMG_AngledFrontHalf.PNG


DMG_BackHalf.PNG


DMG_FrontHalf.PNG

The 3DS sliders are an extremely tight fit against the boxes for the speakers. I am using the SP1511S-3 8 Ohm 700mW speakers since I used them in the G-Wii and they put out a good amount of volume with decent bass (although I do notice a small amount of distortion at the higher ends of the volume range). I left the front left part of the case at an angle which I created using a slightly angled plane in Fusion, and I like the aesthetic of it, but the speaker won't sit flat against the bottom part of the case (not sure if that will affect the volume with the sound bashing against the plastic or not, I can change it if need be).

How do people generally measure how tall the screwposts should be? I plan on using these little 3DS PCBs with the rubber membranes for my ABXY buttons from an original DS Lite, but I have no idea how will be too high. This is the PCB I plan on using (I believe it is the same one Madmorda used in her Wii S Lite). I could design my own PCB but I like the simplicity of being able to use these. Other alternative is to design some 3D printed holders for the buttons which would be super glued down.

Flex Cable PCBs for DPAD and ABXY:
https://www.ebay.com.au/itm/Direction-Cross-Left-Key-Keyboard-Flex-Cable-for-3DS-XL-LL-Dpad-Button-Board/372556479736?ssPageName=STRK:MEBIDX:IT&_trksid=p2060353.m1438.l2649

One question I have is whether or not a 3DS slider looks like it would fit in between the left hand side speaker grill and the slider mount. I am a little sceptical so I'll probably end up creating a slightly larger gap so that I can guarantee it will fit.

Other than that, I've meticulously measured out the screen and created a nice looking indented bezel. Plenty more updates to come on this and I plan to continue to update this thread as I get further into the grind.
 
Last edited by a moderator:

cheese

the tallest memer in town
Staff member
.
.
.
Joined
Mar 2, 2016
Messages
2,759
Likes
2,431
Location
Florida
Not sure how tall those ridges are on the sliders, but remember to take the bit of board that sticks out one side of the slider into account. I'd also bump the speaker a touch further just to make sure, since it looks like you still have some room.
 

StonedEdge

a.k.a. ClonedEdge
.
.
Joined
Nov 16, 2018
Messages
365
Likes
1,495
Location
Japan, Tokyo
Portables
2
Not sure how tall those ridges are on the sliders, but remember to take the bit of board that sticks out one side of the slider into account. I'd also bump the speaker a touch further just to make sure, since it looks like you still have some room.
Thanks for the advice cheese. I'll move the speakers slightly down since I was a bit worried that things weren't going to fit.

Once I finish the front half I'll upload a few pictures to get some advice on how it should print off. I haven't used a 3D printer before so I am not sure what I should be watching out for in my designs.
 

nobble

.
Joined
Apr 30, 2017
Messages
170
Likes
268
Nice work so far! I'm glad you are getting the hang of fusion. Looks very close to a regular DMG, more modernized, but aesthetically pleasing.
 

StonedEdge

a.k.a. ClonedEdge
.
.
Joined
Nov 16, 2018
Messages
365
Likes
1,495
Location
Japan, Tokyo
Portables
2
I added some custom PCBs for the ABXY and DPAD parts. The ABXY has a GC+ controller on the back with conductive pads for the ABXY buttons on the front. The DPAD also is just a simple circuit with both conductive and test pads on the back for soldering across to the GC+. I measured 75mm from the centre of the PCBs and moved the centre of the conductive pads that distance so that the squishy conductive membranes will short GND and data comfortably. Big thanks to @DeoNaught for giving me the footprints for the pads =D

I also took into account the advice from cheese and moved my speaker grills down and towards the outsides of the shell about 1mm. Now there should be sufficient space for the back of the 3DS sliders where the board will extrude out from the mounts. Added a small mount for the start button which is just a squishy tact in the middle. If I get time I might also add an audio amplifier circuit to the back of the DPAD, since at the moment it's just wasted space :p

The front half is almost done. Will be creating some sort of "mounting thing" which will screw into posts in the front half of the case to hold both the screen and driver board I am going to use similar to what Jeff and Gman used for their portables. In my previous portable, I used glue but I am trying to minimise all glue in this project and use nothing but M2 5mm screws for mounting all parts (want to make this portable TSA proof so that I could potentially take it on flights for work lol).

Time to start on the back half which I am sure will be a little bit more challenging - I still need to figure out how I am going to mount my battery clips for the 2x18650's as well as a cover solution but I think I have something in mind that should work well :D

Front.PNG
Back.PNG
 
Last edited:
Joined
Dec 10, 2016
Messages
578
Likes
663
Location
Constant Fear
Portables
sin^2(x) + cos^2(x) +e^(i*pi)
What Package is the pic? that looks way bigger than the one that was on there lol
 

StonedEdge

a.k.a. ClonedEdge
.
.
Joined
Nov 16, 2018
Messages
365
Likes
1,495
Location
Japan, Tokyo
Portables
2
What Package is the pic? that looks way bigger than the one that was on there lol
The package is literally straight from Aurelio's schematic and is the one on the original GC+ 1.0. I didn't use a QFN IC because I didn't really need the space, there's plenty of room there. The IC is a variant of the SSOP28 IC. You can find it in the BOM on his GitHub I believe.
 

StonedEdge

a.k.a. ClonedEdge
.
.
Joined
Nov 16, 2018
Messages
365
Likes
1,495
Location
Japan, Tokyo
Portables
2
It's been a while since I last posted any update here, but I've been working hard on the project when I get the opportunity to do so. I just moved to Tokyo, so I haven't had a whole lot of time to dedicate to this unfortunately..

I think it's coming along decently well. The case is based on an original DMG size and so im extremely limited for space. I didn't realize how small a DMG actually was until I started lol. I think for my first ever experience using CAD the case is coming along pretty well. I really am enjoying Fusion 360. All it takes is a few videos to get started, I thought it was going to be much harder xD oh well. At least I've come this far =D

Here is some more snapshots of my progress below.

IMG_4541.JPG

The back half of the case so far. I really wanted to stay true to the original DMG and keep a battery tray so that the batteries could be removed without opening the system. I know this is pretty impractical since you don't replace 18650s the same way as AAs, but oh well ¯\_(ツ)_/¯, I like it! As far as the cooling system goes, it's pretty standard. Suck cool air through the back and blow it out the side. Only problem is, the side of the case is not flat and there won't be a perfect seal between the side and the heatsink. Not sure if this will affect cooling negatively or not? What do you guys think :D

IMG_4542.JPG

Here is the front half. Pretty self explanatory. I need to figure out a way to hold the screen down without hot glue, probably going to use some sort of 3D printed bracket. I also need to cut into the inner side of the front around the screen so that the screen will sit flush without too much gap between the screen and the case. Big shoutouts to jefflongo for allowing me to use his 3DS slider mounts!! Saved me a lot of time. This is why the community is great here = D

IMG_4543.JPG

My favorite part of the portable so far. Just seeing those batteries there and being able to remove them is really nice after I recharge them 1000 times and they lose their capacity lol. I plan on integrating battery clips. Right now, there's no room to breathe in the back so I plan on widening the battery tray compartment to integrate battery clips.

IMG_4544.JPG

Here is the back half with the battery lid closed. I haven't finished the closing and opening mechanism yet but it will be very similar to the original DMG gameboy that will click when you close it.

IMG_4545.JPG

Finally, the front half of the case with the standard OMGWTF trim inside. I'm going to use 3 screw posts to hold it down. You can see the custom DPAD and ABXY PCBs there as well. Right now, I'm struggling to fit much more in there. I am planning on having an internal USB drive accessible over micro-USB using the little multiplexer board Ginger open sourced. However, right now it's looking like it's not going to fit :( hopefully I can come up with something soon.

Hoping I can work on this some more in the near future! With the new job and moving to a new country I've been pretty busy but I will get this done by the end of 2019!!! (Maybe for the contest =D)

Of course I'm still learning all this CAD stuff so I am open to any feedback/tips on things I should be careful of when printing (wall width, screw post width, etc). If you notice some errors or areas of concern I should focus on I would appreciate it if someone lets me know! I will continue to learn and make more changes.

That's all for now!!!! Thanks for reading :)
 
Joined
Dec 10, 2016
Messages
578
Likes
663
Location
Constant Fear
Portables
sin^2(x) + cos^2(x) +e^(i*pi)
Glad someone is putting my boards to use :P


So with the Gc logo off to the side, it looks off imo, I say having a different pattern maybe, might look a lil better. Just some CC
 
Top