Worklog Various Cosmetic Console Mods

Matthew

Formally known as Chaos
.
Joined
Jul 11, 2016
Messages
523
Likes
989
Location
USA
Portables
1
With other games...maybe. It's been years since I've played RE 0, but I'm guessing it's the same. Honestly not even sure what other 2-disk games the Cube has
Tales of Symponia is one. For GC It works exactly how you describe resident evil to work. it waits for an eject event and then checks if disc 2 has been inserted. I play it on the Wii and nintendont handles the disc swapping perfectly.
 
Last edited:

Madmorda

Painting Queen
.
.
Joined
Oct 27, 2016
Messages
725
Likes
1,718
Location
Texas
Portables
2
This post is for a dmg gameboy that I'm making brick textured. It's going to be longer than the others because it's a new process that I haven't used before and I want to explain it for anyone else interested. I'm leaning towards legend of Zelda or castlevania themed, but if anybody has a better idea I'm open to suggestions :)

I found something better than Bondo Glazing and Spot Putty for making brick texture. It's called Durham's Rock Hard Water Putty. It comes in a 16oz can for $3 at Ace Hardware in the section for sealants and roof textures etc. It's for filling small holes and advertises that you can cast molds with it, which means that it won't crack if you put a thick layer on like with Bondo.

Basically you just mix it with water and it can become watery, gooey, or like playdough depending how much water you use.

I did a test brick piece on a broken gc shell, and it kept sliding off once it was dry. So I put a layer of superglue on before applying the putty and now it sticks super well. It takes a long time to fully dry (maybe like 12 hrs or so), but is harder than Bondo and can be applied more thickly. It's also easier to work with because you can choose your own consistency.
20170214_121039.jpg
Here is the front half of the gameboy. Once it's a bit drier I can match it up to the back half and work on that. When it's fully dry, I am going to sand it lightly and go over it with some spot putty fill in any small imperfections. The speaker vent was a real pain but I eventually figured it out.

Oh, I also tried sculpting a bit with the putty since you can make it like playdough and it's totally doable. I will probably add some designs on it with that method, but haven't decided how to paint small things yet. Posca pens kinda work but aren't recommended. More to come soon :)
 

Madmorda

Painting Queen
.
.
Joined
Oct 27, 2016
Messages
725
Likes
1,718
Location
Texas
Portables
2
Dude. It's brick. It has imperfections! :P

I might get a can of that stuff, sounds useful.
I didn't mean tiny wrinkles or rough patches, I meant imperfections in the brick pattern. Like places where you can tell it's putty put together instead of aged brick :P

I did the whole back side except for the battery port cover. In hindsight, I probably should've done that first because both sides need to be painted so it is usually the part that holds up the process XD

Sidenote: this stuff reminds me a lot of bone between color and texture. I might have to do something with ribs or exposed bones.

Here's pics of all sides:
20170214_221247.jpg 20170214_221230.jpg 20170214_221235.jpg 20170214_221224.jpg 20170214_221220.jpg 20170214_221212.jpg

I also went ahead and painted the test piece I did earlier. I chose to use satin paint instead of gloss / semi gloss like I normally do.
20170214_221609.jpg
It looks a lot more like real stone in real life than it does in the picture. I chose two colors of grey, sprayed the light one on, let it dry, then dabbed the darker one on with a paper towel.

Edit 2/15/17
I should've done the battery port cover first because both sides need to be painted so that's usually the part that takes the longest. I ran out of superglue so I have to pick some up before finishing the texture. I can get started on painting the main body today while the battery cover is drying. Hopefully it'll be done tomorrow morning (60 hours after starting).

I've finished putting all of the water putty on. The entire main body is entirely dry, but the battery port can't be painted until tomorrow when it's fully dry.
20170215_143315.jpg

Here is the body with the first coat of grey on it. I do the lighter color first and then when it's dry I dab on the darker one.
20170215_143309.jpg

I'm working on an overall design as well. I've decided on a castlevania theme since I haven't done that yet. I have some glow in the dark spray paint I'd like to work in somehow (see first post with the wii). It's clear colored unless you put it on really thickly and then it gives a whitish green tint so I was thinking maybe doing a moon on it that glows.

20170215_145917.jpg
I've had these little gargoyles on my shelf of "I thought this was cool but have nowhere to put it" type things for quite a while. I might not have a flat part to put them on though :T wish I'd remembered them yesterday.
If I don't use these here, I'm DEFINITELY doing a matching castlevania gc so I can put them on.

20170215_152926.jpg
Viola! Realistic brick patterns. I just crumpled up a paper towel and dabbed it on. It's important to dab not wipe.

Minor hiccup XD
20170215_203631.jpg
I indented around all the ports except the most important one lol. Now I've gotta 3d print a new button or use a screwdriver to turn the console on :P print underway

20170215_222625.jpg 20170215_222630.jpg
I put the C from the castlevania logo on the back using posca pens. The front and back fit together perfectly.
 
Last edited:

Madmorda

Painting Queen
.
.
Joined
Oct 27, 2016
Messages
725
Likes
1,718
Location
Texas
Portables
2
Guess who has their design all figured out?
This girl!

20170216_173020.jpg
So the whole body is done with the brick and the painting. But I really wanted something more. If I'd thought of the gargoyles sooner, I could've worked them into the water putty for stability, but I can't just stick them on top.

20170216_172840.jpg 20170216_172852.jpg
So you know those tiny cheap fake candles that you put in pumpkins around Halloween? I took the flickering leds out of two of them and am going to try and make torches on the gameboy. I found a torch handle made to fit an led with holes for the legs and everything on thingiverse (free 3d printing models).

I really think this could work. Each led runs off 3v, or in series work on 6v. The original gameboy gets 6v from 4 AAs in series, so I should be able to draw power straight from them for the torches without even needing a resistor.

I got that power button 3d printed and tested, and it should work fine.

20170216_174957.jpg
As you can see, the insides actually have more than enough space to run some little wires along the edges. It also has convenient places to solder to the + and - of the batteries.

20170216_185503.jpg
I turned off all the lights in my room (it's pitch black) with the torches on at about the place and angle I want them. The ps2 buttons I used to prop them up cast some shadows on the top corners, but you can still clearly see that they light up the screen well enough to let you play in the dark. Ignore the horizontal lines on the screen, the gameboy I used to test this has screen issues.

All that's left is to resize, print, and paint the torch handles, drill the holes, and wire it :)
 
Last edited:

fibbef

Wizardry V Completer
.
Joined
Nov 10, 2016
Messages
606
Likes
1,625
Torch-lit DMG is a first. I think it looks really cool! Looks like you need to touch up the connections on that screen though to get rid of those dead lines.
 

Luke

.
Joined
May 23, 2016
Messages
209
Likes
221
Location
Texas
Portables
2
This is strange... but I like it. Although, I think the flickering would drive me insane if I was actually trying to use it to play in the dark.
 

Madmorda

Painting Queen
.
.
Joined
Oct 27, 2016
Messages
725
Likes
1,718
Location
Texas
Portables
2
Torch-lit DMG is a first. I think it looks really cool! Looks like you need to touch up the connections on that screen though to get rid of those dead lines.
Ignore the horizontal lines on the screen, the gameboy I used to test this has screen issues.
The one I'm putting inside the new shell was disassembled so I could make sure the new power switch fit and see where I could run three wires :P this test one had issues.

This is strange... but I like it. Although, I think the flickering would drive me insane if I was actually trying to use it to play in the dark.
Actually it's not super flickery, just barely so you can tell it's not a regular led. And since there are two of them, the screen stays lit pretty well. Although I'm not doing these to play in the dark, I just thought it was a neat bonus :D
 

fibbef

Wizardry V Completer
.
Joined
Nov 10, 2016
Messages
606
Likes
1,625
Ignore the horizontal lines on the screen, the gameboy I used to test this has screen issues.
Wow I'm pretty dense for skipping over that line. Should be easy to fix though, or so I've heard.
 

Madmorda

Painting Queen
.
.
Joined
Oct 27, 2016
Messages
725
Likes
1,718
Location
Texas
Portables
2
I'm so close to being done!
20170217_145219.jpg
Here's the front all assembled.

20170217_142158.jpg
I'm having an issue though hopefully someone can help with. I have the leds in series, and they work perfectly fine when hooked up to the batteries. However, I only want them on when I turn the gameboy on. So I soldered the positive end to the switch here and the negative end to ground. They now turn on only when the gameboy turns on BUT they make an annoying buzzing sound. This only happens when the top half of the gameboy is plugged into the bottom half, otherwise they're totally silent.

Anybody know what's causing this? Not enough power / irregular power / interference? I've tried moving the ground but it doesn't matter. If I move the positive, then they stay on full time.

If I can't figure it out, I guess I could add a second switch to control the lights, but idk where I'd put the switch itself XD.
 

Attachments

Joined
Feb 17, 2017
Messages
3
Likes
0
It's likely that whatever circuit makes your lights flicker is getting into the power. Or that the current changes by the flickering of the lights itself is getting into the power. The amp amplifies it and send it to the speaker. It's kind of the same as the 60 cycle hum you hear on the radio sometimes. You could try soldering a good sized capacitor across the leads to your LEDs. That should smooth the power pulsing out a little bit and keep it from getting into your circuitry.
 

Aurelio

ᕕ( ᐛ )ᕗ
Staff member
.
.
.
.
.
Joined
Mar 3, 2016
Messages
2,229
Likes
2,952
Portables
2
You should use a regulated voltage to power the LEDs. You could hook them up to the same points where the backlight mod is usually connected to. I'm not sure of the voltage, so you should check it with a multimeter and pick the proper resistor accordingly :)
Check this link: http://www.instructables.com/id/Game-Boy-Backlight-DIY/
 

Madmorda

Painting Queen
.
.
Joined
Oct 27, 2016
Messages
725
Likes
1,718
Location
Texas
Portables
2
And it's done!
20170217_195851.jpg 20170217_195753.jpg 20170217_195922.jpg 20170217_195945.jpg 20170217_200000.jpg 20170217_200008.jpg
It's fully functional and working great. I think the water putty is sturdier than Bondo was and has more potential. Thanks to @Aurelio and @Mr Wizard for helping me with the noise. It still very faintly does it, but you can only hear it if you put your ear up to the speaker (and no buzzing in headphones). I accidentally drilled the holes for the led wires too high so they no longer illuminate the screen in the dark, which is slightly disappointing. But tbh if you want to play Dr. Mario at night, just use a newer gameboy lol. The 3d printed power button is working fine too.

I started Monday night and finished Friday night, so I spent a total of four days from start to finish on it. I believe I spent a whopping $26 on the whole project, not including things I had laying around (toothpicks, pla filament, tiny wires, etc). I had fun working on this, but man I'm glad it's done :P
 

Madmorda

Painting Queen
.
.
Joined
Oct 27, 2016
Messages
725
Likes
1,718
Location
Texas
Portables
2
So I have a new project in the works, although updates will probably be slower on this one.

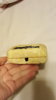
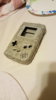
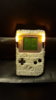
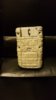
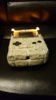
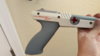
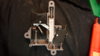
I went to my local game store and was looking around, when I came across one of those NES Zapper guns. I thought it would be really cool to fit a wiimote inside of one, when I realized that I have a disassembled wiimote that needs a shell anyways.
20170424_163219.jpg
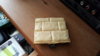
I picked up two, so I have extra parts if I mess up, or I can make it a twin for multiplayer.
20170424_140221.jpg 20170424_144504.jpg
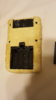
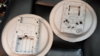
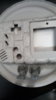
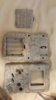
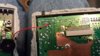
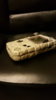
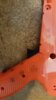
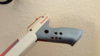
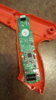
The insides, for anyone curious.

Unfortunately, after getting it all home, I found that someone has <probably> already done this. I found some random pics, one of wii +, -, and home buttons put in the zapper shell (drilled, not frankencased), and another where someone kept the wiimote externally but rewired the sensor to the barrel of the gun. Neither picture has a valid source, I can't find any worklog, and I'm actually not even sure if they're the same gun or two different ones. Normally I try hard to not do things that have already been done by someone, but since I can't tell exactly what they did do, I'm going ahead with it.

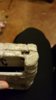
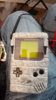
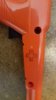
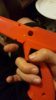
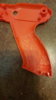
So I took my wii remote and started playing around. Everything would fit much nicer if I removed the huge trigger mechanism, but I really want to keep it. So begins my struggle.

20170424_161726.jpg
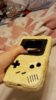
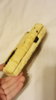
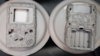
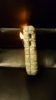
Here is the wiimote fitting in nicely after removing the nunchuck plug. It looks like I will need two remotes in order to do this without a heatgun, which is okay. You can tell I did a bit of conservative sanding.

20170424_161709.jpg 20170424_163006.jpg
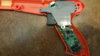
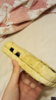
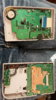
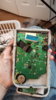
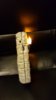
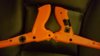
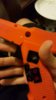
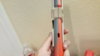
I had to clear out the insides of this and I'm down a screwpost, but it should be fine. The remote juuuuust fits under the trigger. It can be used as is, but I may relocate a component or two on the remote so it fits better.
20170424_162956.jpg
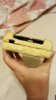
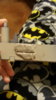
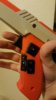
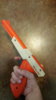
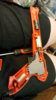
Everything is in there and closed. There is room left for batteries, but I'm going to go with a rechargeable battery just so I don't have to worry about removing AAs. I'm going to look at the ones made for wiimotes, but if you guys have a better suggestion, I'm all ears :)

For now my dilemma is what button to make the trigger. Looking at different shooting games, I think the best course of action is to decide on a particular wii fps game and design it around their button mapping. Obviously since this is the "cosmetic mods" thread, the art style and characters of that game will be taken into account. So I ask the people of bitbuilt, what game would you choose?

Note: it will be nunchuck compatible, so any game that doesn't require wii motion plus should be good.
 

fibbef

Wizardry V Completer
.
Joined
Nov 10, 2016
Messages
606
Likes
1,625
Obviously since this is the "cosmetic mods" thread, the art style and characters of that game will be taken into account. So I ask the people of bitbuilt, what game would you choose?
Please please please do House of the Dead: Overkill. I loved every second of that game from from the black humor to the 70's buddy cop atmosphere including the grainy grindhouse film look. And if you make the Zapper into a revolver, you'll be my favorite BitBuilder.
 

Madmorda

Painting Queen
.
.
Joined
Oct 27, 2016
Messages
725
Likes
1,718
Location
Texas
Portables
2
Ayy afaik most games will either use A or B, so I would add a switch to change the trigger between A and B because then I wouldn't have to choose
This is a really really good idea. Thanks Cheese :D

make the Zapper into a revolver
That might actually be doable, but would require removing or at least majorly changing the grey part. I'll keep it in mind for future projects though, I'm sure 3d printable revolver parts are fairly common.

Please please please do House of the Dead: Overkill.
Haven't played it but it looks cool. I'll see if Game X Change has a copy when I go in tomorrow :)

I really wish I could make it Red Steel 2 themed. That game is amazing, and would have a cool steampunk asthetic. Unfortunately I think it requires wii motion plus, and you switch between a sword and gun so you'd be flailing around with the zapper XD Never bring a pistol to a katana fight

Actually I was considering putting a laser pointer in it with an on off switch. Not for your tv obviously, just because it's actually a really fun toy without a wiimote. I can't stop playing with it.
 
Last edited:

Madmorda

Painting Queen
.
.
Joined
Oct 27, 2016
Messages
725
Likes
1,718
Location
Texas
Portables
2
I went to the store today and looked through all of the wii games for fps titles I may have overlooked. I decided on Resident Evil 4 because it's a long enough game to justify having its own custom controller, and the zapper looks like it could belong to Leon.

Thanks to @cheese, I'm going to put a switch for switching the A and B buttons. Ideally I think it'd be cool to put it on the back of the gun where you'd cock it, but we'll see.

20170426_154247.jpg 20170426_154253.jpg
My rough estimate of where the buttons go.

20170426_213451.jpg
I cut up the wii remote and epoxied the pieces in. The only button it doesn't have a spot for is the Power button, which I'm considering leaving off.

20170426_222057.jpg 20170426_222100.jpg
Here's how they fit. The + - and A B buttons are easiest to press, although the dpad and 1/2 buttons are also within reach without stretching.

20170426_224421.jpg
Preview of how it'll look. It's pretty rough and angular right now but tomorrow the goal is to completely bondo and sand it.

I have an airbrush I have yet to try out, so I'm hoping this'll be the project I finally get to break that out. I'd like to try a rusty metal effect. I'm definitely lighting up the A button too. I've always wanted to do that :D
 

Madmorda

Painting Queen
.
.
Joined
Oct 27, 2016
Messages
725
Likes
1,718
Location
Texas
Portables
2
20170427_191214.jpg 20170427_191303.jpg 20170427_191315.jpg
A whole day of Bondo, sand, prime, and repeat, but I got it looking pretty good. There are a couple minor touch-ups to do, and I still have to put the nunchuck and charging ports on the bottom, but I feel good that I got all of the buttons done. I've decided to leave the Power button off of this remote. I plugged up a hole that I used to be a screw post, and filled in the "grip" because my buttons went partly into it and it would've liked odd otherwise. I also put the slot for my A/B reversal switch on the top. I'm tempted to use "the good paint" so I may put off painting this until I sell some stuff. I think for controllers and handhelds, the upgrade is well worth it. More to come soon :)
 

jefflongo

Broke BitBuilt
Staff member
.
.
Joined
Dec 15, 2016
Messages
1,017
Likes
1,361
Location
Santa Barbara, CA
Portables
3
View attachment 2275 View attachment 2276 View attachment 2277
A whole day of Bondo, sand, prime, and repeat, but I got it looking pretty good. There are a couple minor touch-ups to do, and I still have to put the nunchuck and charging ports on the bottom, but I feel good that I got all of the buttons done. I've decided to leave the Power button off of this remote. I plugged up a hole that I used to be a screw post, and filled in the "grip" because my buttons went partly into it and it would've liked odd otherwise. I also put the slot for my A/B reversal switch on the top. I'm tempted to use "the good paint" so I may put off painting this until I sell some stuff. I think for controllers and handhelds, the upgrade is well worth it. More to come soon :)
Now that there's gray on it, I never realized how good that would look with all the orange painted gray.
 
Top