Worklog Partybox styled build

Joined
Dec 6, 2020
Messages
226
Likes
260
Location
Canada
Portables
3
Well now that my larger printer is up and running I think I can get around to starting this build log.

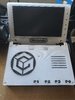
So I'm more a fan of using a standard controller vs some of the controls that can be had in a handheld build, which has had me liking the partybox from Wesk since I came across it just didn't have the printer for it or knew about sls at the time.

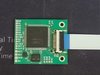
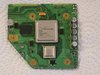
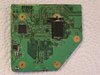
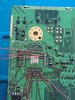
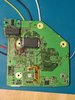
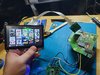
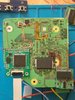
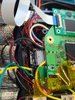
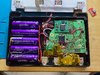
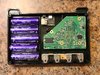
With a lot of the changes to the scene the new PMS2 and PD2 boards from 4layer were definitely the top picks for a build such as this.

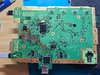
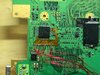
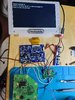
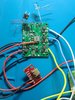
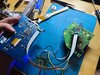
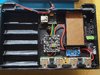
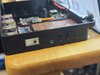
One thing I was hoping to achieve is the implementation of the ave-hdmi board from electron-shepard and remove the ave as it wouldn't be necessary.

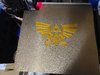
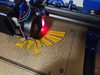
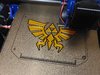
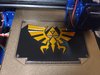
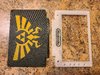
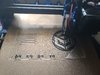
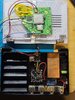
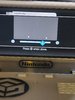
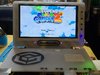
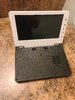
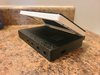
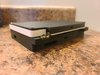
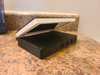
So to kick things off I've done some test prints and part placement.

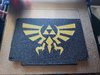
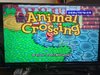
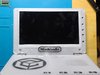
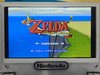
Due to the clean look of sls prints the final end product hopefully will be sls printed nylon and dyed as close to the indigo purple as I can with a few Zelda themed inserts. A clear resin center piece sounds great too however the stress of opening and closing the screen makes me believe I'll come across cracking early on
 

Attachments

Joined
Dec 6, 2020
Messages
226
Likes
260
Location
Canada
Portables
3
Have to drop a small update mainly a messing around with first layer multi colour inserts. So black and gold petg went really well together so I'm hoping my purple petg turns out to look great aswell. Thanks to Nold for the noldendo inserts and
 

Attachments

Joined
Dec 6, 2020
Messages
226
Likes
260
Location
Canada
Portables
3
That two tone Zelda print for the lid is dope!

Thanks it was easier to do than I expected. You'll like these 2 pics then as well. The middle piece was left running while I left to work so all I got is a progress pic

*** Post update with the finished print photo of the middle piece
 

Attachments

Last edited:
Joined
Dec 6, 2020
Messages
226
Likes
260
Location
Canada
Portables
3
So minor update, trims working, zapped the PMS2 so new BQ chip on the way, ave has been kicked to the curb, hopefully will stay that way.

Now that I know ave HDMI is working and best practices for it I'll be testing the fpc connector swap one with a different screen to see how well it works, otherwise best luck for that has been the fpc ribbon HDMI cables. Trim and progress pics attached. One is a scanlines comparison on HDMI GameCube video, my test PSU will show up in there as well it's a 5v USBC modded PMS1.
 

Attachments

Stitches

2 and a Half Dollarydoos
Staff member
.
.
Joined
Feb 5, 2017
Messages
3,817
Likes
3,010
Location
Banana Bender Land, Australia
Portables
6
Progress has been made with fpc ribbon HDMI video from the ave HDMI to a 5" modded screen. Need to hot air the HDMI connector on my 7" LCD but looks like a probability so far. Still lots to do
Them magnet wires be looking mighty not-38AWG. I hope their springy-ness doesn't cause damage to the flex..... nice work tho, it's shaping up quickly!
 
Joined
Dec 6, 2020
Messages
226
Likes
260
Location
Canada
Portables
3
Them magnet wires be looking mighty not-38AWG. I hope their springy-ness doesn't cause damage to the flex..... nice work tho, it's shaping up quickly!
So DD wiring is usually 38 awg then? These for testing are 30 awg but I hadn't been totally sure about using the 36awg that I've got for the digital signal wiring, eventually that ave HDMI board will ideally be mounted where that angle cut from the trim is
 

Stitches

2 and a Half Dollarydoos
Staff member
.
.
Joined
Feb 5, 2017
Messages
3,817
Likes
3,010
Location
Banana Bender Land, Australia
Portables
6
So DD wiring is usually 38 awg then? These for testing are 30 awg but I hadn't been totally sure about using the 36awg that I've got for the digital signal wiring, eventually that ave HDMI board will ideally be mounted where that angle cut from the trim is
It's better to use 36 or 38, yeah. You can use 30, it's just very rigid and can rip pads off if it's under too much strain
 
Joined
Dec 6, 2020
Messages
226
Likes
260
Location
Canada
Portables
3
Build update time again, some spare time this weekend to get some soldering done.

So far I would say I'm finished with the top half with the LCD and IR LEDs, I need to progress the bottom half before I can test how well the wiimote pointer works but they light up decently checking with my phone camera.

Bottom half is being installed layer by layer, Wesk definitely wasn't kidding when he said this is a tight build. From previous recommendations I've swapped the video data lines to 36 awg and tests were successful for video.

After some info about the usb on the Wii I decided to skip the external usb port and will have just the pd board with my thumb drive. To skip having to reprint the base all over I used the chance to make the original port into my power led and power button location, it's tight but it fits.
 

Attachments

Joined
Dec 6, 2020
Messages
226
Likes
260
Location
Canada
Portables
3
So redid placement of my ir LEDs and some video wiring for the ave and my system is much more stable and Mario Galaxy 2 was very much playable with a Wiimote without needing to sit about 3 feet away, now it's about half that. I did get my SLS printed ashida so I totally got side tracked painting that this weekend
 

Attachments

Joined
Sep 30, 2021
Messages
49
Likes
69
Location
Idaho
Portables
2
in my mind i just imagine sitting on a plane and the stranger next to me just pulling this bad boy out lol looks amazing i love the LoZ theming
 
Joined
Dec 6, 2020
Messages
226
Likes
260
Location
Canada
Portables
3
I need to invest in T-handle Allen keys, my fingers hurt from trying to do the initial thread of these screws. However! It all fit together.

Tests to be had now for the next few days, minor audio fix might be necessary, battery life tests, heat seems good approx 50°C as per PMS. The plastic seems to retain some heat which caught me off guard initially I thought something was running when it shouldn't.
 

Attachments

Top