
:O I actually saw that a while back, but just now read the dimensions of it. So tiny. Will this be out in time for the contest, or should I keep looking? I tried searching for dual amps yesterday like you said, but couldn't find any. Is there one you've used before?Nope, not really what I meant. The best way is to use amplifier ICs that have both amplifiers (class D for speakers and class G for headphones) and that can handle automatically the headphones/speakers switching.
This is going to come out soon hopefully and will handle everything")
Worklog Madmorda's First Wii Portable (Wii S Lite)
- Thread starter Madmorda
- Start date
- Joined
- Mar 3, 2016
- Messages
- 2,228
- Likes
- 2,952
- Portables
- 2
I'm waiting for nine PCBs. They should be here in less then two weeks. I'll assemble and test them and most likely they're going to be available in time for the contest:O I actually saw that a while back, but just now read the dimensions of it. So tiny. Will this be out in time for the contest, or should I keep looking?
I've never seen one ready to buy that supported both speakers and headphones, but I haven't even looked much into it.I tried searching for dual amps yesterday like you said, but couldn't find any. Is there one you've used before?
- Joined
- Mar 3, 2016
- Messages
- 2,228
- Likes
- 2,952
- Portables
- 2
Lots of people have wired the amplifier both to the headphones and to the speakers, even if it's dangerous for the headphones.Well I'm excited about yours
Some have assembled custom amplifiers for themselves or for other users
I actually can't find any class g amplifiers at all. Guess I'll order the one from the bom and forgoe the jack unless your board comes out in time.Lots of people have wired the amplifier both to the headphones and to the speakers, even if it's dangerous for the headphones.
Some have assembled custom amplifiers for themselves or for other users
- Joined
- Jan 16, 2016
- Messages
- 1,512
- Likes
- 3,940
- Location
- standing up
- Portables
- please do not ask!!!! I will NOT respond
Always bet on Aurelio. The boards will be out in time.
Yeah I'd really like to get thoseAlways bet on Aurelio. The boards will be out in time.
 . I like the idea of changing volume using button presses. Plus obviously the headphone jack.
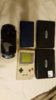

Today I went to pick up a second ds lite case for the Wii S Lite (for parts). I got it home and realized that it's actually bigger than the one I have. Here they are in comparison to some other consoles. I'd compare the one I'm using to be almost exactly the size of the Game Boy, and the other one is a little bit larger in each dimension.
Mine measures 14x9.7x3.4cm. The larger one measures 15x10.8x3.7cm.
I'd definitely prefer to use the one I have because one of my main goals is to have it be as small as possible, but if for some reason it doesn't work out, I could use the larger one. I feel like any larger though and I'll be approaching small laptop status XD
Last edited:
Slow but steady progress here. I printed out several more revisions of the faceplate the buttons go in, and it kept filling in random parts of the word Lite. So I switched up the font and it finally came out well.
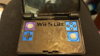
I also indented all of the buttons so that they don't stick up. The 3ds has a recessed screen so it's not a problem, but I won't have enough space for that, so these have to be sunk in so they don't take up any of the screen's face.
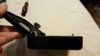
Here you can see that I also printed little corners for the button squares to sit on. That way they have extra support and won't be able to fall through if pressed on too hard. It should also help the Bondo and epoxy to have less chance of cracking under pressure.
I was going to use ds lite buttons, but decided to use 3ds ones instead since the dpad circuit board fits so nicely. I edited the original post where I said it should fit abxy buttons to say that it does. I haven't tested with XL buttons, but with a small 3ds faceplate, pad, and buttons, it can easily be made to fit just about perfectly. I drilled new screw holes so that it can be mounted with screws for easy removal. They feel just like 3ds buttons should and it takes up hardly any room.
Unfortunately, I only have two screws that fit those holes so I have to rustle some up haha. They're pretty tiny.
*Note: the dpad will not fit ds lite buttons
I installed PortablizeMii on Wii #3, and it's running fine. I need to trim it and get that up and running before the rest of my parts arrive.
I also indented all of the buttons so that they don't stick up. The 3ds has a recessed screen so it's not a problem, but I won't have enough space for that, so these have to be sunk in so they don't take up any of the screen's face.
Here you can see that I also printed little corners for the button squares to sit on. That way they have extra support and won't be able to fall through if pressed on too hard. It should also help the Bondo and epoxy to have less chance of cracking under pressure.
I was going to use ds lite buttons, but decided to use 3ds ones instead since the dpad circuit board fits so nicely. I edited the original post where I said it should fit abxy buttons to say that it does. I haven't tested with XL buttons, but with a small 3ds faceplate, pad, and buttons, it can easily be made to fit just about perfectly. I drilled new screw holes so that it can be mounted with screws for easy removal. They feel just like 3ds buttons should and it takes up hardly any room.
Unfortunately, I only have two screws that fit those holes so I have to rustle some up haha. They're pretty tiny.
*Note: the dpad will not fit ds lite buttons
I installed PortablizeMii on Wii #3, and it's running fine. I need to trim it and get that up and running before the rest of my parts arrive.
Slow but steady progress here. I printed out several more revisions of the faceplate the buttons go in, and it kept filling in random parts of the word Lite. So I switched up the font and it finally came out well.
View attachment 1732 View attachment 1733
I also indented all of the buttons so that they don't stick up. The 3ds has a recessed screen so it's not a problem, but I won't have enough space for that, so these have to be sunk in so they don't take up any of the screen's face.
View attachment 1734
Here you can see that I also printed little corners for the button squares to sit on. That way they have extra support and won't be able to fall through if pressed on too hard. It should also help the Bondo and epoxy to have less chance of cracking under pressure.
View attachment 1735
I was going to use ds lite buttons, but decided to use 3ds ones instead since the dpad circuit board fits so nicely. I edited the original post where I said it should fit abxy buttons to say that it does. I haven't tested with XL buttons, but with a small 3ds faceplate, pad, and buttons, it can easily be made to fit just about perfectly. I drilled new screw holes so that it can be mounted with screws for easy removal. They feel just like 3ds buttons should and it takes up hardly any room.
Unfortunately, I only have two screws that fit those holes so I have to rustle some up haha. They're pretty tiny.
*Note: the dpad will not fit ds lite buttons
I installed PortablizeMii on Wii #3, and it's running fine. I need to trim it and get that up and running before the rest of my parts arrive.

Could you find it in your heart to link me that abxy assembly? I need it because reasons >.>
Sure thing
Could you find it in your heart to link me that abxy assembly? I need it because reasons >.>
You're going to need a non-xl 3ds faceplate:
http://www.ebay.com/itm/302082061479
(It might work with XLs, no idea)
And the buttons to match, with the silicone:
http://www.ebay.com/itm/162413344462
And the d-pad from a n3ds:
http://www.ebay.com/itm/262852252615
And some screws to screw it all together
Edit: you'll see it when you get it, but there's really only one way the d-pad can be oriented. 3 of the screwholes can be drilled in the right places and one cannot. Fortunately, the 3ds faceplate only has 3 holes to screw it in, so it works out. But the ribbon cable will have to point to the right if you're looking at it from the top. Not a big deal, but thought I'd mention it in case space was an issue for you.
Last edited:
Thanks muchly! I've been looking all over for something just like this.Sure thing
You're going to need a non-xl 3ds faceplate:
http://www.ebay.com/itm/302082061479
(It might work with XLs, no idea)
And the buttons to match, with the silicone:
http://www.ebay.com/itm/162413344462
And the d-pad from a n3ds:
http://www.ebay.com/itm/262852252615
And some screws to screw it all together
There's a bit of good and a bit of bad news xD
First of all, the good news:
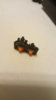
I know exactly how to do the L and R buttons. I received my squishy tacts from the BOM and made little brackets to hold them. I have posted the files for the brackets under 3D design if anybody wants to use them. I'll update it as I make more revisions, but for now the one uploaded is just the basic structure that you can mount however you want.
These are the basic brackets.
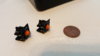
And these are the brackets I'll be using. It holds 3 tacts instead of two, and has a flat base on one side to lay on. The larger half of it is double tact modded while the smaller side has only one. I'll upload this as well as the same thing but with the base on a different side so they stand vertically.
The plan is to use these as the L, R, Start, and Z buttons. Look familiar? it's a chopped up ps2 dpad.
I already pre-frankencased two of the buttons in. Unfortunately, I broke off a part of the hinge that holds the lid. There's no way to reattach it that I would feel was secure enough (I'm going for compact and sturdy this time, no shortcuts allowed), so I'll just replace the shell.
That's the bad news. The replacement shell I have is larger so I have to order a new one. Plus since there are two very similar sizes, it'll be hard to tell which one I'm ordering so it might take twice as long.
On the 3ds dpad front, it like like two screws is enough to hold the abxy buttons, so I'll add a third and some support just for safety. I'll order some screws as well because I need ones for the actual dpad as well as the joysticks.
First of all, the good news:
I know exactly how to do the L and R buttons. I received my squishy tacts from the BOM and made little brackets to hold them. I have posted the files for the brackets under 3D design if anybody wants to use them. I'll update it as I make more revisions, but for now the one uploaded is just the basic structure that you can mount however you want.
These are the basic brackets.
And these are the brackets I'll be using. It holds 3 tacts instead of two, and has a flat base on one side to lay on. The larger half of it is double tact modded while the smaller side has only one. I'll upload this as well as the same thing but with the base on a different side so they stand vertically.
The plan is to use these as the L, R, Start, and Z buttons. Look familiar?
it's a chopped up ps2 dpad.I already pre-frankencased two of the buttons in. Unfortunately, I broke off a part of the hinge that holds the lid. There's no way to reattach it that I would feel was secure enough (I'm going for compact and sturdy this time, no shortcuts allowed), so I'll just replace the shell.
That's the bad news. The replacement shell I have is larger so I have to order a new one. Plus since there are two very similar sizes, it'll be hard to tell which one I'm ordering so it might take twice as long.
On the 3ds dpad front, it like like two screws is enough to hold the abxy buttons, so I'll add a third and some support just for safety. I'll order some screws as well because I need ones for the actual dpad as well as the joysticks.
That is genius.There's a bit of good and a bit of bad news xD
First of all, the good news:
I know exactly how to do the L and R buttons. I received my squishy tacts from the BOM and made little brackets to hold them. I have posted the files for the brackets under 3D design if anybody wants to use them. I'll update it as I make more revisions, but for now the one uploaded is just the basic structure that you can mount however you want.
View attachment 1757
These are the basic brackets.
View attachment 1758
And these are the brackets I'll be using. It holds 3 tacts instead of two, and has a flat base on one side to lay on. The larger half of it is double tact modded while the smaller side has only one. I'll upload this as well as the same thing but with the base on a different side so they stand vertically.
The plan is to use these as the L, R, Start, and Z buttons. Look familiar?
View attachment 1759View attachment 1760
I already pre-frankencased two of the buttons in. Unfortunately, I broke off a part of the hinge that holds the lid. There's no way to reattach it that I would feel was secure enough (I'm going for compact and sturdy this time, no shortcuts allowed), so I'll just replace the shell.
That's the bad news. The replacement shell I have is larger so I have to order a new one. Plus since there are two very similar sizes, it'll be hard to tell which one I'm ordering so it might take twice as long.
On the 3ds dpad front, it like like two screws is enough to hold the abxy buttons, so I'll add a third and some support just for safety. I'll order some screws as well because I need ones for the actual dpad as well as the joysticks.
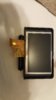
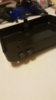
OOOOOOH. It's perfect. I might cry if the driver board doesn't work with it. There are these little legs built into the shell that PERFECTLY hold the lcd flat in the shell. Which is a shame because I believe I need to fit the driver board under the screen for space reasons so I'll have to cut them off. Maybe if I did one without batteries it could work. Then the buttons wouldn't have to be indented. *sigh*
I ordered a new shell and when it stops raining I will use the one I have to practice painting and make sure the paint sticks.
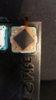
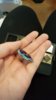
My GC+ also came in and it's tiny and I'm happy about it
. 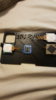
I'd like to make a pocket for it on the back of the button faceplate. I'd like to hook everything up to it, so that the whole controller is attached to this faceplate. Then I would like to have a plug coming from the gc+ going to the wii. That way if it needs to be taken back apart, I can remove the whole controller by simply unplugging it. I'd either need one that has like eight or so connections or a couple of smaller ones. I don't see this being too difficult for the convenience offered.

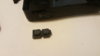
I've got a couple of these 12 connector plugs from inside Wiis. One should be more than enough to connect / disconnect the gc+ from the main body. (Data, ground, vcc, lt, lr, l, r, z, st). It would be nice to do small plugs for the double tact mod as well. The 3ds makes it easy to replace L/R buttons by doing something similar and I don't think it would be too much trouble to add a small plug to the tact brackets. I'd need a plug that has like 4 or 5 connections for each bracket.
I think the gc+ plug is pretty much a must, but the L and R things are just to make me happy.
Also, the audio amp from the BOM is miniscule. I think it should fit fine underneath the screen so that all video and audio is in the top half.
I'm loving the progress your making!View attachment 1874
OOOOOOH. It's perfect. I might cry if the driver board doesn't work with it. There are these little legs built into the shell that PERFECTLY hold the lcd flat in the shell. Which is a shame because I believe I need to fit the driver board under the screen for space reasons so I'll have to cut them off. Maybe if I did one without batteries it could work. Then the buttons wouldn't have to be indented. *sigh*
I ordered a new shell and when it stops raining I will use the one I have to practice painting and make sure the paint sticks.
My GC+ also came in and it's tiny and I'm happy about it
View attachment 1875
I'd like to make a pocket for it on the back of the button faceplate. I'd like to hook everything up to it, so that the whole controller is attached to this faceplate. Then I would like to have a plug coming from the gc+ going to the wii. That way if it needs to be taken back apart, I can remove the whole controller by simply unplugging it. I'd either need one that has like eight or so connections or a couple of smaller ones. I don't see this being too difficult for the convenience offered.
View attachment 1876
I've got a couple of these 12 connector plugs from inside Wiis. One should be more than enough to connect / disconnect the gc+ from the main body. (Data, ground, vcc, lt, lr, l, r, z, st). It would be nice to do small plugs for the double tact mod as well. The 3ds makes it easy to replace L/R buttons by doing something similar and I don't think it would be too much trouble to add a small plug to the tact brackets. I'd need a plug that has like 4 or 5 connections for each bracket.
I think the gc+ plug is pretty much a must, but the L and R things are just to make me happy.
Also, the audio amp from the BOM is miniscule. I think it should fit fine underneath the screen so that all video and audio is in the top half.
How'd you get yours so fast? My screen is still pending shipmentView attachment 1874
OOOOOOH. It's perfect. I might cry if the driver board doesn't work with it. There are these little legs built into the shell that PERFECTLY hold the lcd flat in the shell. Which is a shame because I believe I need to fit the driver board under the screen for space reasons so I'll have to cut them off. Maybe if I did one without batteries it could work. Then the buttons wouldn't have to be indented. *sigh*
I ordered a new shell and when it stops raining I will use the one I have to practice painting and make sure the paint sticks.
My GC+ also came in and it's tiny and I'm happy about it
View attachment 1875
I'd like to make a pocket for it on the back of the button faceplate. I'd like to hook everything up to it, so that the whole controller is attached to this faceplate. Then I would like to have a plug coming from the gc+ going to the wii. That way if it needs to be taken back apart, I can remove the whole controller by simply unplugging it. I'd either need one that has like eight or so connections or a couple of smaller ones. I don't see this being too difficult for the convenience offered.
View attachment 1876
I've got a couple of these 12 connector plugs from inside Wiis. One should be more than enough to connect / disconnect the gc+ from the main body. (Data, ground, vcc, lt, lr, l, r, z, st). It would be nice to do small plugs for the double tact mod as well. The 3ds makes it easy to replace L/R buttons by doing something similar and I don't think it would be too much trouble to add a small plug to the tact brackets. I'd need a plug that has like 4 or 5 connections for each bracket.
I think the gc+ plug is pretty much a must, but the L and R things are just to make me happy.
Also, the audio amp from the BOM is miniscule. I think it should fit fine underneath the screen so that all video and audio is in the top half.

That's kind of worrying. I ordered mine on the 9th and it took 15 days to get here which is completely normal. Maybe I bought from a different seller than you. Is the status that tells you "pending" from a tracking number or from aliexpress? If it's usps saying that it's just that customs takes a long time sometimes. If the seller hasn't shipped it maybe you should write and ask.How'd you get yours so fast? My screen is still pending shipment
Order page now says shipped on the 13th.... wat? I guess Australia Post is just slow as always >.>. Next time, I'm shilling for a courier.That's kind of worrying. I ordered mine on the 9th and it took 15 days to get here which is completely normal. Maybe I bought from a different seller than you. Is the status that tells you "pending" from a tracking number or from aliexpress? If it's usps saying that it's just that customs takes a long time sometimes. If the seller hasn't shipped it maybe you should write and ask.
- Joined
- Dec 24, 2016
- Messages
- 180
- Likes
- 273
I'm soooo excited to see how your portable turns out(which I'm sure will be amazing!). It's gonna be siiiiiick! Have you gotten your Wii all trimmed up yet?
:O you live in Australia? I have no idea how my mail got to the US first lol. Do you get free shipping from China too? My gvt has this deal where they will pay for any shipping from China, but then eBay was invented so now I can order a Nintendo screwdriver and have it shipped to me for 79 cents.Order page now says shipped on the 13th.... wat? I guess Australia Post is just slow as always >.>. Next time, I'm shilling for a courier.
Thank you so much! Hopefully tonightI'm soooo excited to see how your portable turns out(which I'm sure will be amazing!). It's gonna be siiiiiick! Have you gotten your Wii all trimmed up yet?
. I've been putting it off because I was lazy and then I was sick but I feel better and my stuff is pretty much all here so there's no reason not to. I've been working on little things like the L/R buttons lately. I did pick up a second backup wii though so I will get this done!