Worklog DIY Concept UFO

Dmcke5

.
2020 1st Place Winner
Joined
Feb 16, 2020
Messages
216
Likes
885
Location
Queensland, Australia
Portables
3
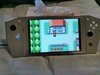
Thanks guys, I really appreciate all the feedback! I'm printing some hand grips for it today so I'll get some photos of that when they are done. Apart from that though I'm waiting on some stuff before I can keep going with it.

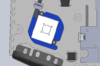
I'm going to try casting the buttons from resin so I can get a nice glossy black finish and maybe even a clear center to allow the RGB lights to shine through. This will be my first go at working with resin, so it may take me a few goes to get it right. I've got to order some liquid silicone so I can make a mold so there may not be too much more progress for a few days!
 

Dmcke5

.
2020 1st Place Winner
Joined
Feb 16, 2020
Messages
216
Likes
885
Location
Queensland, Australia
Portables
3
Shit is getting too real, seeing stuff like this makes it feel less of a hobby and more like the big leagues.

I swear I'm still just a hobbyst! I did (and still do occasionally) run a CNC for work, but I am by no means a pro. My job position is currently a draftsman, so I'd like to think I'm pretty reasonable at CAD work. But the stuff I'm paid to design is nothing like this, unfortunately!

Seriously though, I appreciate the complement! I have recently been surprising myself with these projects. I never used to have the patience or ability to finish things to this degree, but having my own CNC machine at home has helped dramatically as I'm much less likely to rush on it and am willing to just let it run while it shaves off 0.02mm at a time haha
 

Dmcke5

.
2020 1st Place Winner
Joined
Feb 16, 2020
Messages
216
Likes
885
Location
Queensland, Australia
Portables
3
What CNC are you using?
Its my own design. 3 Axis, 350x300x100 work area, 25mm linear rails, 16mm ballscrews, Nema 23 stepper motors (on 24v), gecko g540 stepper driver, an ethernet smooth stepper for PC interface and a 1.5kw Chinese spindle. The whole thing is enclosed in a 600x600x600 box which helps keep the noise and dust/dirt in.

CNC_Mk2_Complete_Machine_5-3-19_2019-Mar-05_02-18-49AM-000_CustomizedView37666842973.png
 

Dmcke5

.
2020 1st Place Winner
Joined
Feb 16, 2020
Messages
216
Likes
885
Location
Queensland, Australia
Portables
3
Took a quick video just to show how need for speed performs on the little tablet.

Also this thing makes Gameboy games look great haha. Probably a bit of a waste to play on it though. Also, excuse the tissue box prop. Needed something to keep it standing up for the video
 

Attachments

Dmcke5

.
2020 1st Place Winner
Joined
Feb 16, 2020
Messages
216
Likes
885
Location
Queensland, Australia
Portables
3
Joysticks, clear plastic joystick surrounds and temporary 3D printed hand grips fitted! And thanks to quarantine I have tomorrow off work so I can start tracking down stuff I need to have a go at casting these buttons! And before anyone asks, no that is not where the main board is eventually going to sit. Its just there for ease of access at the moment while I muck around with it testing games.

IMG_20200416_230430.jpg


IMG_20200416_230454.jpg
 
Joined
Aug 25, 2019
Messages
112
Likes
98
Location
netherlands
Portables
1
in case you dont want to test every game by yourself, some dude has over 200 games tested on your chip if you are interested
 

Dmcke5

.
2020 1st Place Winner
Joined
Feb 16, 2020
Messages
216
Likes
885
Location
Queensland, Australia
Portables
3
in case you dont want to test every game by yourself, some dude has over 200 games tested on your chip if you are interested
Nice find mate! I've found a few videos of people testing games but they were mostly newer and required ultra low settings to even be close to playable, which is just not what I'm looking for. I should have time today to check it out so thanks!

Incredible. What are you using for the game controller?
Arduino micro. I've got one on order, just waiting for it to turn up. I'm still in two minds about how I'm going to do it. I'm considering running two of them (one for each side of the controller) and getting one to emulate a mouse with one of the joysticks for games that don't have good gamepad support. I'll try it with just one as a gamepad to begin with though.
 

Dmcke5

.
2020 1st Place Winner
Joined
Feb 16, 2020
Messages
216
Likes
885
Location
Queensland, Australia
Portables
3
Well the bad news is the store I was going to get liquid silicone from has closed because of Covid-19 so guess I'm ordering it online instead!
On the upside, the connectors for the switch joysticks turned up so I went and grabbed some PCB material so I can work on the PCBs this weekend.
 

Attachments

StonedEdge

a.k.a. ClonedEdge
.
.
Joined
Nov 16, 2018
Messages
365
Likes
1,495
Location
Japan, Tokyo
Portables
2
This is going to be so good. Also I love the design of your CNC. How loud does it get when it’s cutting?
 

Dmcke5

.
2020 1st Place Winner
Joined
Feb 16, 2020
Messages
216
Likes
885
Location
Queensland, Australia
Portables
3
This is going to be so good. Also I love the design of your CNC. How loud does it get when it’s cutting?
It's a bit hard to describe... It's definitely louder when the cover is up but I wouldn't say it makes a HUGE difference to the volume. I am planning to line as much of the inside of the enclosure with foam as possible to help keep the noise in. It does seem to take a bit of the harsh "edge" off the noise of the tool in the material. Obviously it depends a lot on the material though. The spindle itself is pretty quiet, so I frequently cut PCB's with it in the middle of the night, as it hardly makes any noise. But cutting through big blocks of aluminium is a completely different thing and generally makes quite a bit of noise (although the compressor for the coolant mist is still by far the loudest part of it).
Put it this way, for light passes in plastic or wood, I'm able to run the machine late at night and not wake my own kids up who are directly above me upstairs. I figure if it doesn't wake my kids up hopefully it's not too loud for the neighbours lol
 

Dmcke5

.
2020 1st Place Winner
Joined
Feb 16, 2020
Messages
216
Likes
885
Location
Queensland, Australia
Portables
3
Well I've officially made my first mistake of the project! I accidentally toolpathed some of the pockets on the second side of this job for the wrong sized tool. I also didn't realise that I hadn't taken the USB ports deep enough on the first side of the job. If it was just the USB port holes I'd have a go at fixing it, but since there's a considerable amount of material on the top side that has been removed that shouldn't have been I'll probably just have to start these parts again. The outside of the parts are correct (asides from the wacky bits above the USB ports due to the machining not being deep enough) so at least I've been able to fit these ones up and see what it looks like! Ignore the fact that it doesn't line up with the 3D print. The filament I used is horrible and it did not want to do what I wanted it to, so the edges ended up curling up a bit. I'm pretty sure the machined ones are going to fit just fine when I get around to making them ;)

IMG_20200420_190734.jpg


IMG_20200420_190752.jpg
 

Dmcke5

.
2020 1st Place Winner
Joined
Feb 16, 2020
Messages
216
Likes
885
Location
Queensland, Australia
Portables
3
Just realised I've made a huge mistake with this design. I mounted this joystick on an angle to try and keep it as far from the shoulder buttons as possible. But its just occurred to me that means I'm going to need some pretty tricky maths in the controller program to "rotate" the axis to make it work properly. Otherwise I've got to try and make an adapter to get the rotation right, or remake the front housing which I really don't want to have to do.
 

Attachments

Aurelio

ᕕ( ᐛ )ᕗ
Staff member
.
.
.
.
.
Joined
Mar 3, 2016
Messages
2,228
Likes
2,952
Portables
2
Just realised I've made a huge mistake with this design. I mounted this joystick on an angle to try and keep it as far from the shoulder buttons as possible. But its just occurred to me that means I'm going to need some pretty tricky maths in the controller program to "rotate" the axis to make it work properly. Otherwise I've got to try and make an adapter to get the rotation right, or remake the front housing which I really don't want to have to do.
Nothing complex: https://en.wikipedia.org/wiki/Rotation_matrix
 

Dmcke5

.
2020 1st Place Winner
Joined
Feb 16, 2020
Messages
216
Likes
885
Location
Queensland, Australia
Portables
3
Maybe not to you, but maths is definitely one of my shortcomings haha. I could probably work it out, but I'm not sure if its worth all of the hair pulling.....

Maybe 3d print/CNC a small mount to rotate it slightly, losing a mm or so of height shouldn't affect it too much as joycon stick ranges are pretty low anyway.
Yeah that's what I'm thinking. I've checked and I have room to straighten it up without having to remove the existing standoffs. I'll just make a new plastic insert with standoffs in the correct orientation as part of them. The frustrating part is now that I'm looking at the joysticks in real life I can see that the body of the joystick isn't actually central to the stick itself. That means I could have just rotated the joystick 180 degrees and given myself more room for the shoulder buttons from the word go, but instead I chose to make life difficult lol. Need to fix up the model of the joysticks first before I go too far, as they don't quite match up perfectly with the ones I downloaded before I had the joysticks here. Seems to be a running theme, as I had trouble with the downloaded models of the PSP joystick I used on my first portable too.
 

MRKane

.
2021 3rd Place Winner
Joined
Nov 5, 2017
Messages
405
Likes
488
Man I love those little Arduinos! I've had so much fun with those!
 
Top