Worklog Cookies and Criim Ashida

Joined
Sep 30, 2021
Messages
49
Likes
69
Location
Idaho
Portables
2
Alternate title: I'm Addicted, Pliise Send Help

So after finishing up my last Ashida, I've had a hole in my life; one that can only be filled with making another portable. I considered doing a G-Wii, and probably still will sometime in the future, but there's something amazing about the feel of the Ashida. It brings back so much nostalgia from when I was a kid and would spend hours playing Mario Kart: Double Dash!! or Smash Bros. Melee with friends on the GameCube, but anywhere you go. @Wesk really hit the ball out of the park with this one. So, I figured I'd add another Ashida worklog onto the forums!

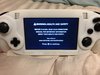
I'm rather proud of how my previous Ashida turned out:
IMG_0400.jpeg


However, it has some issues that aren't entirely easy to fix. Allow me a brief moment of your time to explain.

It had been a year or so since the last time I had any soldering projects, and at the time I wouldn't have said I had much practice with the skill at all, only ever having to solder a few things here and there over the span of several years. In part, that is why I wanted to take on this project. There were a few minor things that I did early on that had little to no impact on the final product, but as far as professionalism goes, there was a lot to be desired. While none of the internals are too revolting, several of the solder joints revealed my inexperience. However, one of the bigger mistakes I made was when I went to attach the ribbon connector. In my hubris, I accidentally burnt off a solder pad or two on the left controller PCB, making the ribbon cable an impossible option. Not only that, I had severed the connection that ran through the connector. I ended up having to reroute the connection through extra wires to a few of the buttons. I'm not sure I did it quite properly however, as there are times that there seems to be some accidental connection between buttons and even the sticks (not to the point that games are unplayable, but sometimes there is some rather strange and inconvenient behavior).

The glaring mistake, however, was the 3D printed case. I've briefly touched on this a few times in my original thread, but I had absolutely no idea what I was doing when I printed the case. Rather than doing what I should have done from the beginning and reprinting I figured I'd just grin and bear it. That is a wrong decision. I had to sand way more than I should have, several screw posts broke off and had to be glued back into place, cracks here and there causing loose internals, the whole shebang.

I think I'll fix up this project sometime in the future, but it will require printing a new case and ordering new Ashida controller PCBs, but that's the easy part. I then will need to desolder several wires as they run in the through holes under the heat sink in the case, relocating them in the new case, rewiring the controller, and a few other odds and ends. Not impossible just time consuming and I wanted to make another one anyway, so here we are.

Anyway, enough blabber and onto what we all are here for: some sexy pictures.

IMG_0425.jpeg

As is the case in many worklogs, I'm waiting on a few more components. 4Layer always comes so fast though! I'm currently waiting on my DigiKey order, but I still had one ribbon connector left over since the one I horribly botched last time was the first, and as such I didn't even attempt the second. A quick triple check that none of the pins are bridged and we are good to go!


IMG_0427.jpeg

I also of course triple checked continuity for all of the button pads and connector pins to the GC+2.0 and everything is looking great!


IMG_0428.jpeg

On to the PCB that runs along the bottom - we have our audio dial and headphone jack in, along with the U-Amp 2


IMG_0429.jpeg


IMG_0430.jpeg

Here are a few more hero shots of that bottom PCB (notice the tact and power switches are missing - they're somewhere out there waiting to be delivered).


And now... the big reveal


My original intent was just simply a black on white design kind of like piano keys, so I ordered the case in white Somos Ledo from PCBWay with #1000 sanding. I'll have to admit, seeing as I only had a vision of what it might look like in my head I was nervous that I would get everything and hate the way it looked. But as soon as I got it it far exceeded my expectations. It wasn't as white as I was expecting it to be, but I like it much more than if it would have been. Maybe it's not your cup of tea, but I think it'll end up looking pretty sick.

IMG_0431.jpeg

It really has this creamy, white chocolate look to it hence the name. That with the all black buttons that have yet to be delivered should look a lot like cookies and cream ice cream, or one of these things:
Cookies'n'Creme.png


Here are some hero shots of the case:

IMG_0432.jpeg


IMG_0433.jpeg


IMG_0434.jpeg

I feel like this picture particularly shows how much it looks like you could just bite into it.

IMG_0435.jpeg

I clipped the excess guide nub, thanks to @Cyframe pointing out that it remains from the original scan. I probably would have missed that detail otherwise.

IMG_0437.jpeg

If you don't know what you're looking for you might not see it, but that's where the nub used to be.

IMG_0438.jpeg

Of course I had to check that things were lining up with the port holes in the case.

IMG_0439.jpeg

Everything is lining up as it should!

IMG_0440.jpeg

With the 3D printed buttons in you can really see how it's looking like cookies and cream.

IMG_0443.jpeg

Again, making sure that ports are lining up properly.

IMG_0444.jpeg

Oh, can't forget these bad boys. Translucent UTR-8100 from PCBWay and some of the sexiest parts of the build. Too bad they'll be inside and no one will ever see them, but this time I'm all about the flair.

IMG_0445.jpeg

Another sexy shot of those babies.

IMG_0446.jpeg

Another hero shot of the printed parts.

IMG_0447.jpeg

I think the Wii is tentatively eyeing that case. It knows what it's about to go through.

IMG_0448.jpeg

My wife liked this shot a lot from my previous build so I felt the need to do it again. That Wii is going to have to lose some weight to fit in there.


Again, some final thanks to @Wesk for the awesome design and all the awesome people at 4Layer for making this so easily accessible for everybody!
 
Joined
Sep 30, 2021
Messages
49
Likes
69
Location
Idaho
Portables
2
Ok so a question for all the portablizing genies out there...

I bought the screen from the Ashida BOM. I wired it up for VGA and video came to the screen! However it comes out really purple like this:

IMG_0473.jpeg


Edited: So I’ve confirmed the problem is with the green input. Whether the green line is wired or not it looks the same. I’ve checked continuity between the green pin on the driver board and the green output leg on the wii and theyre connected. Is there a possibility that the h and v sync could be causing this? I’d rather not desolder them for testing since they connect to those tiny legs. Additionally, every time I power on I have to manually change to VGA - not sure there’s a way around this. Also when it does the auto adjust the video runs off the right side as seen in the picture. Any help is appreciated!
 
Last edited:
Joined
Sep 30, 2021
Messages
49
Likes
69
Location
Idaho
Portables
2
As an update on the screen: I resoldered the hsync and vsync lines and now pixels no longer run off the edge! I think I might have also found the issue with the green line. Upon further inspection it seems that two of the pins on the ribbon connector were bridged together. I guessed that one of those was the green channel, so I removed the excess solder in hopes that would fix the issue. No dice. I’m really hoping it’s not an issue on the motherboard and am clinging to the thin possibility that due to the bridge on the ribbon connector the green channel shorted and was ruined that way.

I do have another screen driver board but it’s currently inside my original Ashida.. I also have another Wii in there as well but seeing as there are so many things soldered into it I’m really hoping it’s just the driver board. I for sure will have time on Tuesday to tear that sucker down.
 

Wesk

Undervolting....
Staff member
.
.
Joined
Jul 12, 2017
Messages
869
Likes
2,176
Location
Queensland, Australia
Your screen issue isn't a colour line problem but an order issue. Re-read the trimming guide and when it comes to the colour lines read the NUMBERS and not what COLOURS are shown. It looks like all the colours are actually there.
;)

Any pics of the wiring?
 
Last edited:
Joined
Sep 30, 2021
Messages
49
Likes
69
Location
Idaho
Portables
2
Your screen issue isn't a colour line problem but an order issue. Re-read the trimming guide and when it comes to the colour lines read the NUMBERS and not what COLOURS are shown. It looks like all the colours are actually there.
;)
At first that's what I thought too, as I know that is a common mistake to make but I was paranoid about it all day so I checked and rechecked multiple different times that the lines were wired correctly. However I have you to thank @Wesk because in wanting to show some pictures so you can see what's going on better I figured out it is with the display driver board (I should have done this test earlier but didn't think of it until now)

So I isolated the wires and tested them one by one. Forgive the pictures being upside down. This is what it looks like if only green is wired:
IMG_0475.jpeg


Notice the weird gradient from the left side. Now here is what the screen looks like with just red, and then just blue:
IMG_0478.jpeg


IMG_0479.jpeg


It's easier to see with the red line, but that gradient is still there, despite nothing being wired to the green channel. So I was nervous I had somehow damaged the output from the Wii, but then I tested what would happen if I wired red to the green channel to see if I could get anything on screen and...
IMG_0476.jpeg


There is the gradient again. So finally, to make sure the green was for sure putting out a signal I wired the green line to the red channel and here's what happened:
IMG_0477.jpeg


So the green line is coming through and somewhere on the driver board the green line was fried.

Again thanks a ton because if it weren't for your suggestion I would have been toiling over it all night but it'll be super simple to swap those boards.
 
Joined
Sep 30, 2021
Messages
49
Likes
69
Location
Idaho
Portables
2
So while I wait for a few more shipments I'll go ahead and show off a few more pictures of the progress on this baby.

IMG_0465.jpeg


I got the first boards wired up and put in and then fired it up for a test run and the fan started right up! After testing some voltages I was good to continue on!

IMG_0466.jpeg


I got the screen installed and it's starting to look real good! I'm still waiting on buttons unfortunately so I'm anxiously waiting to get a glimpse of what the finished product is going to look like.

IMG_0468.jpeg


OEM stick boxes hit different B|

IMG_0469.jpeg


We can't forget about those nice clear trigger PCB mounts.

IMG_0470.jpeg


Ready to free this Wii from its mortal form

IMG_0480.jpeg


That Wii looks a lot more comfortable in there. I'll go and clean up that angel hair mess as soon as I get a new screen driver board
 
Joined
Sep 30, 2021
Messages
49
Likes
69
Location
Idaho
Portables
2
So I went and ordered a new driver board for the screen and when it came I wired it up and it looks beautiful now! I am having a problem and from what I understand it is a little bit common. The options for the GC+2.0 constantly flick on and off whenever I am on settings, and it happens as well when I am in-game, which causes the analog sticks to reset at random intervals, so my character will get stuck moving one way until the sticks decide to reset again. I have tried both 32 and 34 awg wire for the connection and as far as I can tell there has been no difference. I also have the wire as short as it can possibly be, as I've seen some people post about how that can cause issues as well. I'm not sure if there is an update in firmware that I am missing, and if there is I'm not sure where to find it. Thanks for any help in advance!

Edit: I am pulling 3v3 from the screen driver board would that cause any problems?
 
Last edited:
Joined
Sep 30, 2021
Messages
49
Likes
69
Location
Idaho
Portables
2
Ok! So I found the problem to my previous question.. First I wired the controller PCBs straight to the Wii motherboard instead of pulling it from the screen and it started working!... kind of... It would still flick on and off, so I ended up wiring two more 3v3 points to the controller (3 in total) and that seems to work perfect! I now have 10-15 hours of testing and have yet to see the controller disconnect again! 3 seemed to be the sweet spot for me, as I had tried two but it still seemed to flick off every so often.

So I got that fixed up and relocated the bluetooth module, since where I had it before made the insides kind of cramped. Now, the insides fit perfectly.

I'm still figuring out all of the nuances of getting the settings just right (tons of customization which we love to see from @Aurelio) so this is what I have the settings at right now, but let me know if I should change anything (I'm using the PD charger linked in the BOM):

IMG_0519.jpeg


Anyway, eventually I'd like to get the MX chip working. I've tried wiring it up a couple of times and haven't had any luck so far but I'm not in any rush to play Animal Crossing yet so it can wait.

IMG_0510.jpeg


IMG_0509.jpeg


IMG_0511.jpeg


IMG_0515.jpeg


IMG_0516.jpeg


IMG_0517.jpeg


IMG_0518.jpeg


Now that the Cookies and Criim is done I can finally crack into these babies I've been saving

IMG_0520.jpeg


Oh, and of course get onto playing Wind Waker since that's why I built it in the first place...

IMG_0514.jpeg
 

Attachments

Joined
Sep 30, 2021
Messages
49
Likes
69
Location
Idaho
Portables
2
Thanks wesk! Good point with lifting the joystick cap. It’s a little loose because it’s third party but I remember seeing somewhere that people would put a tiny ball of tin foil in the hole for the stickbox to elevate the joystick so I’ll do that to help.

I should have this on the cutting edge within the next day or so!
 
Joined
Apr 12, 2020
Messages
207
Likes
235
This is beautiful! Do you have a picture of the internals? Also did you twist your wore for the VGA connection? I only see the photo with them straight. Just curious!

Great job my dude!
 
Joined
Sep 30, 2021
Messages
49
Likes
69
Location
Idaho
Portables
2
This is beautiful! Do you have a picture of the internals? Also did you twist your wore for the VGA connection? I only see the photo with them straight. Just curious!

Great job my dude!
Thanks @CalebPikmin! I might have a picture of the internals somewhere from a while ago but not anything recent but no I don't think I ever twisted them together because I only have one color of magnet wire I just ran them all close together. I'm not sure if that is supposed to help picture quality or if it only helps for organization (I'm no sparklebear) but everything comes out super clear and pretty on the screen so if it ain't broke...

IMG_0500.jpeg


Yeah I found this one but this was still early on - you can see the MX chip and bluetooth modules were not in very good locations and it still kind of looks like a mess because I was still in the phase of shutting it, making sure things worked, opening, tweaking, and then repeating.
 
Joined
Apr 12, 2020
Messages
207
Likes
235
Thanks @CalebPikmin! I might have a picture of the internals somewhere from a while ago but not anything recent but no I don't think I ever twisted them together because I only have one color of magnet wire I just ran them all close together. I'm not sure if that is supposed to help picture quality or if it only helps for organization (I'm no sparklebear) but everything comes out super clear and pretty on the screen so if it ain't broke...

View attachment 20170

Yeah I found this one but this was still early on - you can see the MX chip and bluetooth modules were not in very good locations and it still kind of looks like a mess because I was still in the phase of shutting it, making sure things worked, opening, tweaking, and then repeating.
Oh okay no worries! I'm about to do the VGA to finish off the g-wii so I was just curious on that. I saw it was recommended to twist wires according to gboy guide and others mentioned to me. But hey if it works without it! Sweet haha!
 

Wesk

Undervolting....
Staff member
.
.
Joined
Jul 12, 2017
Messages
869
Likes
2,176
Location
Queensland, Australia
Twisting the video lines is optimal, you may have a clear image at home but if you take the device to an electronically "Noisy" environment (Lots of radio signals) or sit too close to an unshielded device the image quality may degrade.
 
Joined
Nov 6, 2021
Messages
11
Likes
8
Oh okay no worries! I'm about to do the VGA to finish off the g-wii so I was just curious on that. I saw it was recommended to twist wires according to gboy guide and others mentioned to me. But hey if it works without it! Sweet haha!
shielded wire is even better, you can harvest some from the wifi module
 
Top