- Joined
- Jan 17, 2018
- Messages
- 28
- Likes
- 9
After completing my Wii Micro successfully, I thought I'd press my luck and hack up another 4 layer board.
I wanted to do something that involved an integrated screen this time and take a shot at the full OMGWTF trim. (The Micro left the video and USB ports on the trimmed board. What could possibly go wrong? ;-)
This is what I'm shooting for:
- OMGWTF 4 layer board
- PM
- Wii and Gamecube functionality
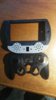
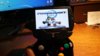
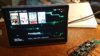
- 5" TFT 16:9 screen
- Original Gamecube controls
- Integrated IR LEDS for the Wii.
- 5v powered by standard phone charger (I think when I'm not near an outlet I could power it with a phone recharging battery pack)
What I've done so far:
- Installed PortablizeMii
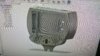
- Relocated U10 (tested OK)
- Relocated Bluetooth (I still hate that one!) (tested OK)
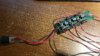
- Assembled my regulators. (tested OK)
- Trimmed the board
- Relocated USB (had a heck of a time getting reliable connections for this!!) (tested OK)
- Got my 5" backup monitor from ebay and converted it to 5v. (THANKS Jefflongo!!)
- Ordered a GC+ from Noah 3 weeks ago. Still waiting for it. (does it usually take a long time?)
- Ordered an audio amp (not here yet)
- Ordered a laptop fan/heatsink. (not here yet)
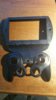
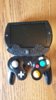
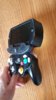
- Picked up a Wavebird controller.
I want to either attach the screen to the Wavebird body with a hinged support, or separate the controller into 2 halves and print a body to put between them that would contain the screen and all the other wiring.
I'm not really sure which way to go.
EDIT: I tested it with a portable phone charger battery pack that I use for my tablet when I'm flying. It worked like a charm! Once it's complete I'm curious how long it will function on that power source.
EDIT:
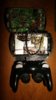
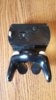
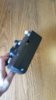
After seeing ShockSlayers awesome Wavebird portable, I decided to try something similar using a standard controller. I'm designing a 3d printed add-on that will hold a 5" screen and a OMGWTF board.
I wanted to do something that involved an integrated screen this time and take a shot at the full OMGWTF trim. (The Micro left the video and USB ports on the trimmed board. What could possibly go wrong? ;-)
This is what I'm shooting for:
- OMGWTF 4 layer board
- PM
- Wii and Gamecube functionality
- 5" TFT 16:9 screen
- Original Gamecube controls
- Integrated IR LEDS for the Wii.
- 5v powered by standard phone charger (I think when I'm not near an outlet I could power it with a phone recharging battery pack)
What I've done so far:
- Installed PortablizeMii
- Relocated U10 (tested OK)
- Relocated Bluetooth (I still hate that one!) (tested OK)
- Assembled my regulators. (tested OK)
- Trimmed the board
- Relocated USB (had a heck of a time getting reliable connections for this!!) (tested OK)
- Got my 5" backup monitor from ebay and converted it to 5v. (THANKS Jefflongo!!)
- Ordered a GC+ from Noah 3 weeks ago. Still waiting for it. (does it usually take a long time?)
- Ordered an audio amp (not here yet)
- Ordered a laptop fan/heatsink. (not here yet)
- Picked up a Wavebird controller.
I want to either attach the screen to the Wavebird body with a hinged support, or separate the controller into 2 halves and print a body to put between them that would contain the screen and all the other wiring.
I'm not really sure which way to go.
EDIT: I tested it with a portable phone charger battery pack that I use for my tablet when I'm flying. It worked like a charm! Once it's complete I'm curious how long it will function on that power source.
EDIT:
After seeing ShockSlayers awesome Wavebird portable, I decided to try something similar using a standard controller. I'm designing a 3d printed add-on that will hold a 5" screen and a OMGWTF board.
Attachments
-
 6.5 MB Views: 272
 -
 5 MB Views: 284
Last edited: