Worklog Various Cosmetic Console Mods

Fiskers1208

BANNED
.
Joined
Jan 16, 2017
Messages
0
Likes
0
View attachment 2275 View attachment 2276 View attachment 2277
A whole day of Bondo, sand, prime, and repeat, but I got it looking pretty good. There are a couple minor touch-ups to do, and I still have to put the nunchuck and charging ports on the bottom, but I feel good that I got all of the buttons done. I've decided to leave the Power button off of this remote. I plugged up a hole that I used to be a screw post, and filled in the "grip" because my buttons went partly into it and it would've liked odd otherwise. I also put the slot for my A/B reversal switch on the top. I'm tempted to use "the good paint" so I may put off painting this until I sell some stuff. I think for controllers and handhelds, the upgrade is well worth it. More to come soon :)
Looks awesome:)
 
Joined
Feb 17, 2017
Messages
3
Likes
0
Love your work. The Bondo job is excellent. Love the placement of the controls.
 

cheese

the tallest memer in town
Staff member
.
.
.
Joined
Mar 2, 2016
Messages
2,759
Likes
2,431
Location
Florida
My dad actually owns the original gray one, it was weird to see the red ones after looking at the gray for so long... Def agree the gray is better
 

GingerOfOz

no wario
Staff member
.
.
2020 2nd Place Winner
2022 3rd Place Winner
Joined
Dec 16, 2016
Messages
1,122
Likes
2,709
Location
The Oregon Wildlands
Portables
just so many i am so cool
Well, I was born after the n64 came out, but I did get to play my dad's NES (since he barely ever used it) until we eventually got a gamecube...
Ayyyy same. My best memories are of SMB3 and Mario Party 5. Mom bought an NES with her paper route money when she was a teenager, and it worked up until a few years ago.
 

cheese

the tallest memer in town
Staff member
.
.
.
Joined
Mar 2, 2016
Messages
2,759
Likes
2,431
Location
Florida
Ayyyy same. My best memories are of SMB3 and Mario Party 5. Mom bought an NES with her paper route money when she was a teenager, and it worked up until a few years ago.
My mom got it for my dad's 30th birthday ¯\_(ツ)_/¯
Also you should take a look and try and fix it, depending on what's wrong
 

GingerOfOz

no wario
Staff member
.
.
2020 2nd Place Winner
2022 3rd Place Winner
Joined
Dec 16, 2016
Messages
1,122
Likes
2,709
Location
The Oregon Wildlands
Portables
just so many i am so cool
I think we got rid of it... I believe she gave it to my uncle, but I don't think he ever took the time to fix it unfortunately.
 

jefflongo

Broke BitBuilt
Staff member
.
.
Joined
Dec 15, 2016
Messages
1,017
Likes
1,361
Location
Santa Barbara, CA
Portables
3
Did this mod awhile back but never posted it. Basically just installed some green LEDs into the power LED and each controller port. I tapped into the 5v line on each controller port to power each LED. Rumble still works fine. It looks better in person. :)

20170314_174654.jpg
 

Madmorda

Painting Queen
.
.
Joined
Oct 27, 2016
Messages
725
Likes
1,718
Location
Texas
Portables
2
Did this mod awhile back but never posted it. Basically just installed some green LEDs into the power LED and each controller port. I tapped into the 5v line on each controller port to power each LED. Rumble still works fine. It looks better in person. :)

View attachment 2326
Glad to see that you did one! Now to start painting them... :P
 

jefflongo

Broke BitBuilt
Staff member
.
.
Joined
Dec 15, 2016
Messages
1,017
Likes
1,361
Location
Santa Barbara, CA
Portables
3
Not a console but here's my GC controller I use for melee. Did this about a year ago now, before I joined this forum for sure. Top is from an emerald green controller my friend got me while in Japan and the bottom is from a purple/clear Japanese controller which I traded bottoms with a friend. Installed 3 slow color changing LEDs and I like it. :-)


Madmorda

Painting Queen
.
.
Joined
Oct 27, 2016
Messages
725
Likes
1,718
Location
Texas
Portables
2
@jefflongo I like the controller a lot! It's cooler than any of mine so far. You should start a worklog for your cosmetic mods as well :)

So, update on the wiimote / zapper gun combo:

20170513_002100.jpg
The trigger does fit on top of the wiimote and can be secured without it being at all noticeable, but it was able to wobble a bit. I drilled some holes in one side of the trigger to accommodate some small components on the wiimote that stuck up. Now it fits perfectly.

20170513_002035.jpg
I plan to include one 18650 battery (a single-cell phone charger) and use a TI reg to bring it down to the right voltage for the remote. I thought recharging would be easier than removing batteries. I believe you could fit up to at least 3 cells in one of these, but that's really just unnecessary weight. This one can definitely fit here, but I may decide to move it to a better place balance-wise later on if it feels heavy.

20170513_002048.jpg
I frankencased in the plug for the nunchuck plug. I'll be keeping the hole on the right as-is for charging most likely.

I also realized that I forgot to put a sync button in, which I'm not sure how to approach yet. It might end up being a tall tact switch, but I've yet to decide. If I go that route I'll add the power button as a matching one.

I was playing with my airbrush today to see how it works on plastic, and I don't like it. I love the airbrush, but I don't like how any of the paint I have looks on plastic. So I'll pick up some different paints, but may end up spray painting it with tamiya if it doesn't work out since it is a controller and needs to feel nice.
 

Madmorda

Painting Queen
.
.
Joined
Oct 27, 2016
Messages
725
Likes
1,718
Location
Texas
Portables
2
I picked up one of those portable phone batteries with a single 18650 inside and a pcb.
20170516_164359.jpg
I removed the usb and micro usb ports, then add in a little regulator magic and a charging plug.
20170518_001911.jpg

I had to get a new wiimote because I did something wrong to my old one (didn't bother finding out what). That's okay though since I would've needed two remotes anyways and I did this one cleaner.
20170518_001832.jpg 20170518_001828.jpg20170517_222911.jpg
I removed the nunchuck port and relocated the ir sensor. Unfortunately, the wii remote is smart enough to know that if it's tilted upwards, it isn't looking at the sensor bar. Since it needs to fit into the handle vertically, it would never show up on screen unless I relocated the accelerometer. I removed it and wired it back a few inches away. I tested it and it still works, so the epoxy is drying on it now. Thanks to @JacksonS for helping me with that :)

I chopped up the broken wiimote and removed the buttons, put wires on them, and that epoxy is also drying. I think I may need one more controller for parts because I messed up the dpad, and I don't have a nunchuck port with the circuit board attached.
 

Madmorda

Painting Queen
.
.
Joined
Oct 27, 2016
Messages
725
Likes
1,718
Location
Texas
Portables
2
20170603_184251.jpg
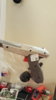
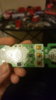
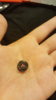
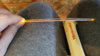
After quite a bit of testing, I was able to make a unique A button for the zapper gun. I've decided on a metroid theme (big surprise) and the A button will be a custom metroid one as shown here. I plan to make a guide on this in the near future, for anyone interested :)

20170603_171431.jpg
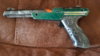
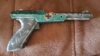
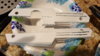
The main body of the gun will look like this. I did some practicing with this wiimote to get a scuffed metal look. The grey is "oil rubbed bronze" and the silver is metallic silver, both Rustoleum for plastics. I'm going to use a higher quality top coat for a nicer feel though.

20170604_190938.jpg
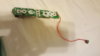
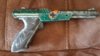
Here is the main body drying after the first color. Tomorrow I can get on with the next colors :) 
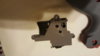
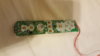
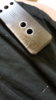
I'm considering some orange accents. You can see that I added three new holes to the right of the dpad. One for sync, one for the power button, and one for a green power led.

20170604_190920.jpg
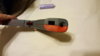
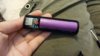
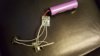
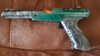
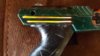
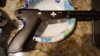
So, since I'm rather attached to the idea of it being scuffed metal colors, but also with a metroid theme, I was left with mainly these two pieces to make it clear that it's a metroid controller. You can see that I have two stripes on each of them dremelled out.

Phendrana_Drifts_Screenshot_(25).png 20170604_115834.jpg
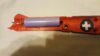
The reason for the stripes is that I'm going to paint it like Samus's arm cannon. I'm going to use the clear plastic piece from the Wii's faceplate to give it the yellow glowing stripes. They will likely be behind the plastic gun piece instead of embedded in it, but if I can figure out how to light it properly with it embedded, I will. To keep the light from spilling out and diffusing, I'll be using my aluminum tape to keep it in the clear parts. I've already tested and it lights up well.

I hope to have this done by the day after tomorrow, but you never know :D

I also realized that I'll have to make a matching nunchuck, but I'll wait until it's finished I think
 
Last edited:

Madmorda

Painting Queen
.
.
Joined
Oct 27, 2016
Messages
725
Likes
1,718
Location
Texas
Portables
2
I'm calling this project officially done. I have to take it apart again because the pointer stopped working (I believe closing it up caused two wires to touch) but here it is. Everything is functional and working great (except that one bug lol).

20170611_194029.jpg 20170611_194039.jpg
Lights on :D

20170611_194016.jpg 20170611_194009.jpg
Lights off :D

20170611_194043.jpg
Here's a close-up of those. They only light up when the remote is on.

There's an led next to the two tact switches that is yellow when the remote is being used and blinks green when charging.

The pointer is at a comfortable angle, and all buttons are reachable without stretching or reaching. The balance of it is nice too and it's not too heavy. Guess I'll have to play through the prime trilogy on wii now lol. I also realized that I need a nunchuck to match it, so I'll do that at some point.

All in all, this project took up 3 wiimotes and a zapper gun. It can definitely be done in much less space, much cleaner, but this worked out. I had fun with this so there may be a rev 2 in the future.
 
Top