
- Joined
- Mar 10, 2016
- Messages
- 39
- Likes
- 155
I posted my stock heat sink mod for my Win 2 to the GPDWin reddit group and had a few people ask for a tutorial. So I guess what better place to post it than here right? I hope this is ok, if not a Mod can flog me with a wet noodle or something. There is a commercially available alternative to this mod which will run you anywhere from $150-200 US dollars installed called the "3rd cooling mod". This stock heat sink mod will get you close to to the same performance at a fraction of the cost. I saw 8-12 degrees C reductions from this mod depending on what I was doing.
Disclaimer: No one else but you, the end user is responsible for anything good, bad or indifferent that may happen to your device attempting to modify it. As with all mods you do this mod at your own risk. Myself nor Bitbuilt Forums are not liable/responsible for your stupidity if you break something.
Links to stuff needed for the mod:
Mini Heatsinks: You will need 6-8 of these for this mod. Should be 8.8 x 8.8 x 5mm https://www.ebay.com/itm/20-x-Alumi...663010?hash=item23d5ca5762:g:iNwAAOSwHOFepof9
Thermal Paste:https://www.ebay.com/itm/New-Arctic...396253&hash=item2acb68a961:g:nL4AAOSwze9c0Gr9
Super Glue or Thermal Adhesive (This is the superglue I used, though any superglue would probably do. Artic silver thermal adhesive is probably overkill): https://www.ebay.com/itm/LOCTITE-40...440649?hash=item1a96571b09:g:MnUAAOSweRpdgFX8 or https://www.ebay.com/itm/Arctic-Alu...973708?hash=item3d958bd2cc:g:4vYAAOSwG8ldqJ6q
Other stuff needed: 800'ish grit sandpaper and access to a 3D Printer to print the custom fan shroud, you will also need a way to modify the small heat sinks. I used a small band saw, but a small hacksaw would work if you don't have access to a band saw. You will also need drill bits and a drill and some type of measuring device for the back case modifications.
I'm not going to go through the whole process of opening the GPD Win 2 up, there are plenty of video tutorials online that show how to open the device and remove the heat sink . Google is your friend. We'll start with the stock heat sink removed from the device.
The first thing you'll want to do is remove the fan from the heat sink by removing the 2 screws on top and set them aside for later (we will use these screws for the 3D printed fan shroud). You can also remove the stock shroud from the fan. To do this remove the tiny screw holding the shroud to the fan and pry up on the 2 clips around the outter edge of the shroud that hold the shroud to the fan. I appologize, I didnt plan to make an in depth tutorial on this so I have no pictures of these things.
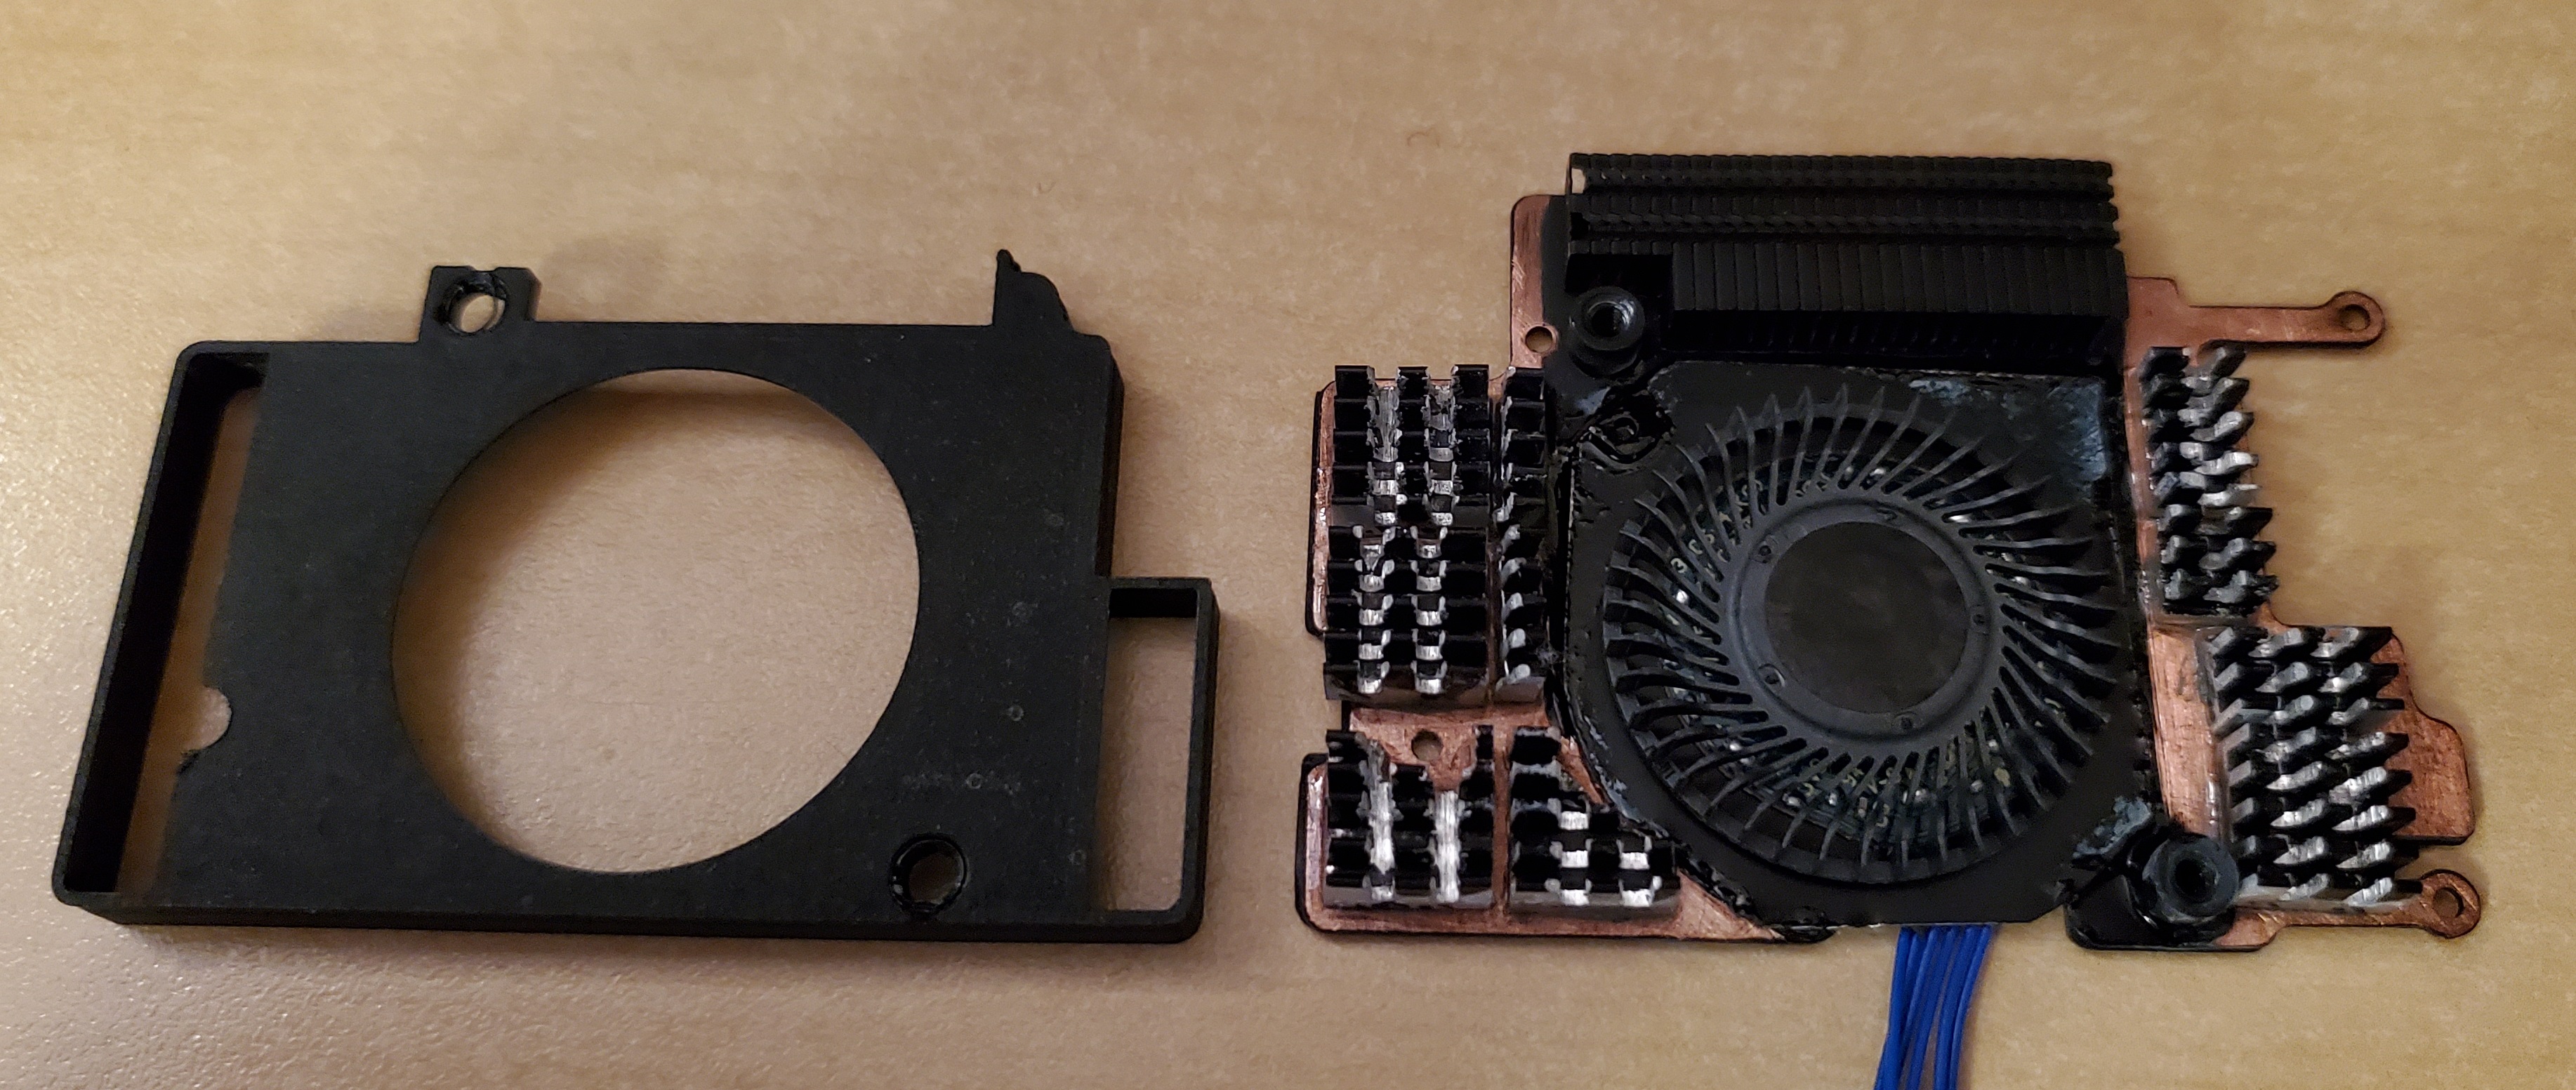
You should be left with something like this (Depending on what model GPD Win 2 you have the heat sinks are slightly different):
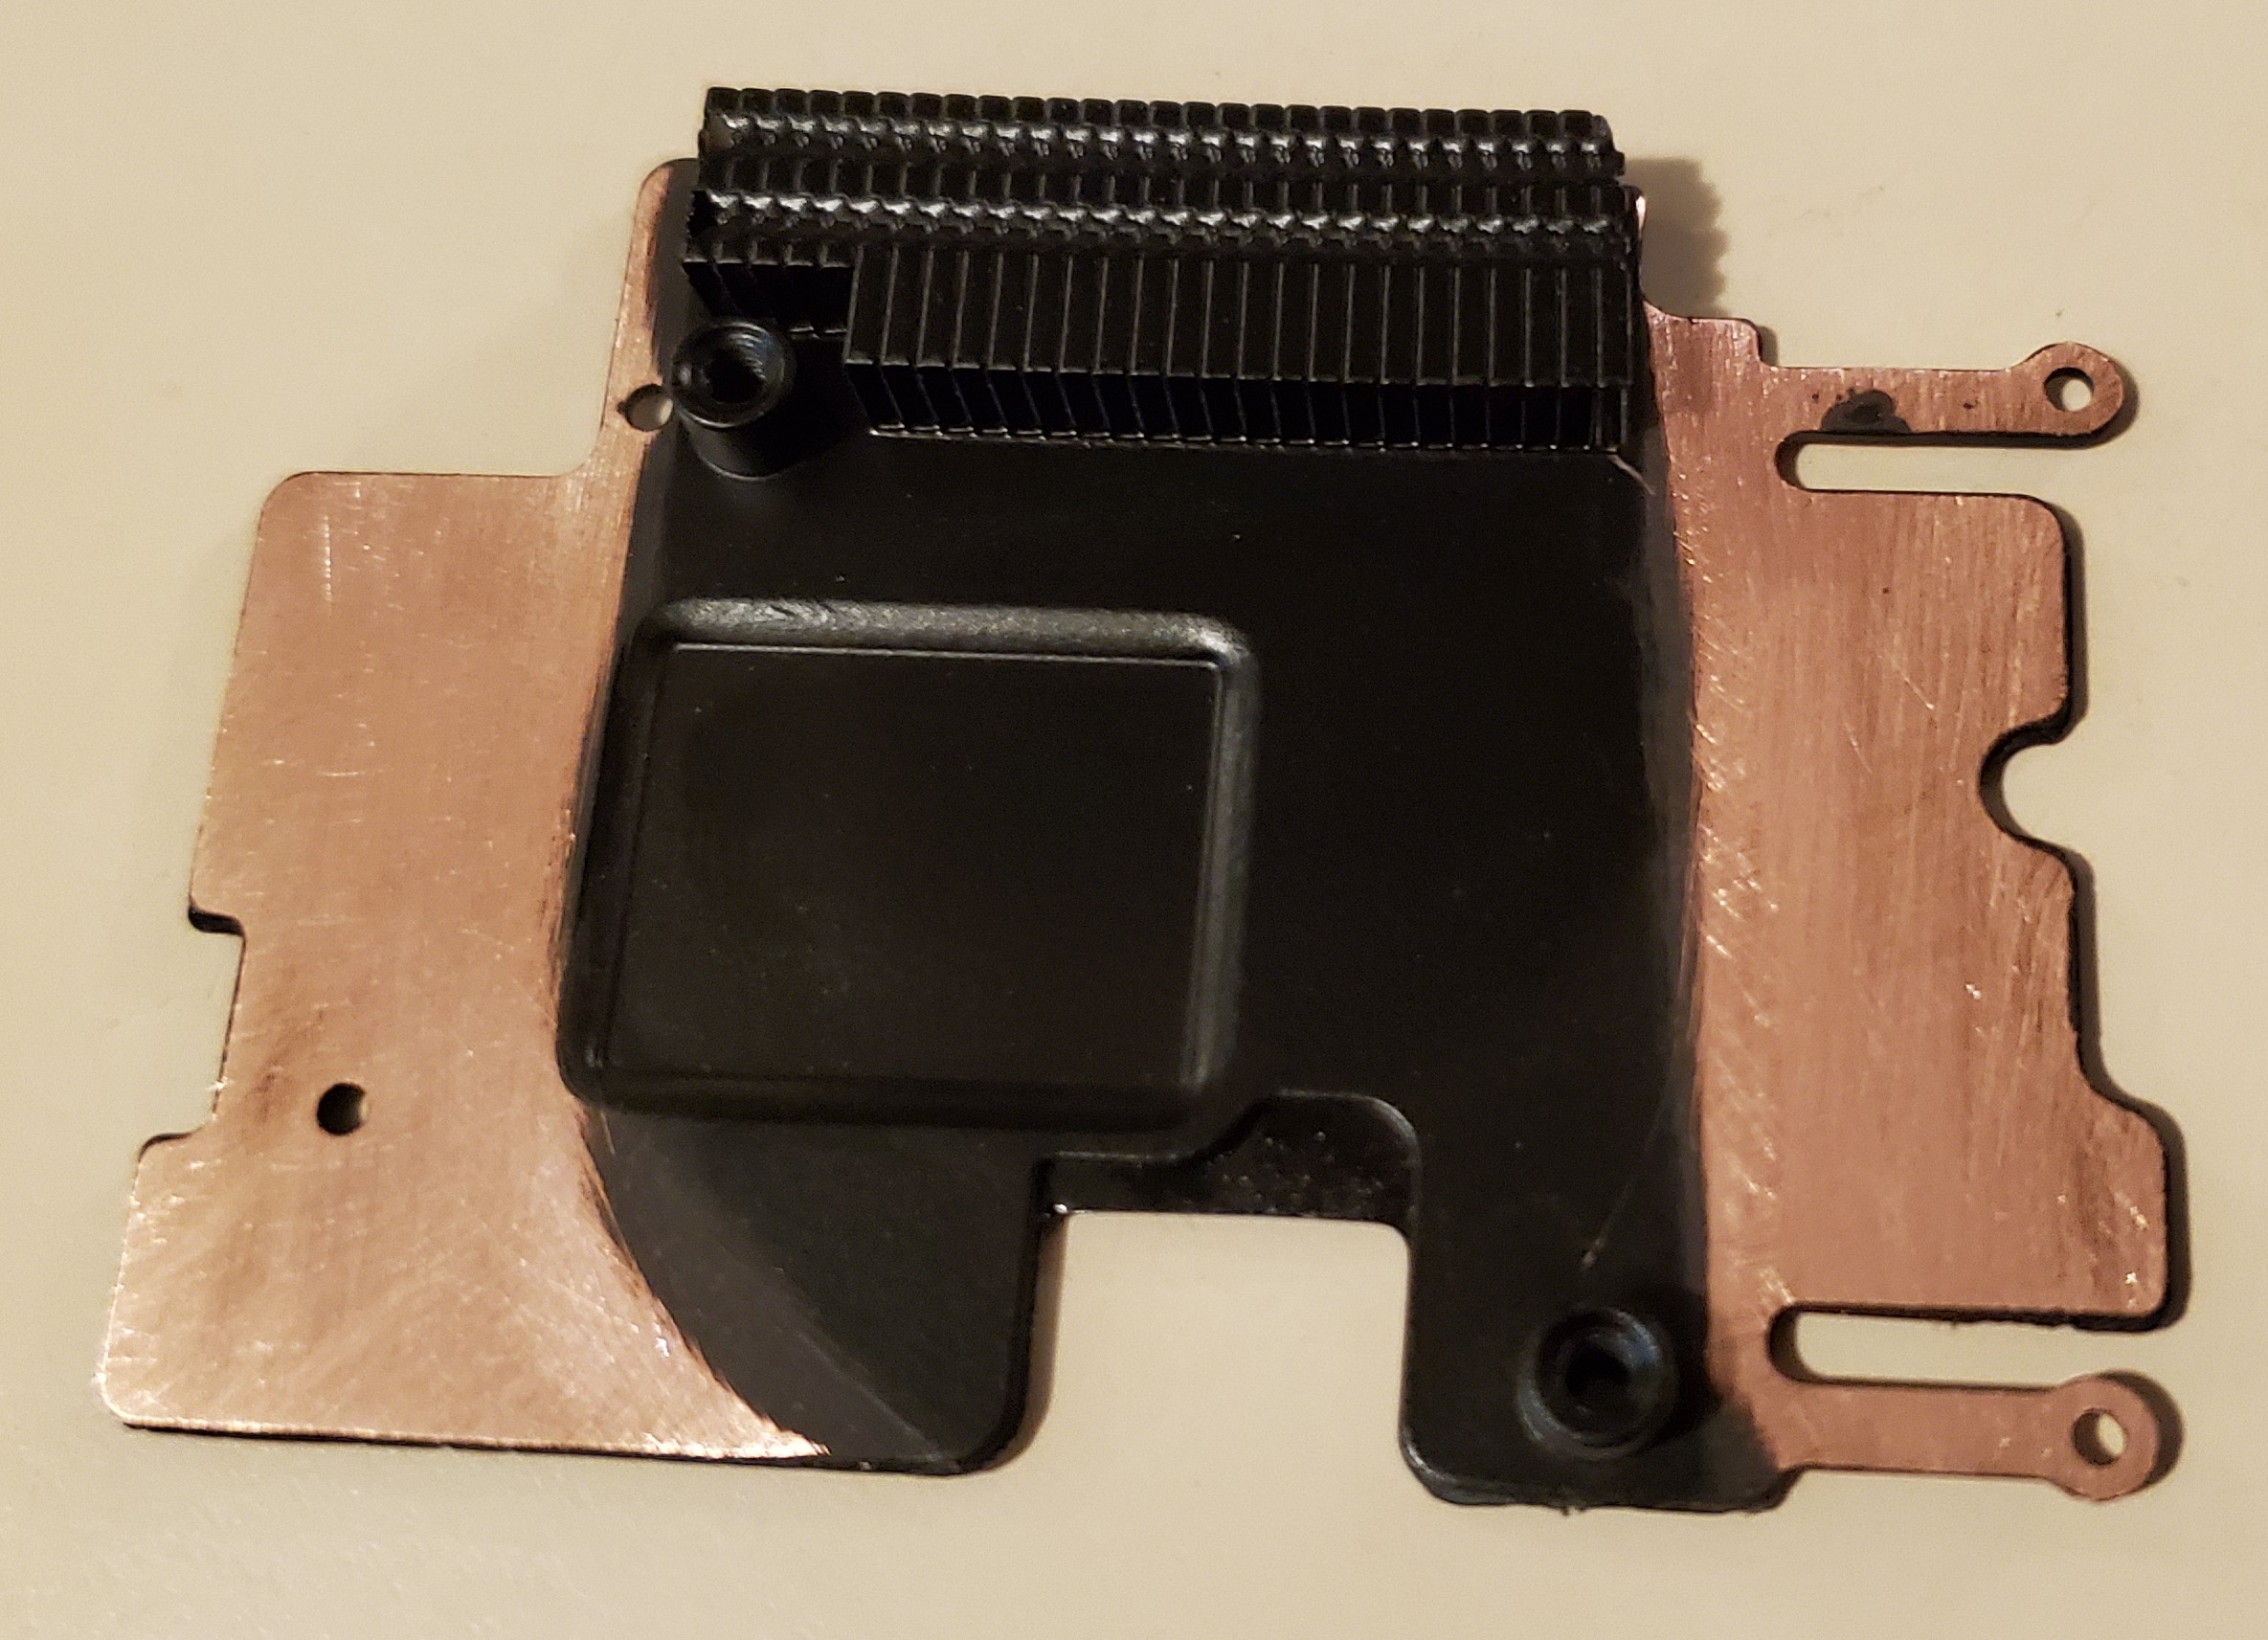

I don't have before pictures, but both models heat sinks are completely covered in black paint. For the best thermal conductivity you must sand off the black paint from where we are going to adhere the mini heat sinks to as pictured above.
After the heat sink paint is sanded off and the copper is completely exposed you can get a rough idea of where your mini heatsinks will be positioned by stacking them on top of the main heat sink and placing the 3D printed fan shroud over them to check alignment and fit. After you are sure your mini heatsink placements are good and you have cut them to fit you should end up with something that looks like the pictures below:
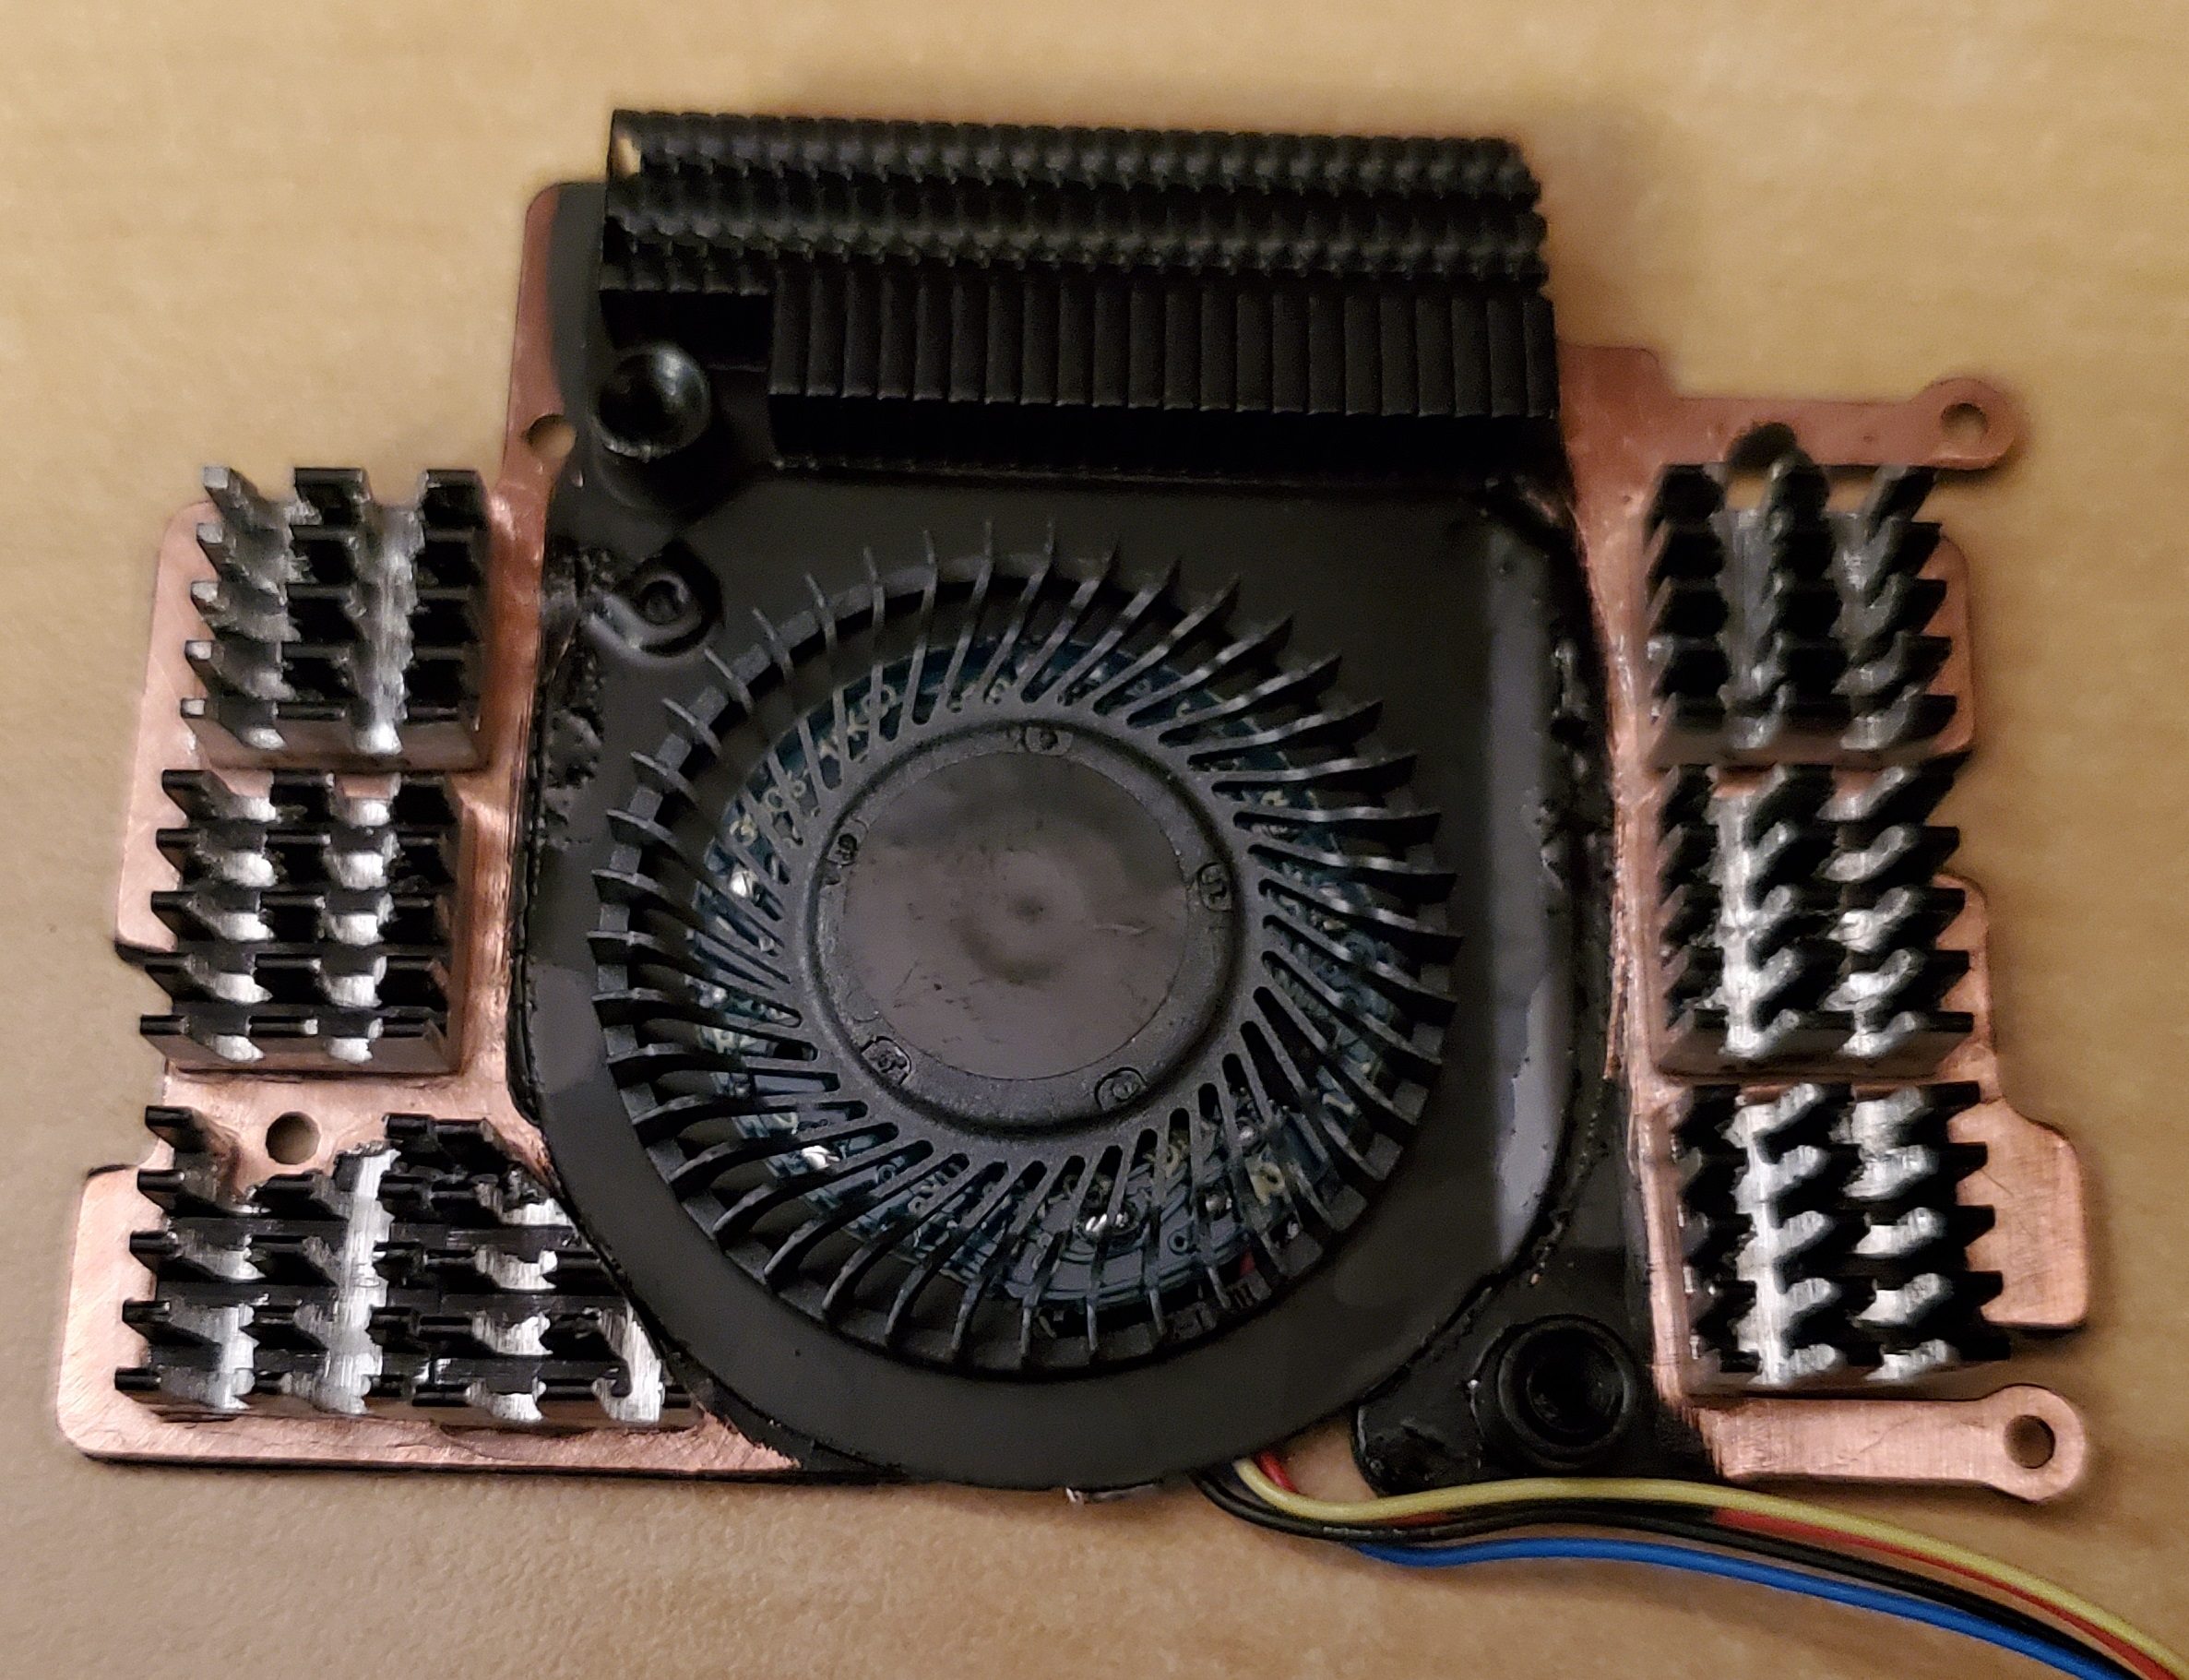
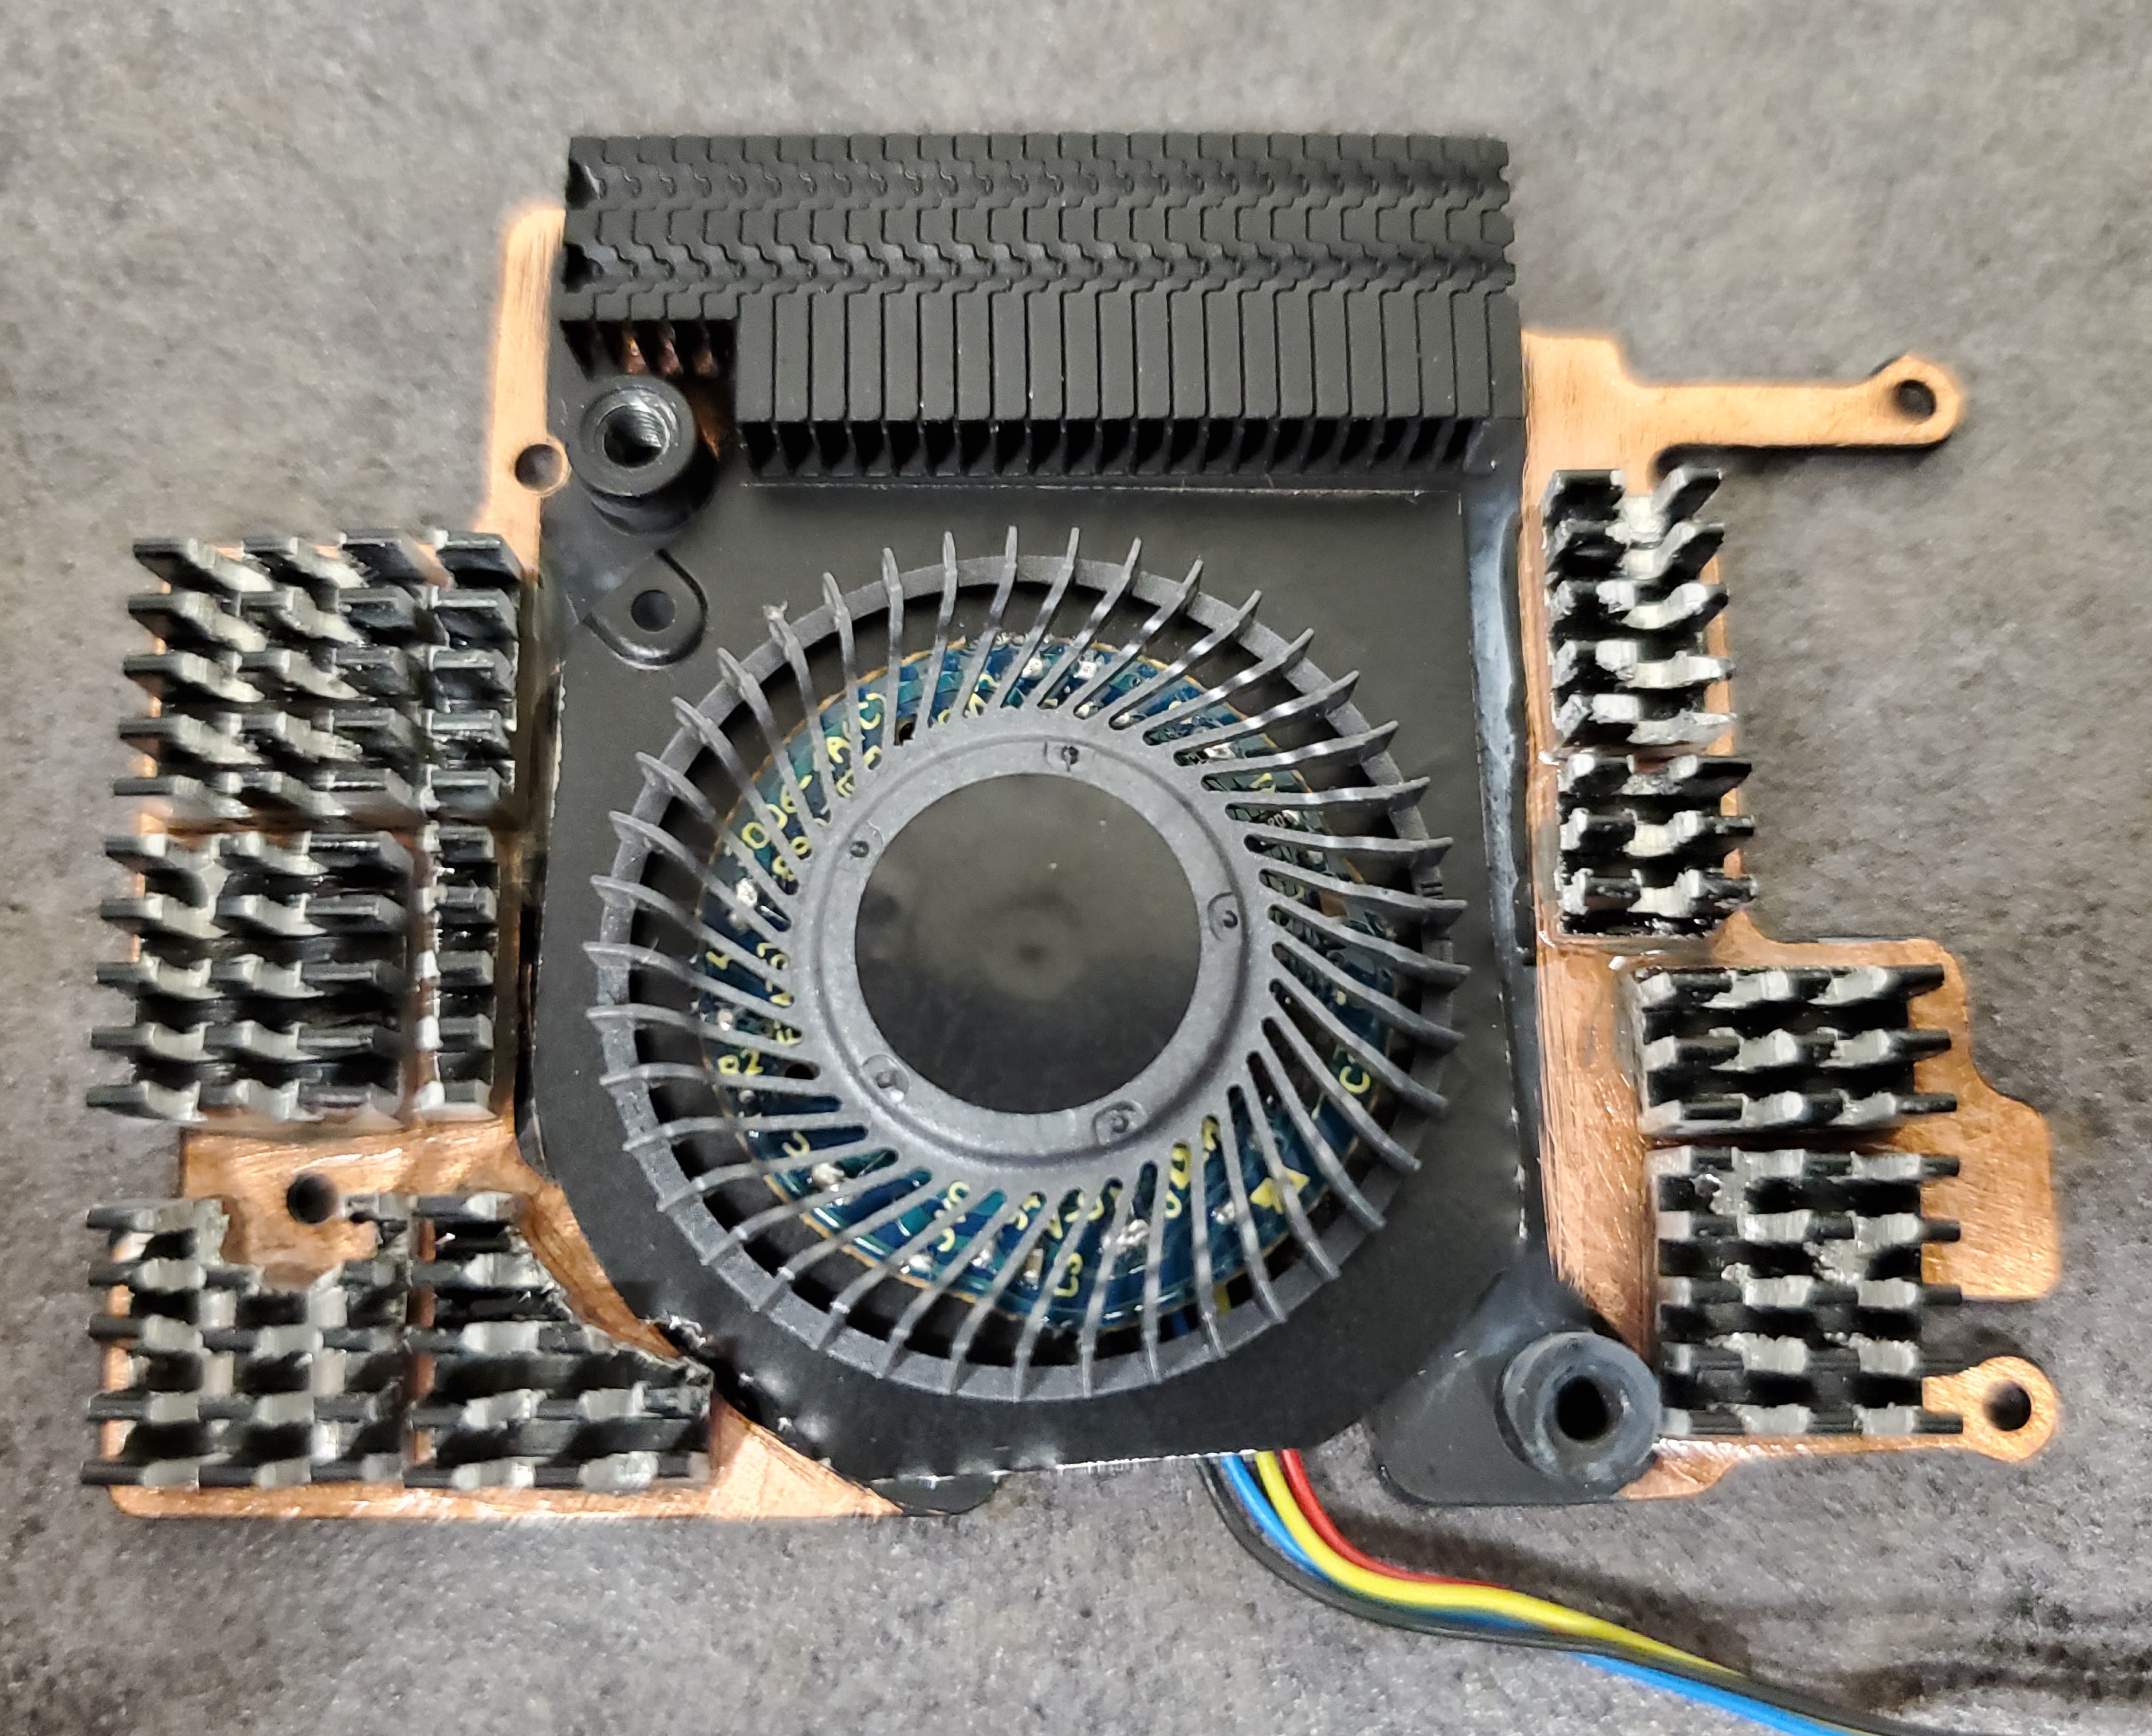
As you can see pictured above, my mini heat sinks have been milled out for better airflow over them. This is optional, but recommended.
After you have your placement down and are 100% sure the mini heat sinks are positioned how you want them so that the 3D printed fan shroud AND the fan fit back together with them you have two options:
1. You can put a dab of thermal compound under each mini heat sink and super glue around the base-perimiter of each mini heat sink. (this is what I did for mine)
2. You can use thermal adhesive epoxy to "glue down" the mini heasinks to the main heatsink (untested by me but should work as good or better than the above, though probably overkill).
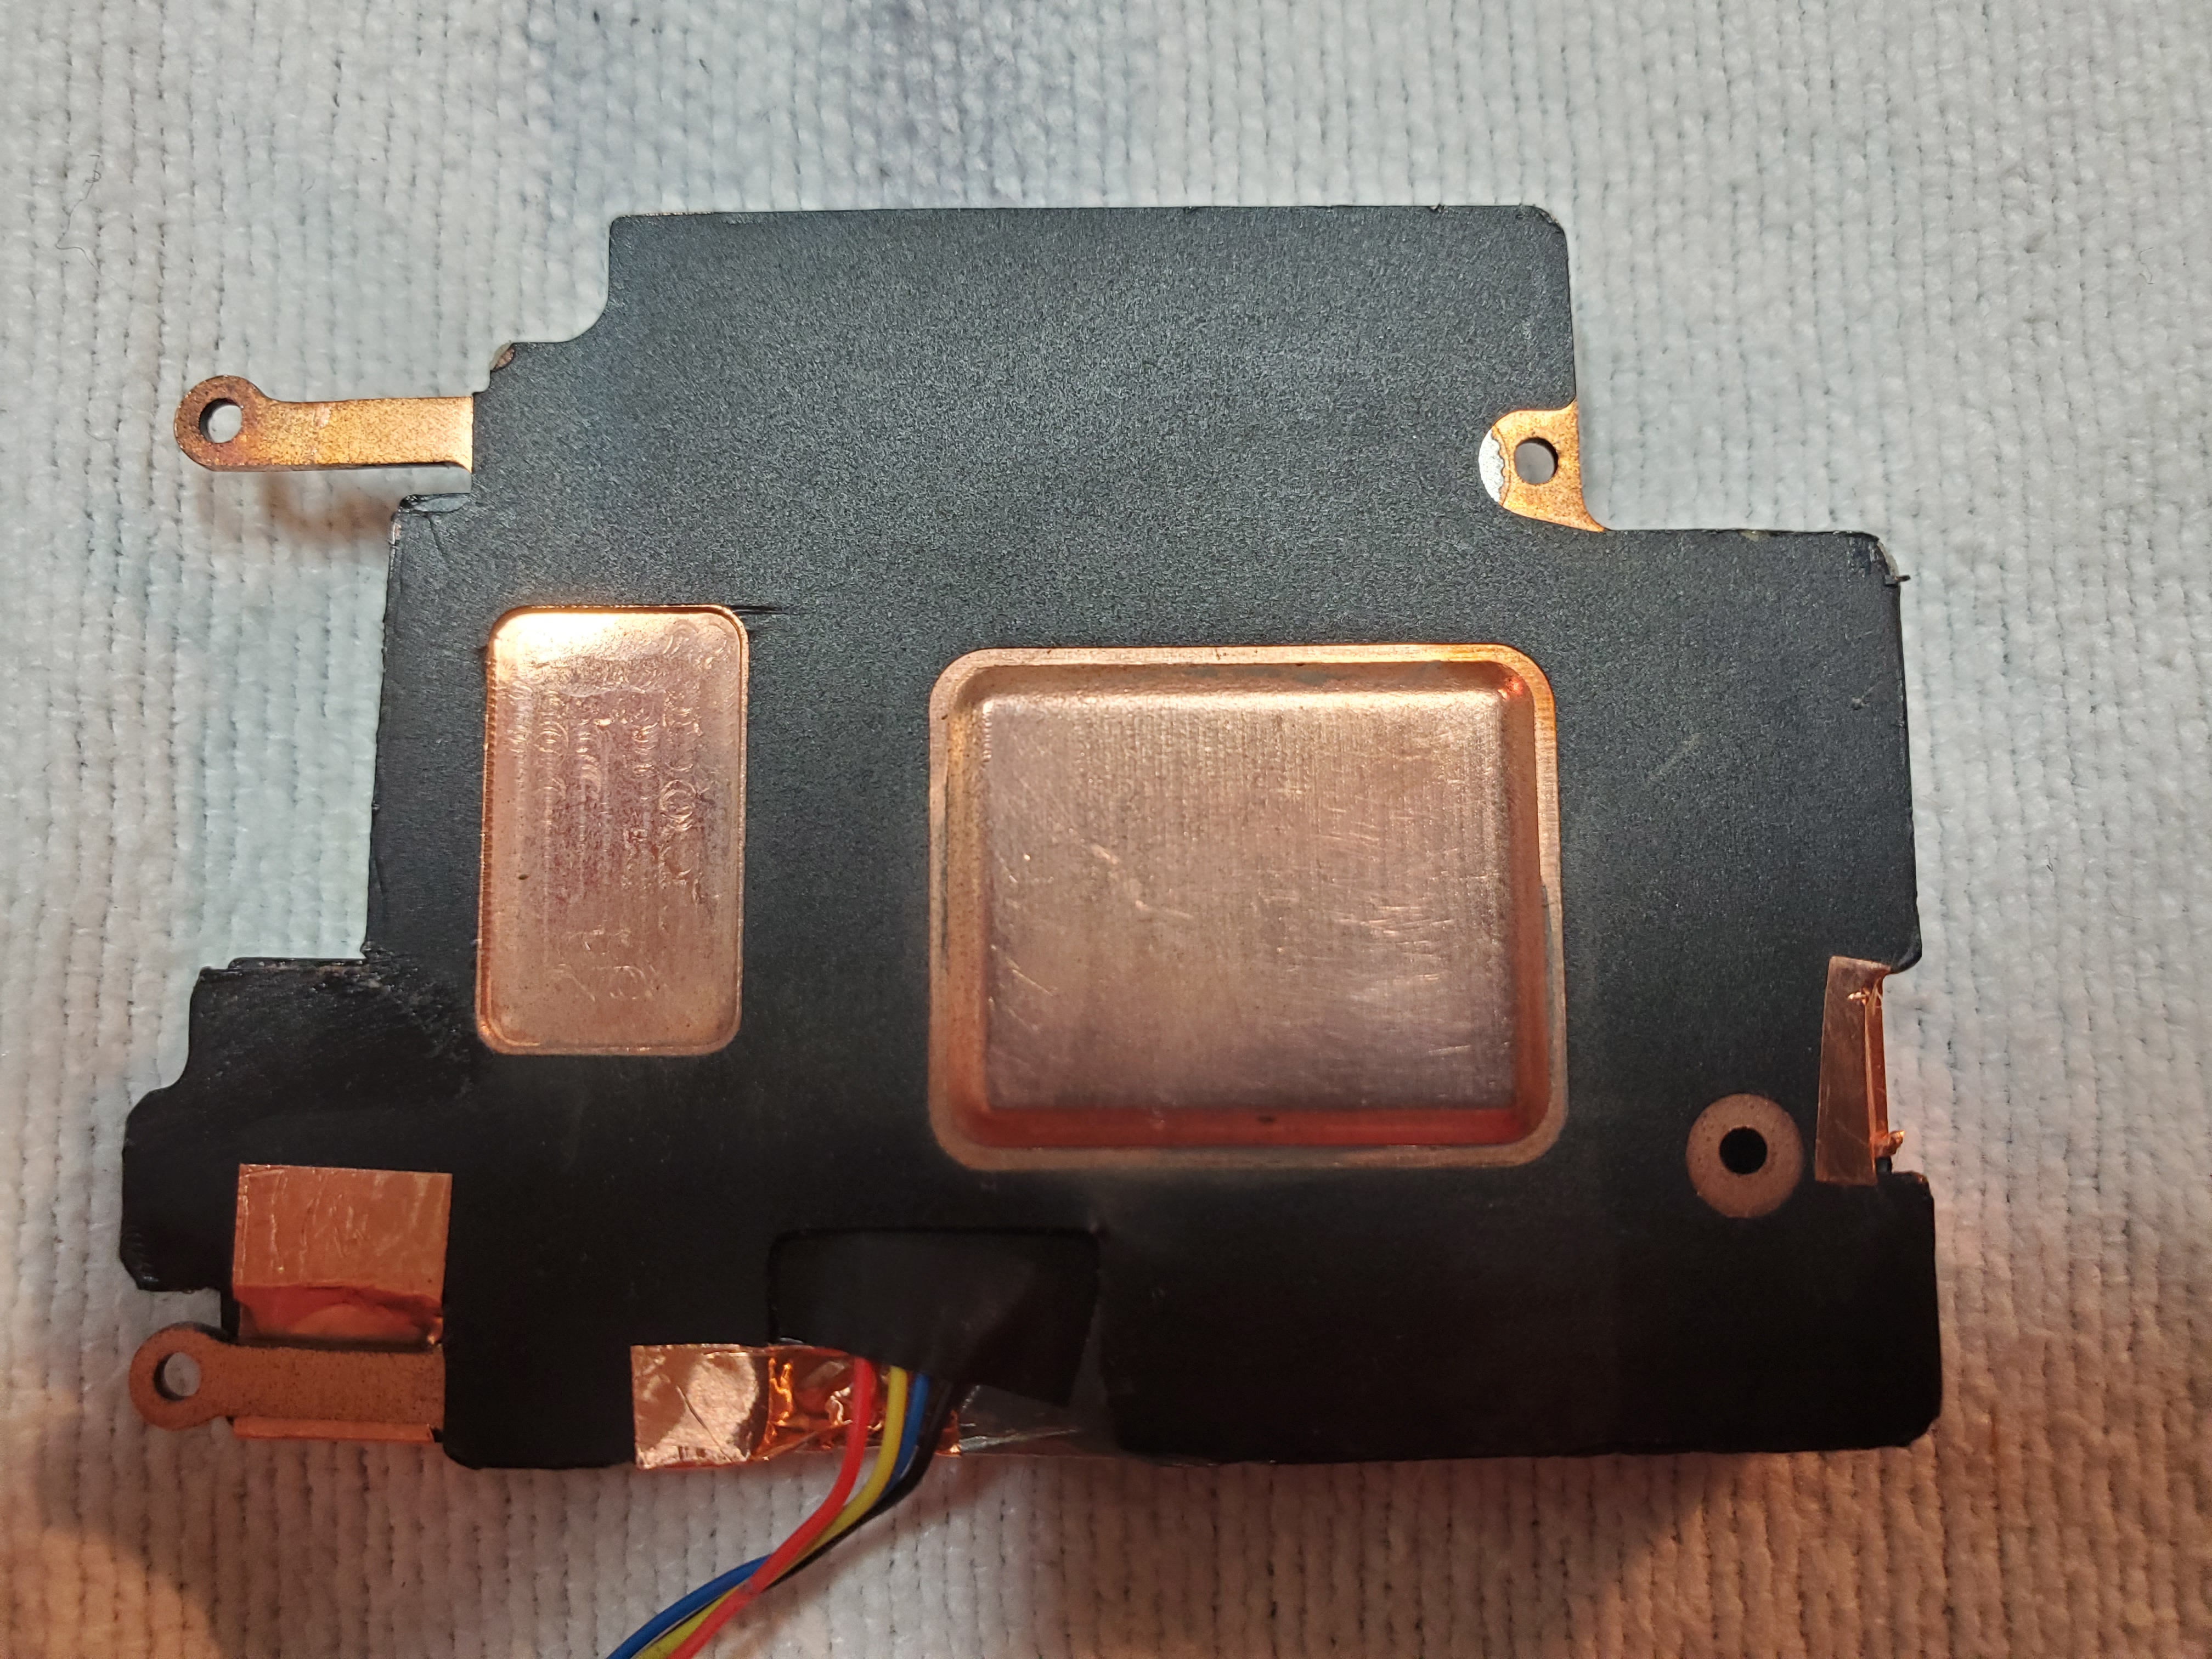
At this point we will need to discuss the fan, because the next step is to permanently glue the fan down to the main heasink. But, with my custom fan shroud the wires for the fan become extremely tight when run over top of the heatsink, I chose to extend the wires to the fan and run around the outter perimiter of the heat sink. This is optional, but recommended. If you choose to extend the wires, you can de-solder the wires/plug from the fan as shown here to splice in your extensions:
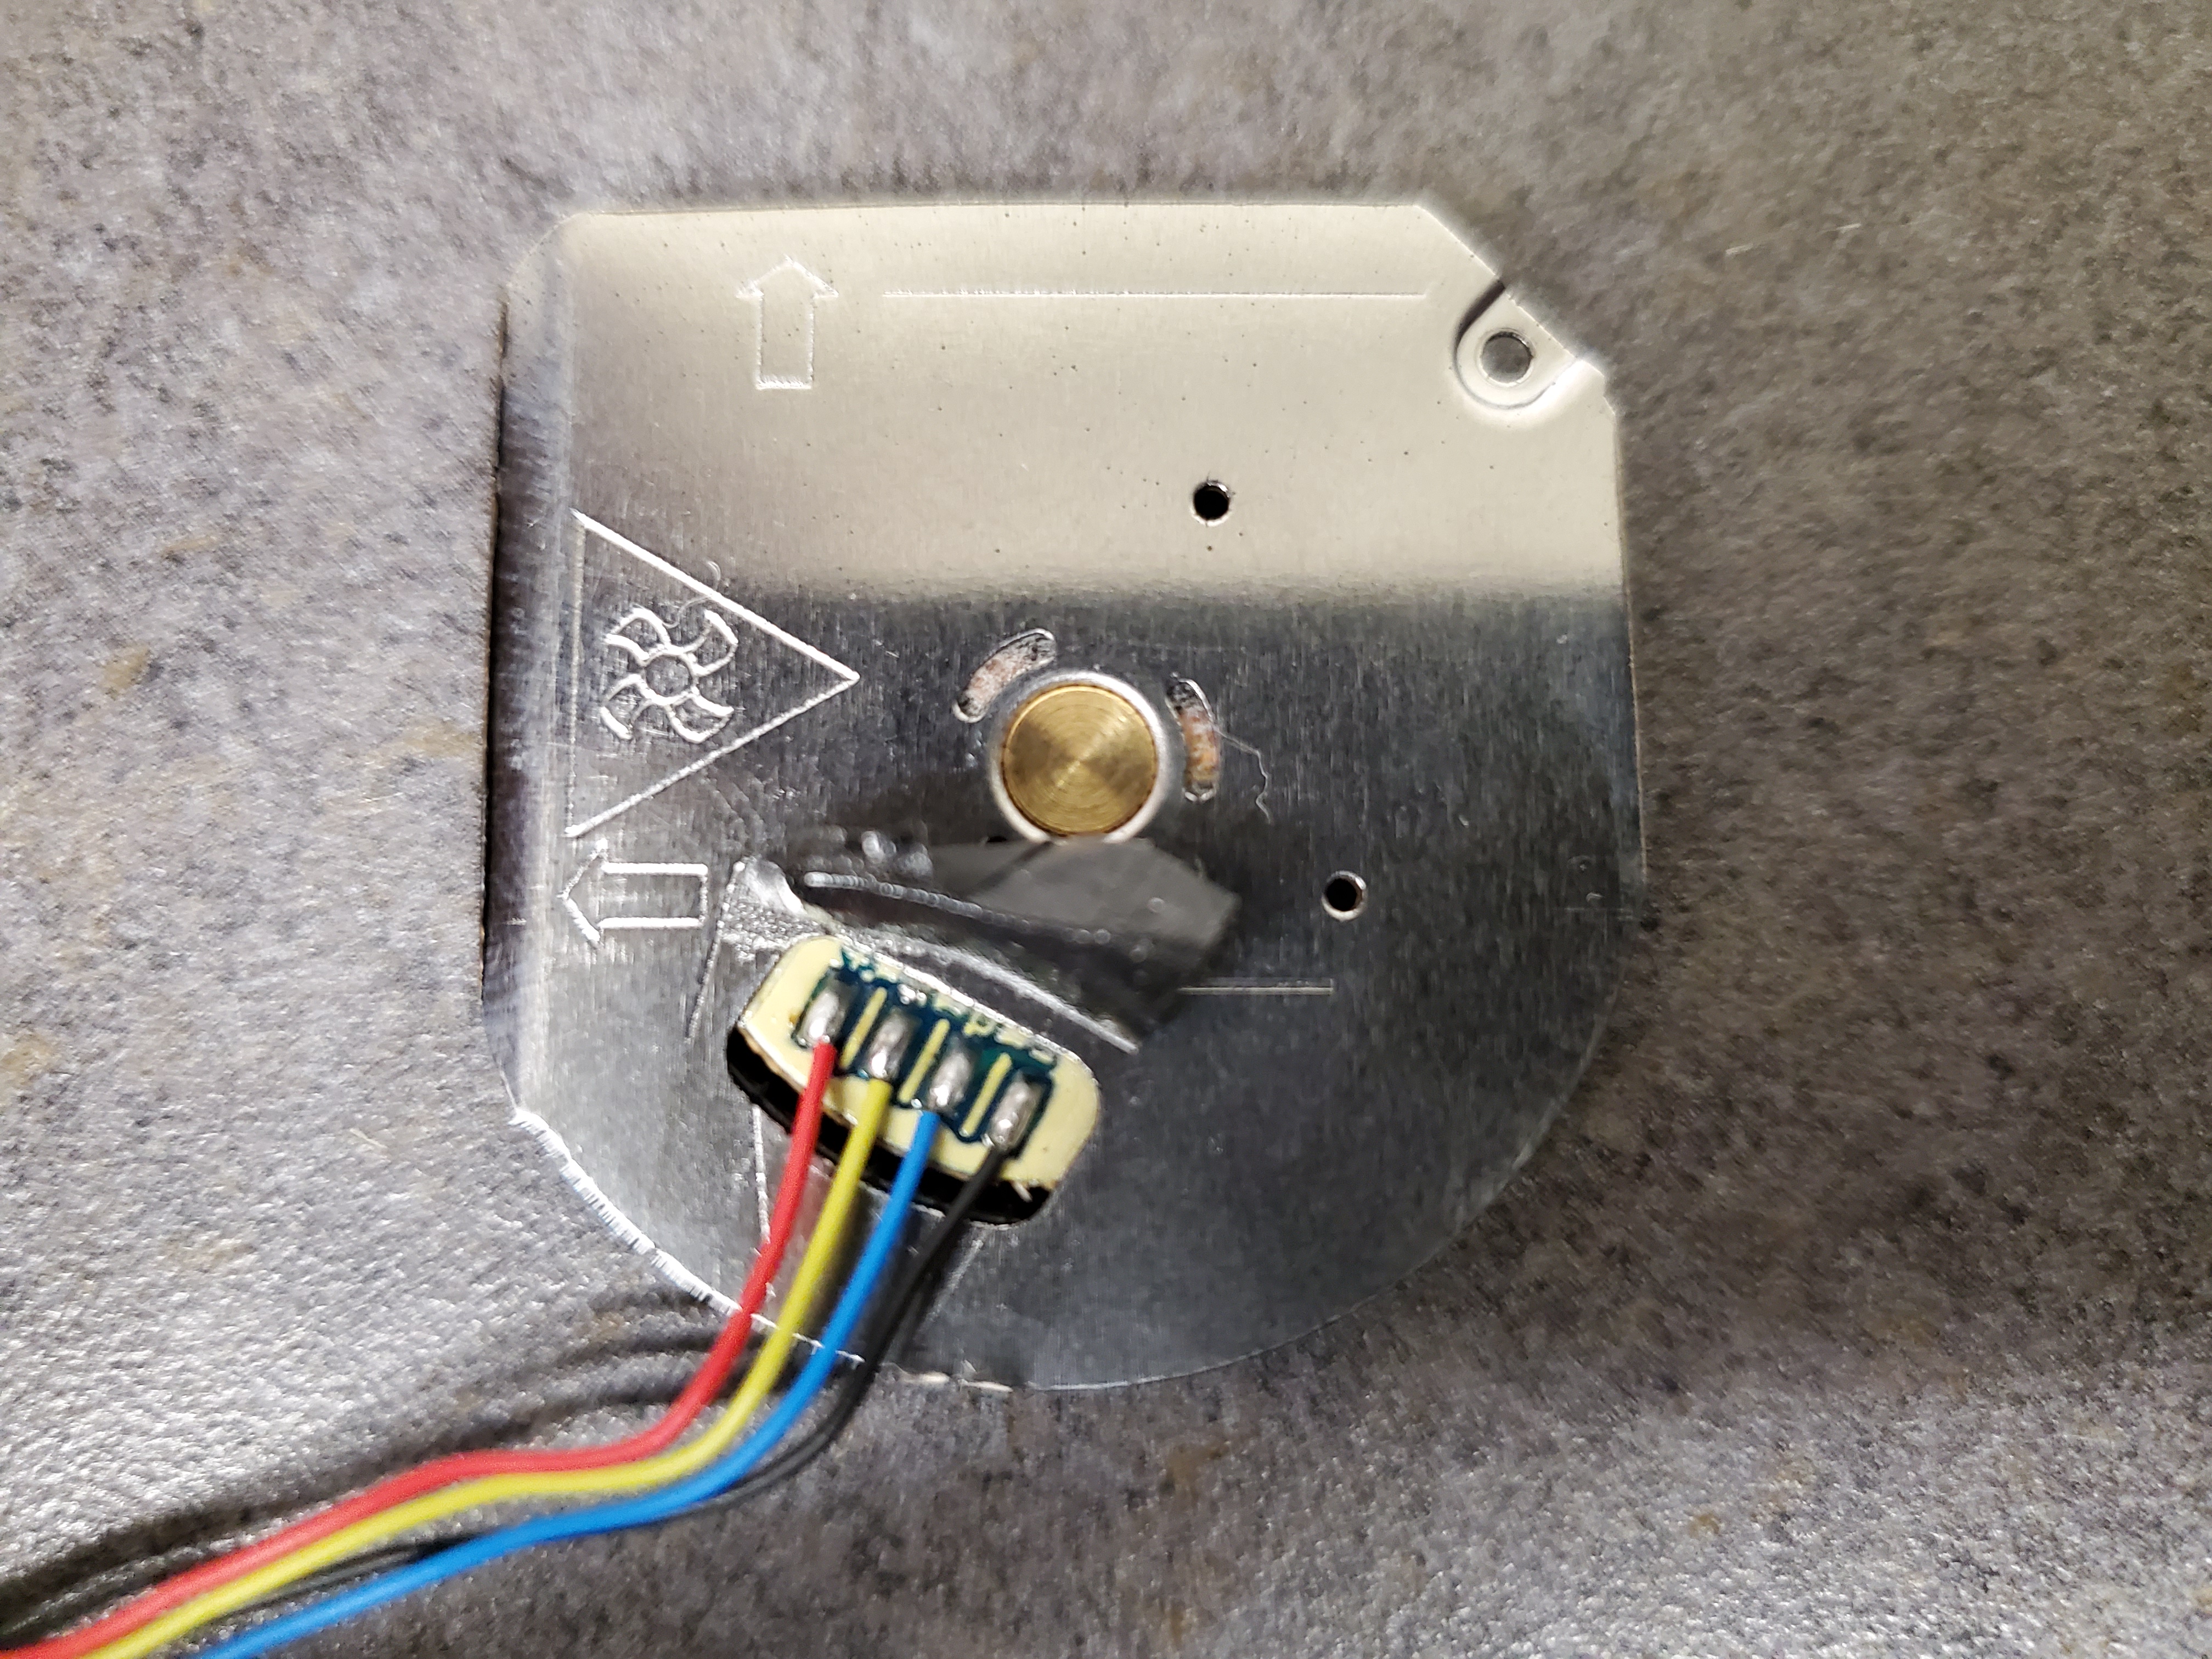
I extended my wires about 2.5-3" and I also added an extra +/- (red/black wire) that will be used for a future mod to cool the SSD and the rest of the system.
So, after all of that is done and after the mini heat sinks are permanently adhered to the main heatsink you can use super glue to glue down the fan to the main heatink. I was very liberal with the glue here as I don't ever want the fan coming back off. I would recommened against using thermal compound for this step and stick with super glue, as you don't actually want to transfer heat into the fan itself. Again, its a good idea to check alignment with the 3D printed fan shroud to make sure your fan is centered where it should be.
This is what you want at this point:
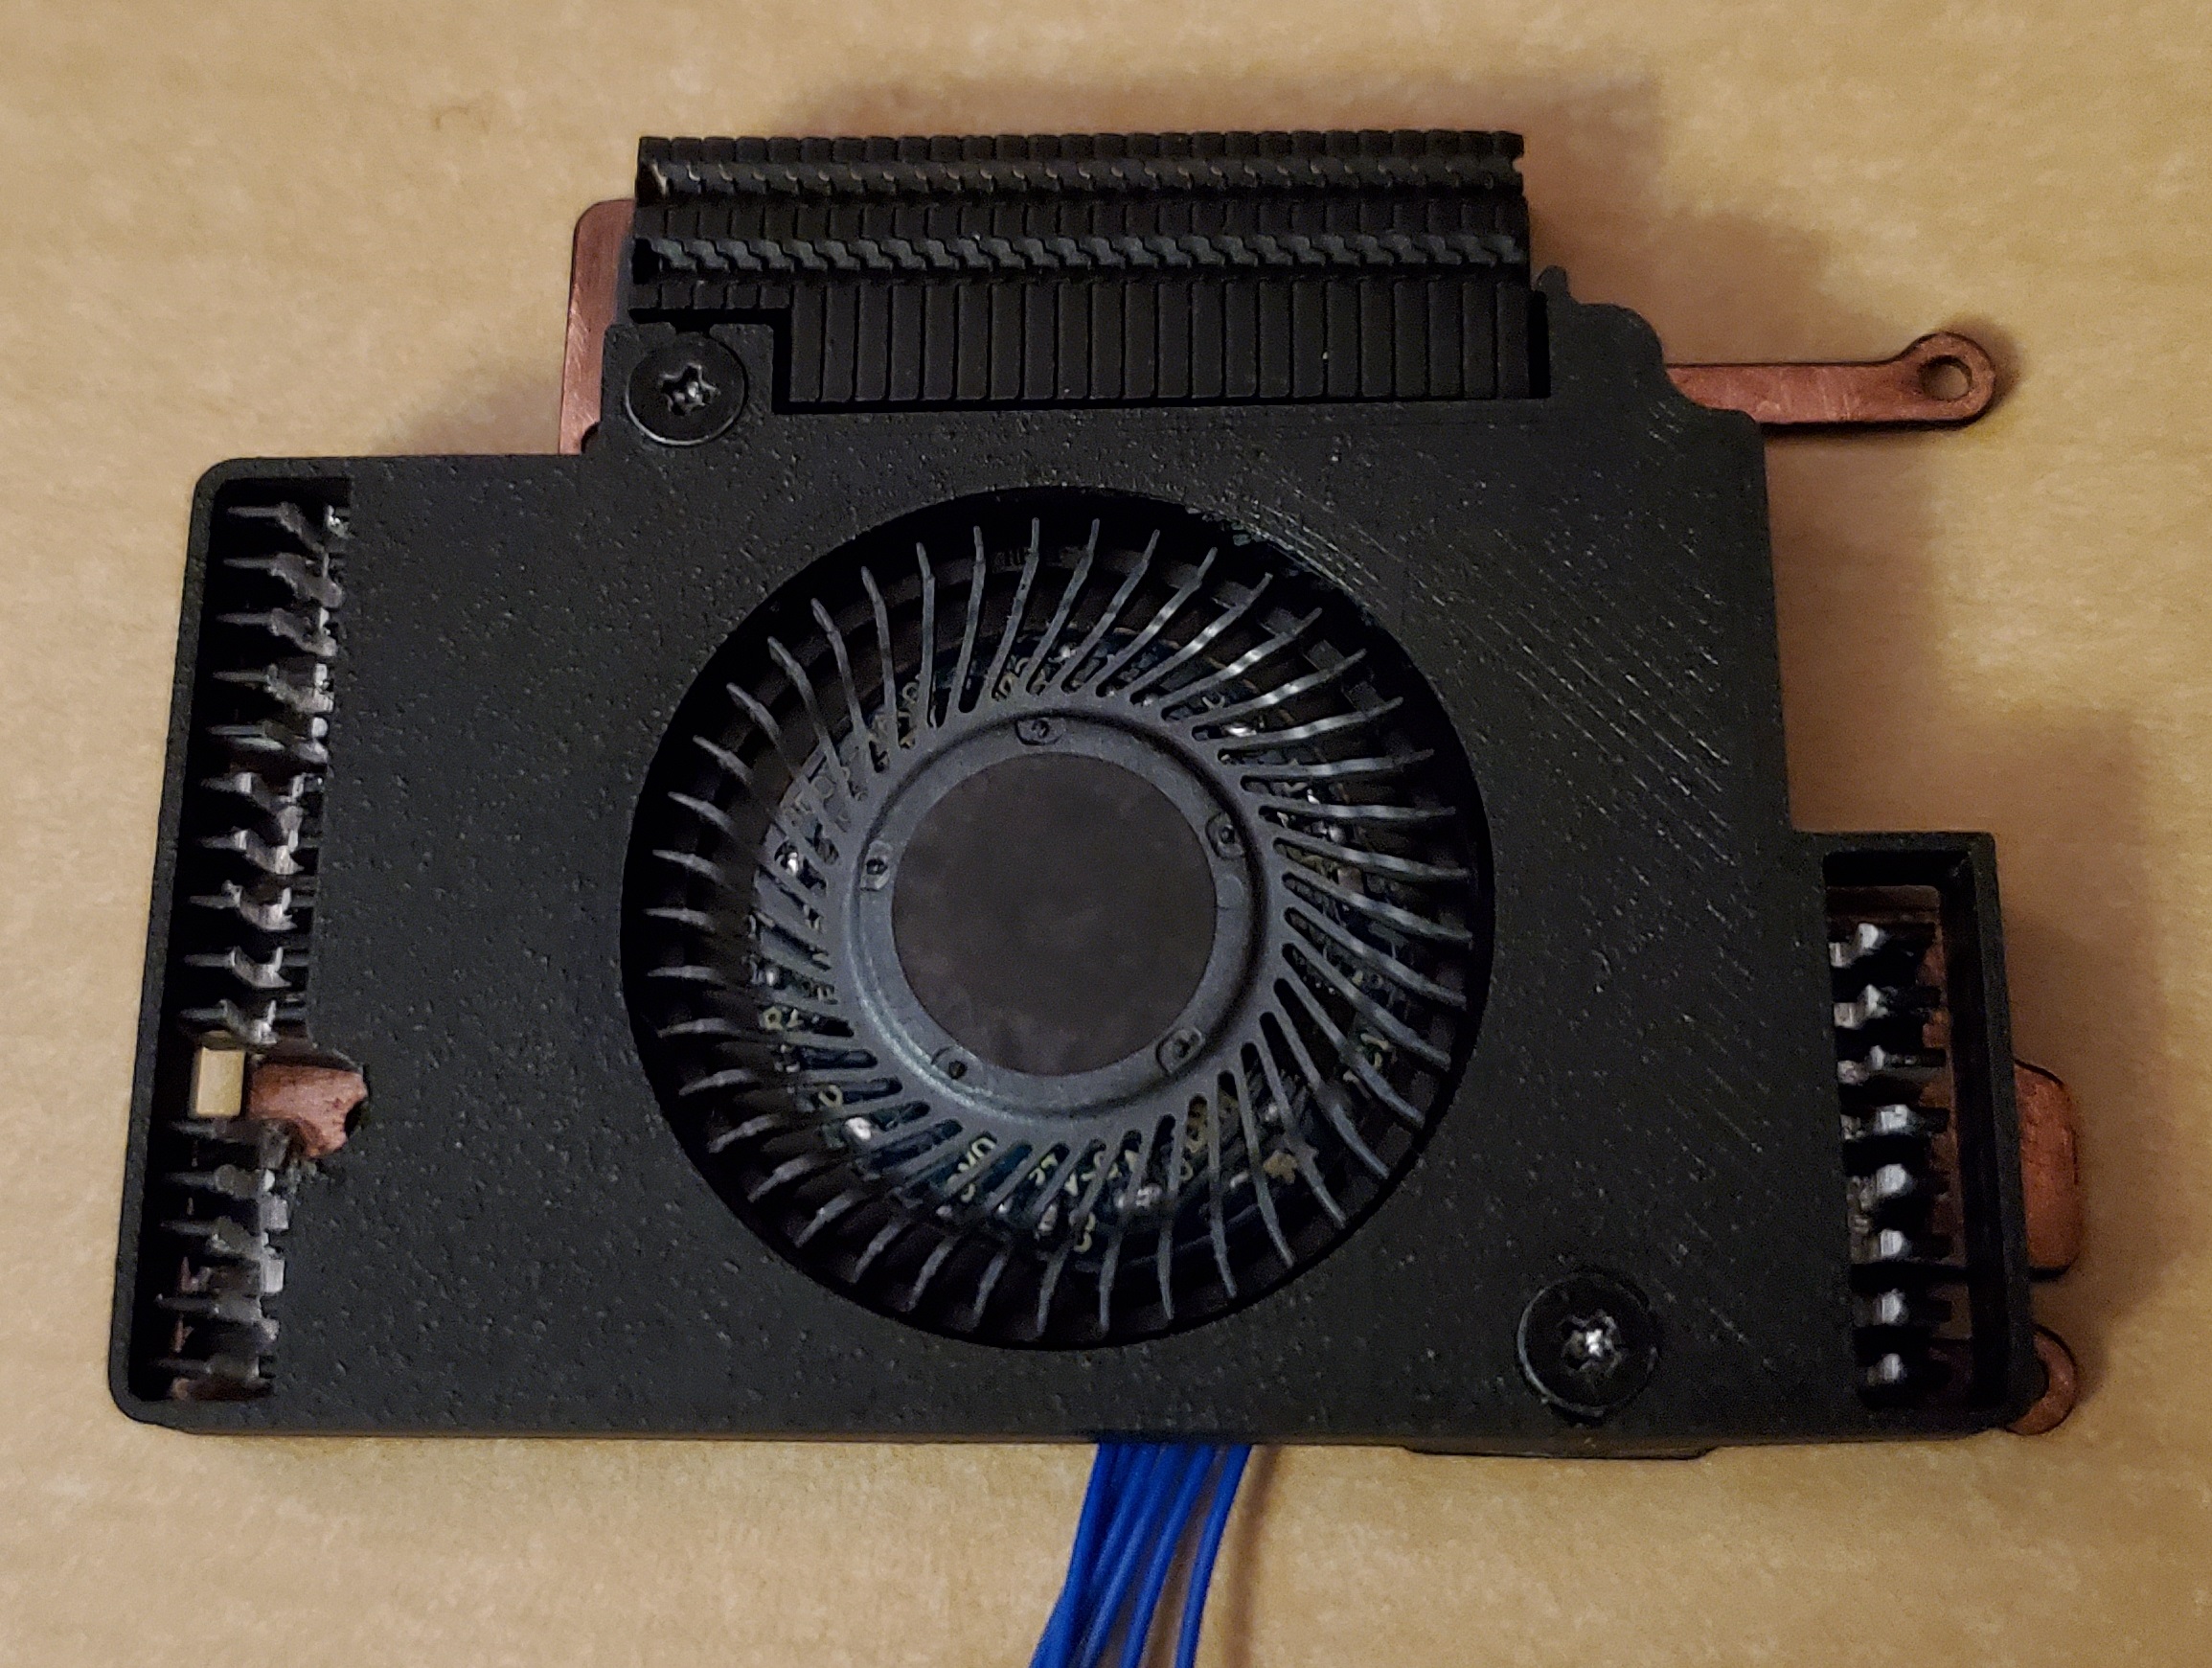
I also super glued the fan shroud down and used small bits of copper tape to tape off any holes around the bottom edge of the heat sink at this point. Again, not nesseceary, but recommended. I waited a full 24hrs for the glue and everything to set before reinstalling the heat sink into the main GPD unit.
That being said... If your glue is fully dried, you can re-apply your thermal paste to the CPU and re-install the heat sink to the main GPD unit. Again, I wont go into great detail about these steps. There are plenty of youtube videos of how to properly re-paste and reinstall the stock heat sink out there and the same methods apply here as well. Here is what your modded unit should look like with the completed modded heat sink reinstalled:
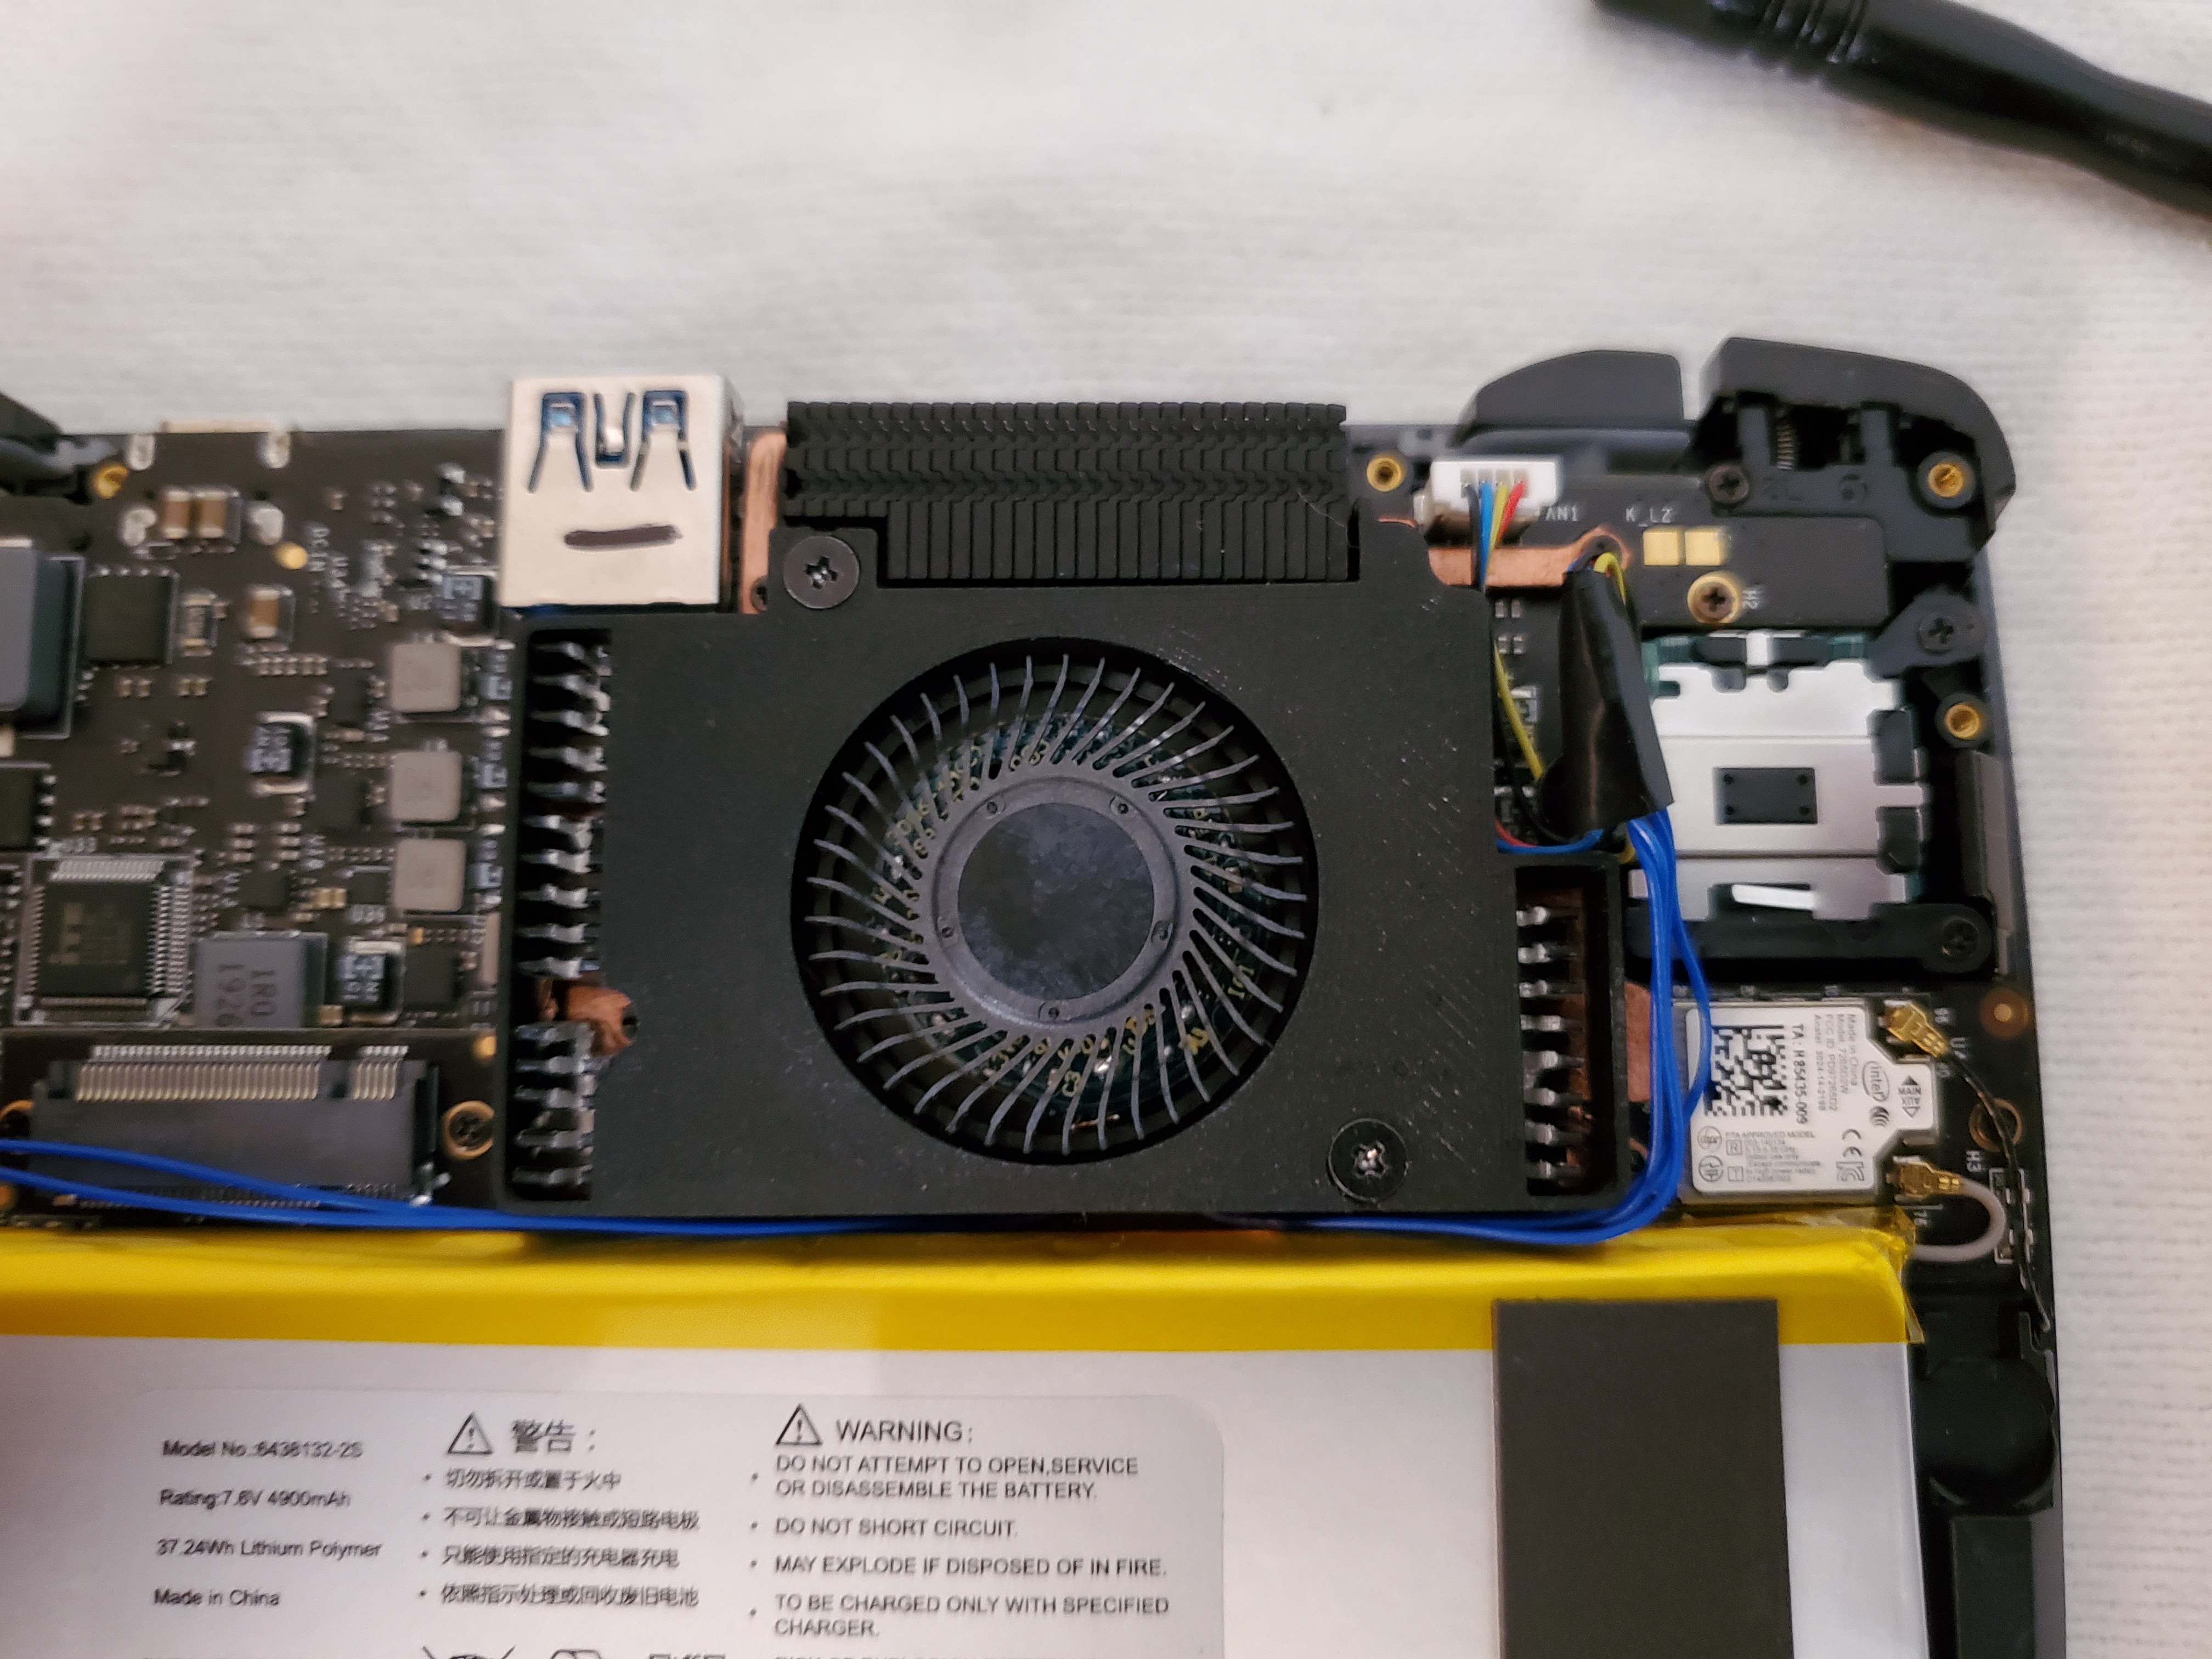
You can stuff the wires back in wherever you can that is out of the way and then we can start on the back case modifications.
The first thing we need to do to the back case housing is to clear some room for our newly modded heat sink so it will fit when we close the unit. To do this I used a pair of dikes (yes, that is actually the technical term for this tool).
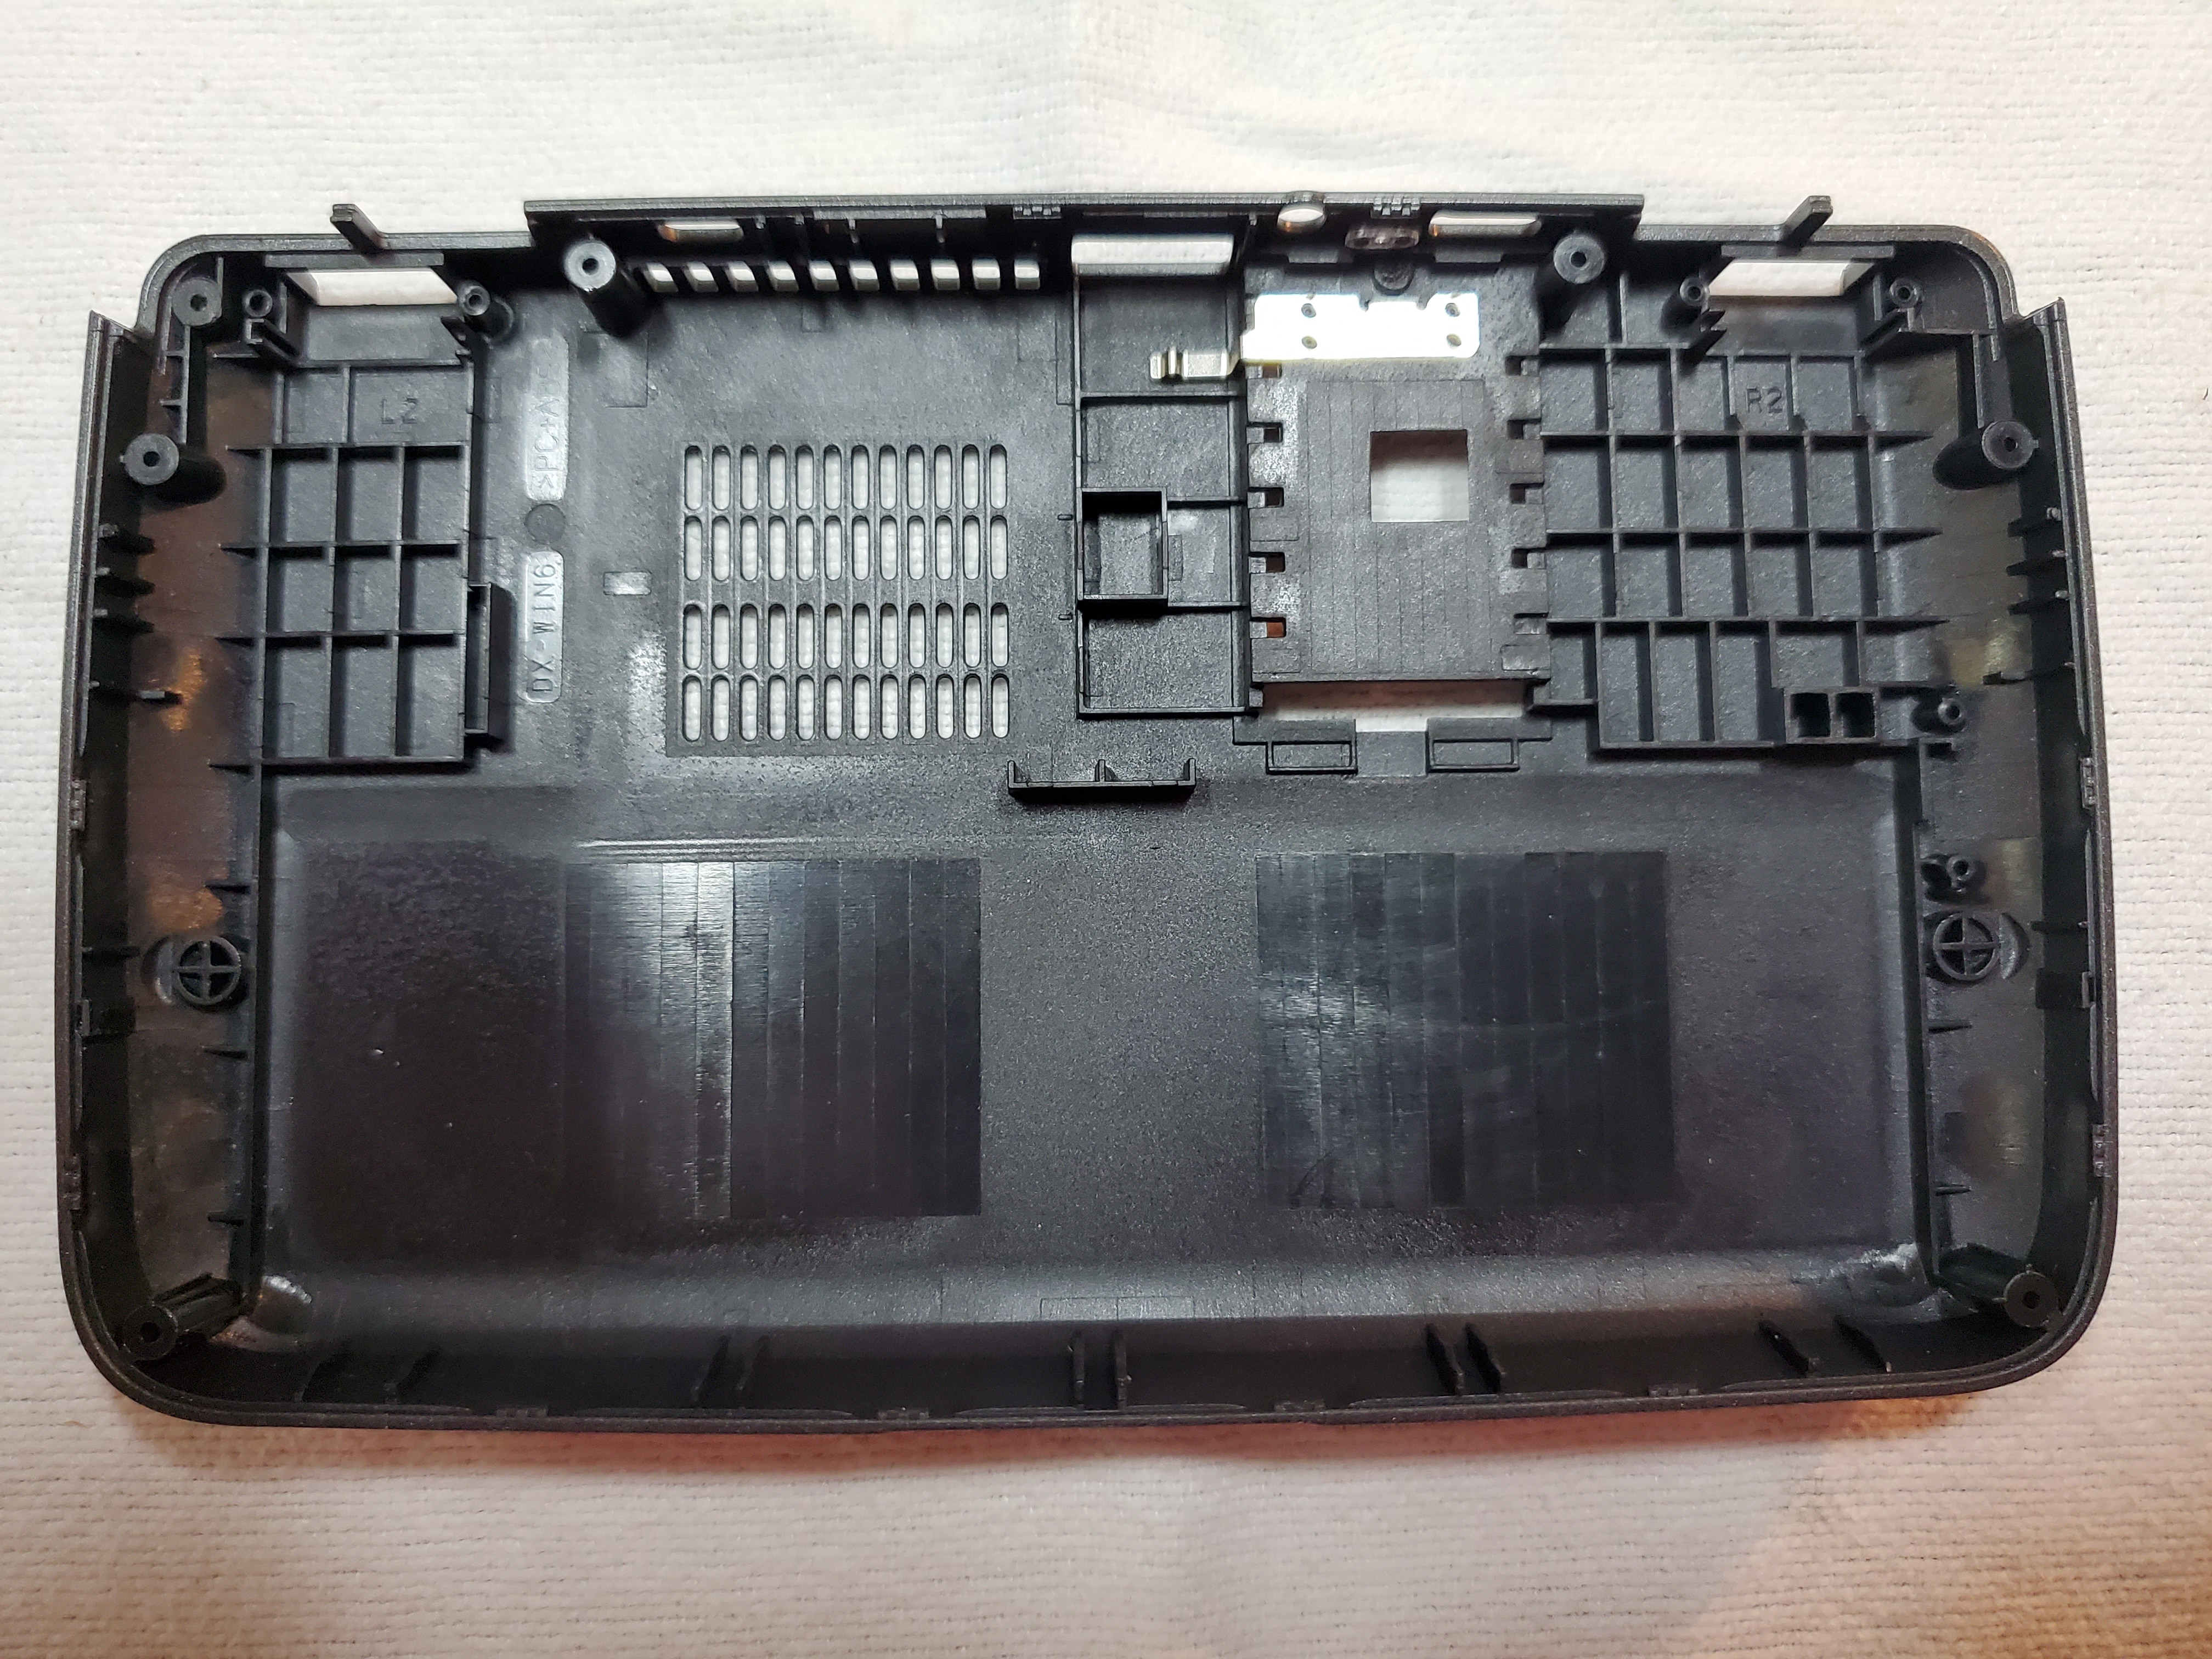
Here is the inside of the case before modification:
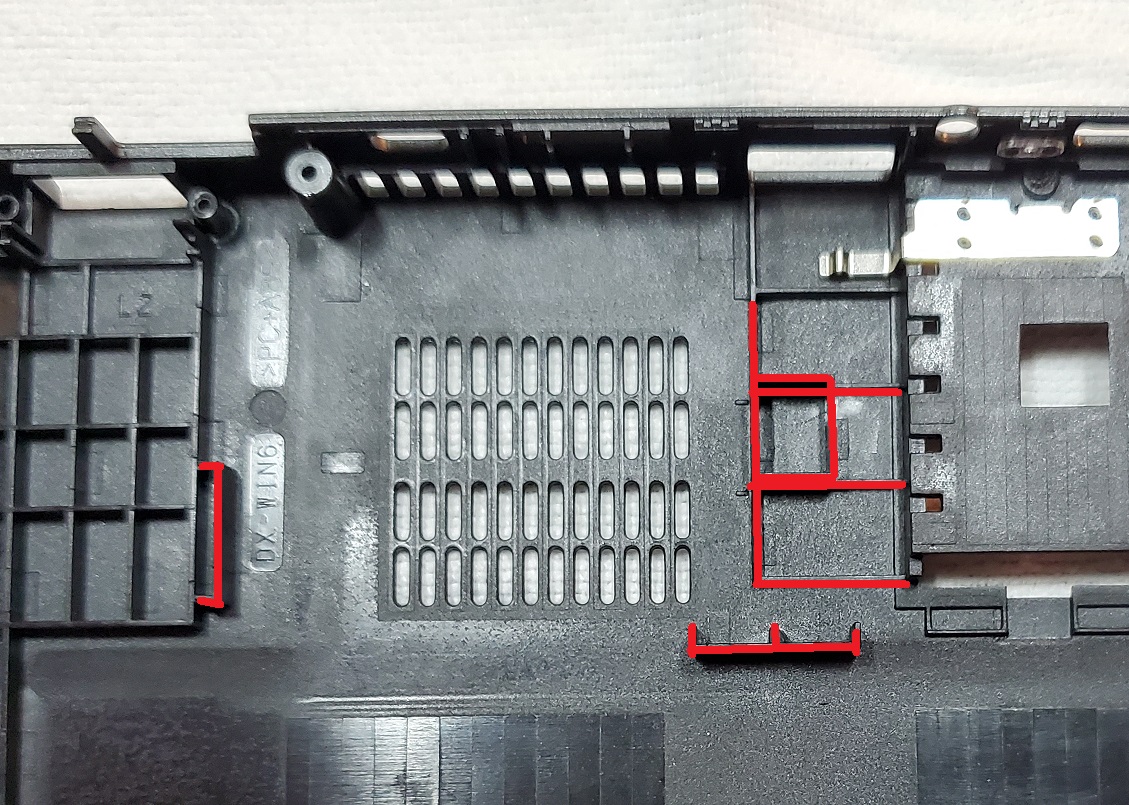
And here it is after trimming the necessary bits:
Bits to trim out highlighted:
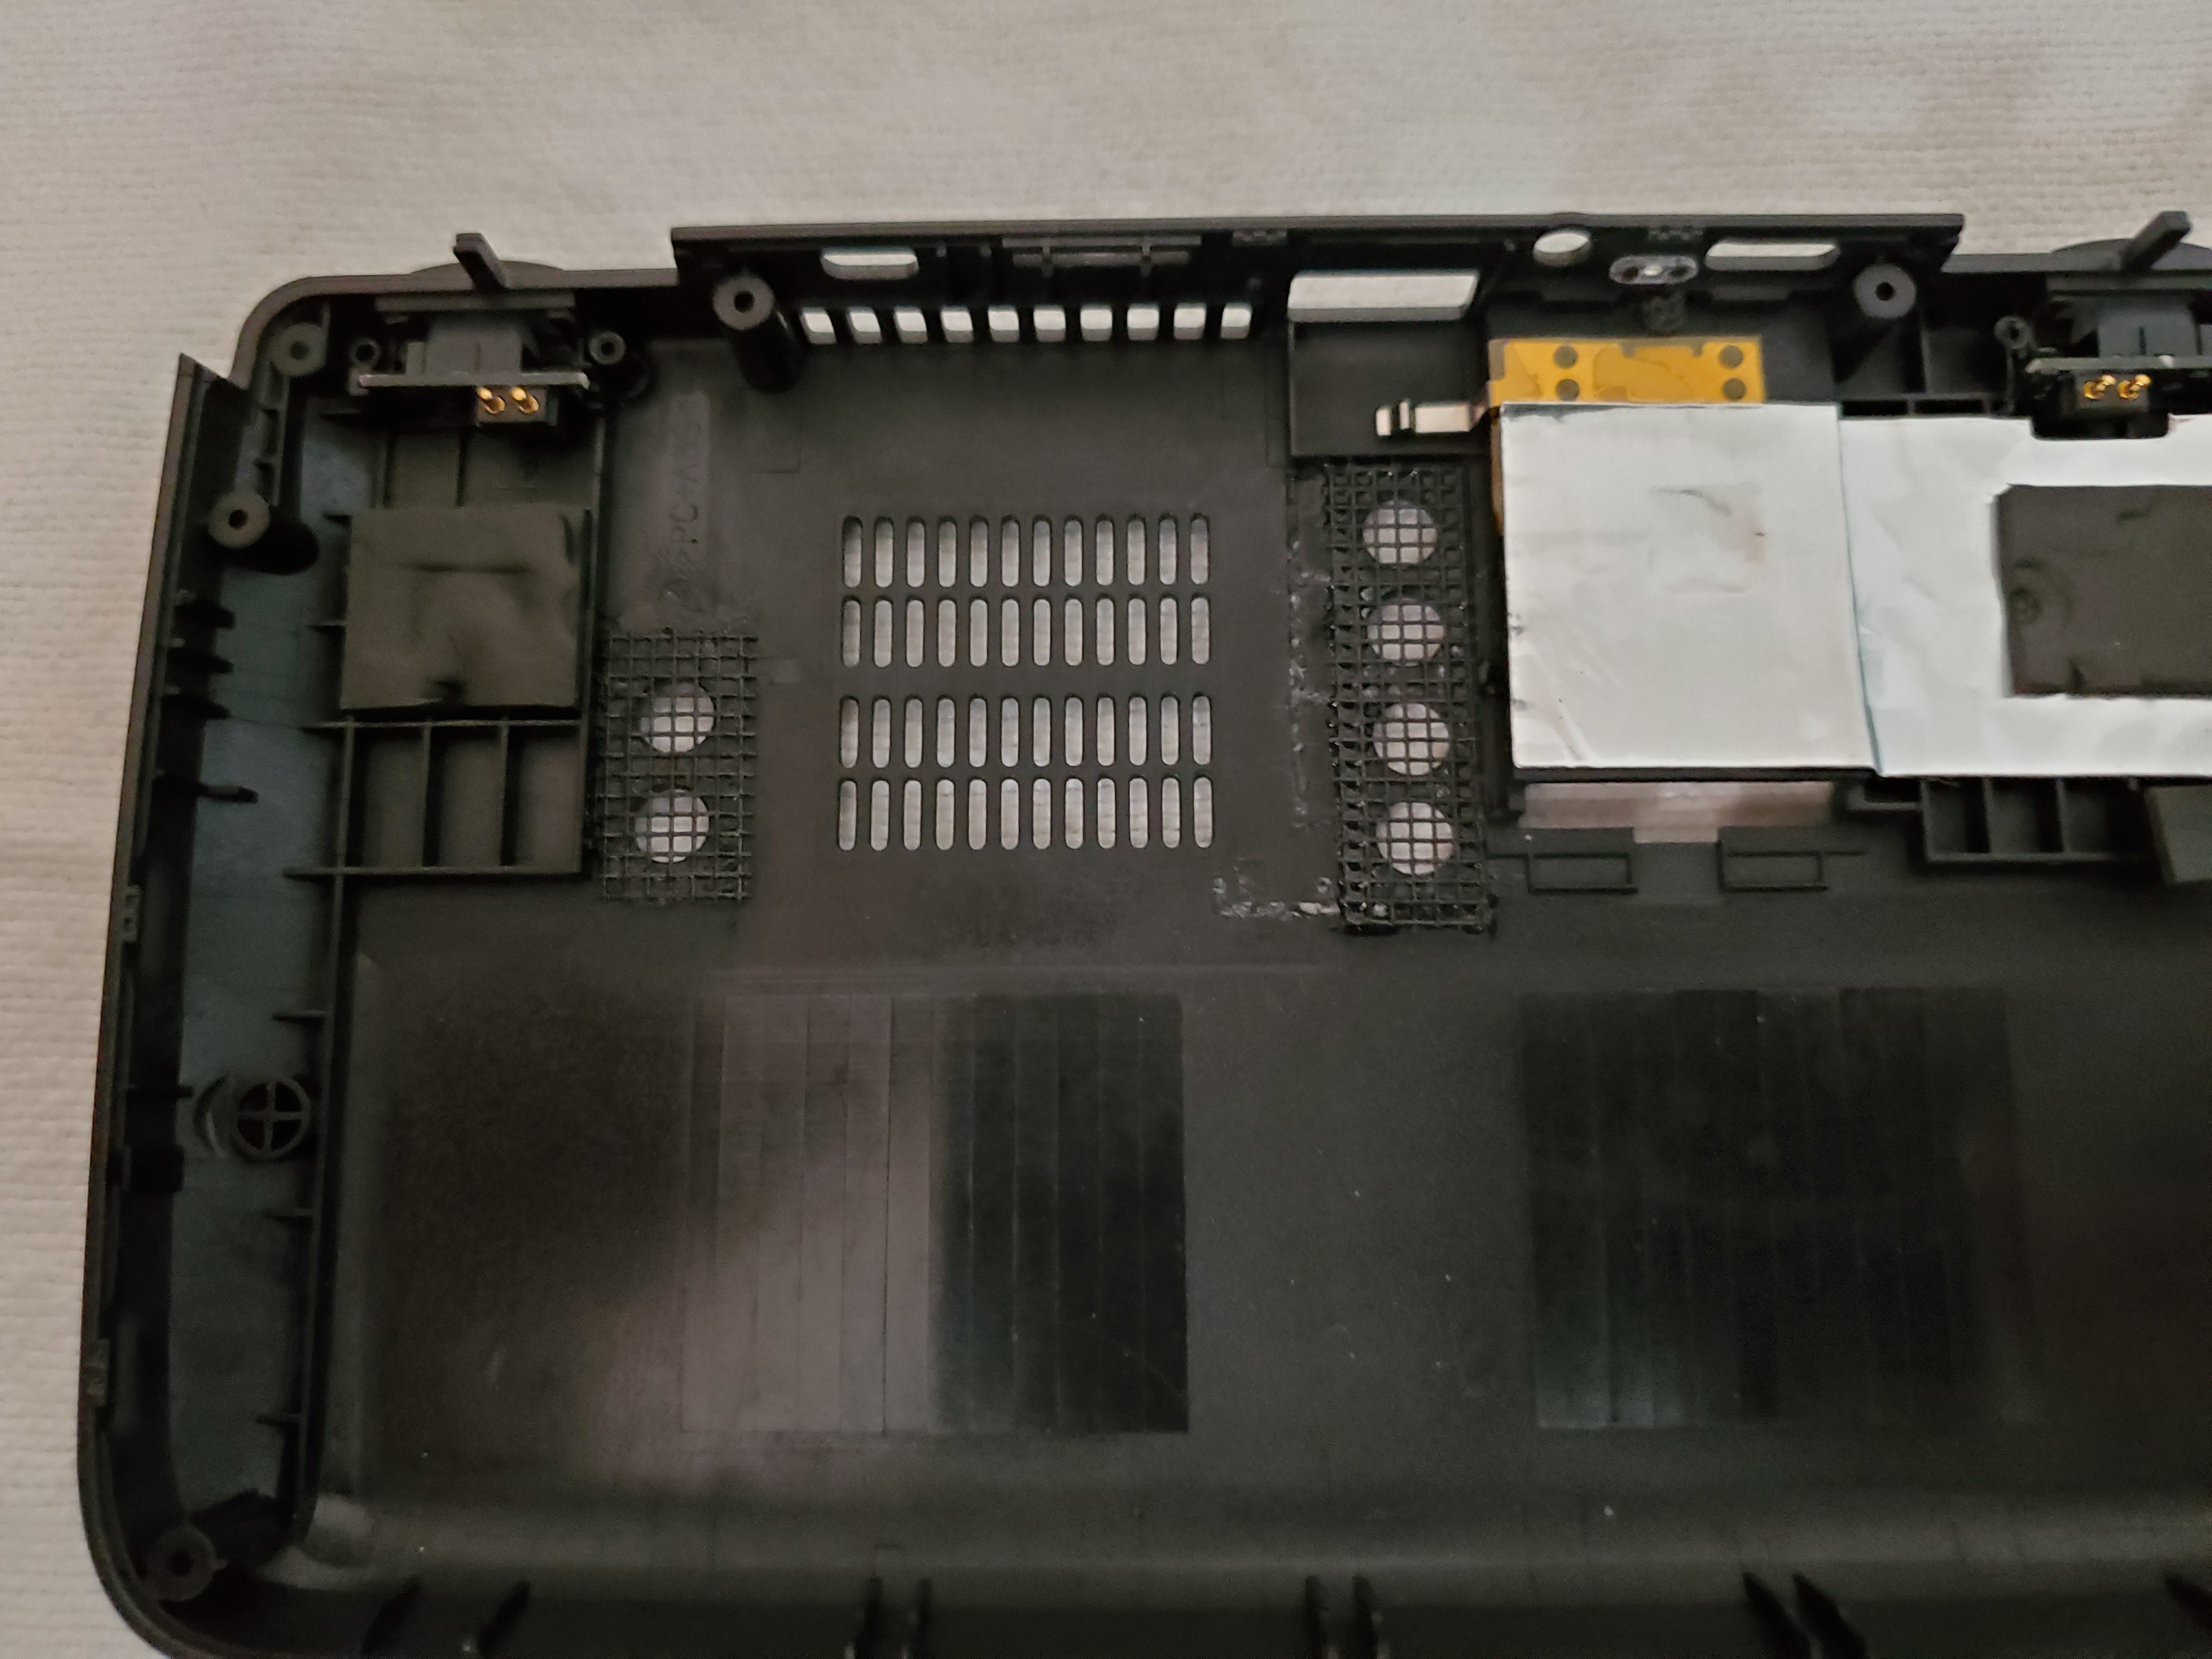
After these bits are trimmed out its time for some measuring and marking the outside for where you will drill your holes. For the 2 different models there will be different hole patterns. My unit is an 8100y unit, so as you can see below on the right side of my unit there are only 2 vent holes, for the 7y30 model you could add 4 vent holes on this side if you wanted.
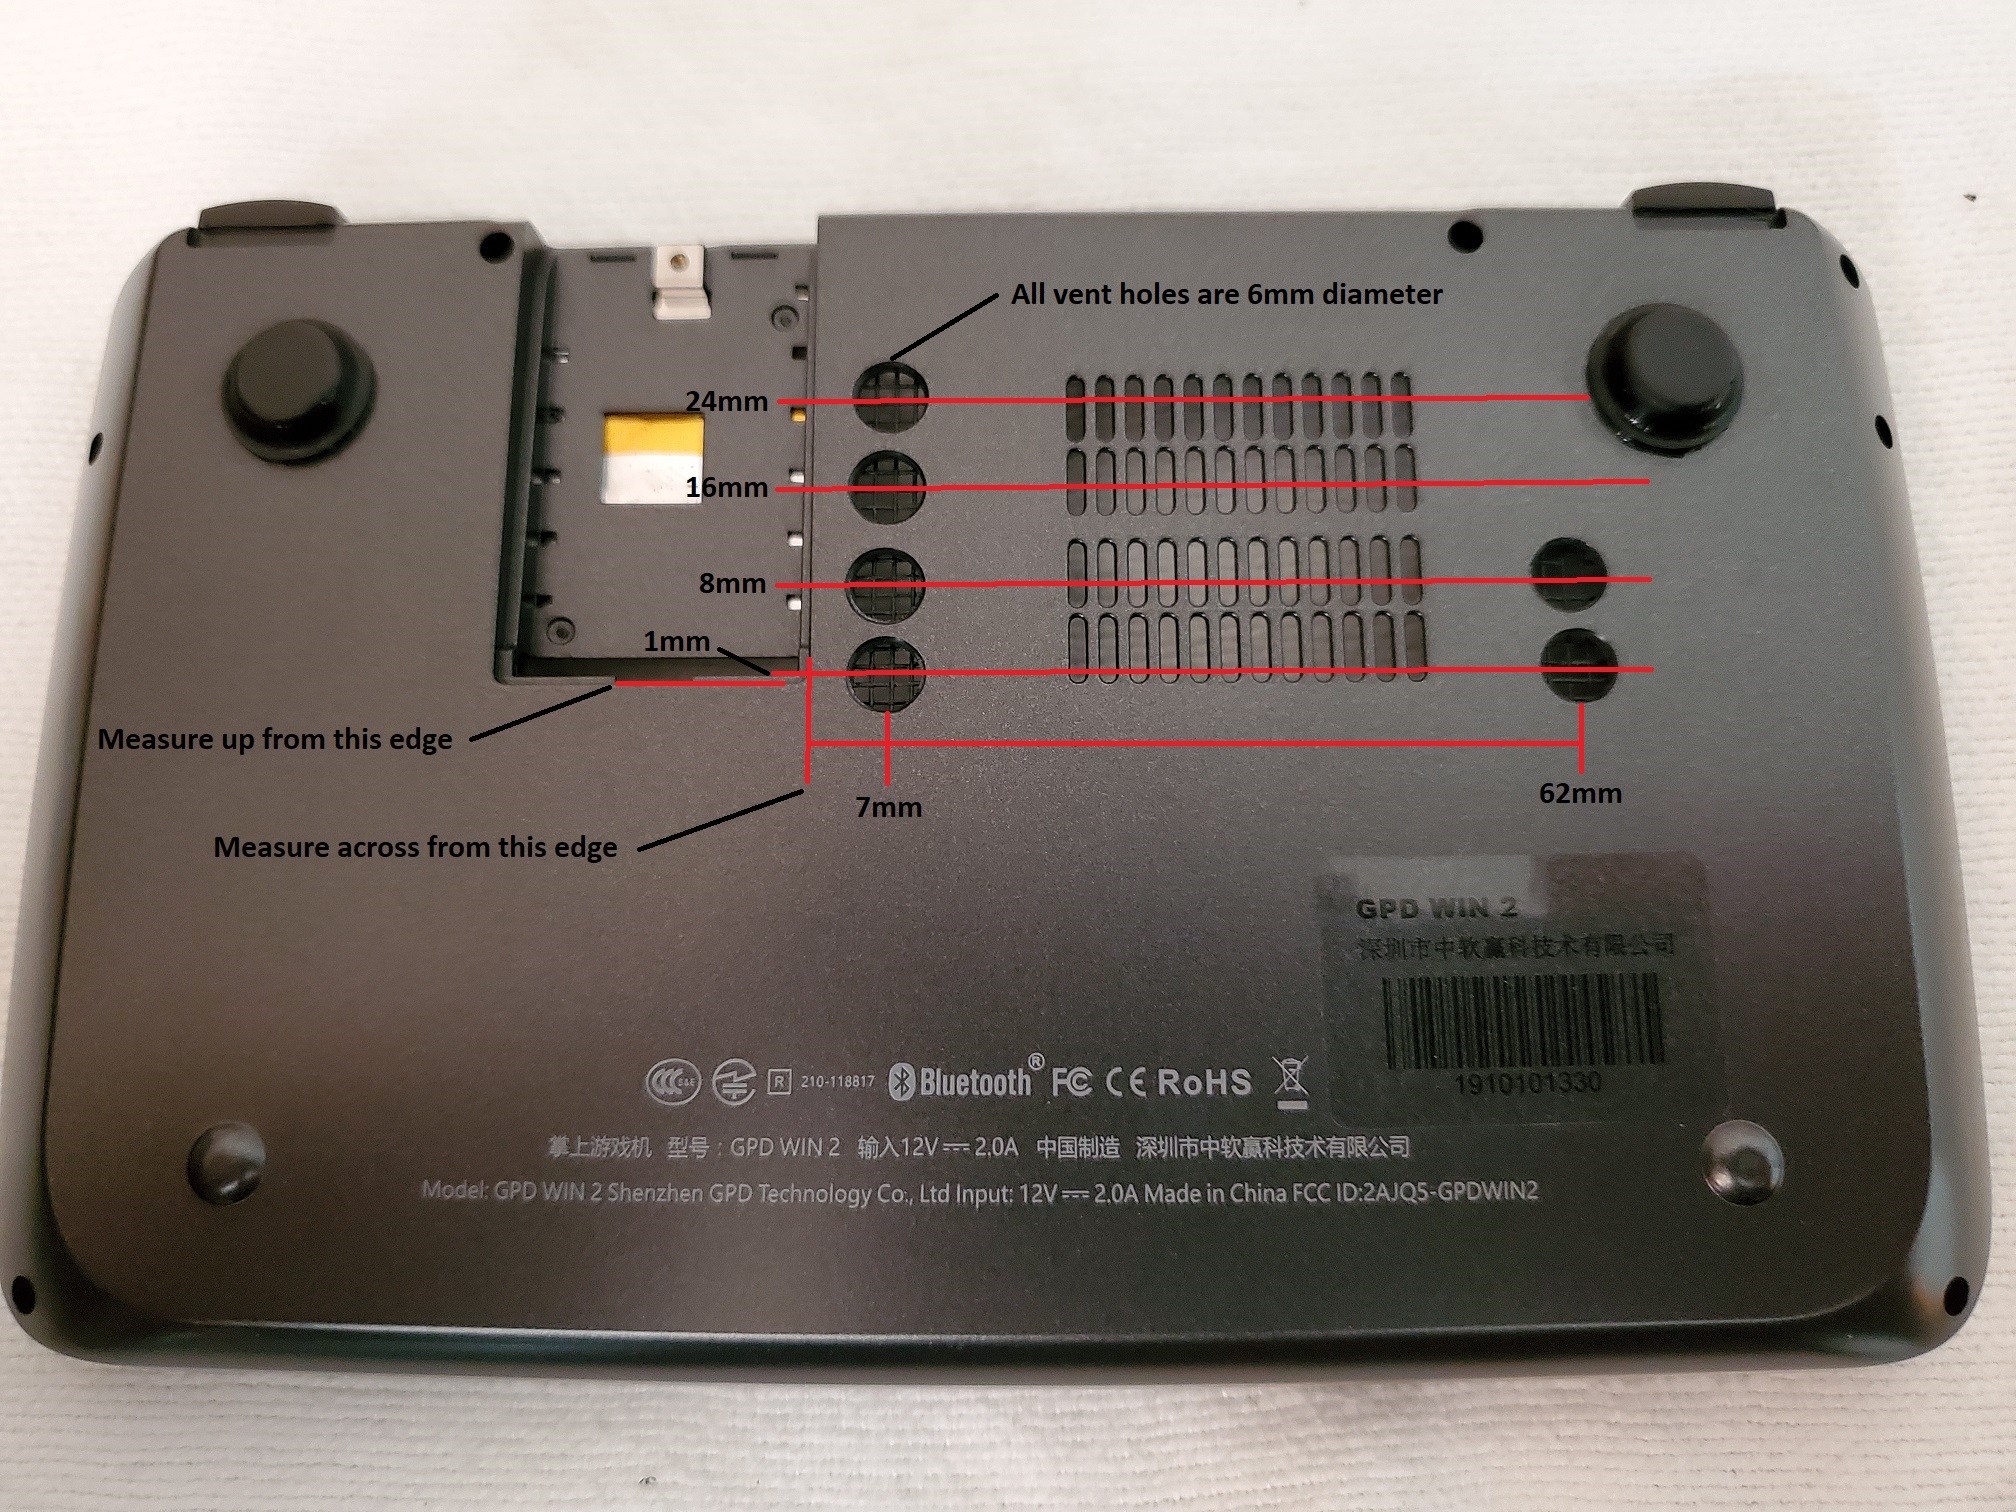
The measurements above are to be measured from the edge of the SSD slot on the back of the case as marked. Measure to the centerpoints of each hole, mark and use a center punch to mark the drill spot then drill to size. I added in some thin screen material to the inside of the case but to do this I actually had to mill down the plastic a bit to get it to close properly. Unless you have the ability to do this I don't recommend adding the screen material.
Enjoy! Any questions feel free to ask. SSD cooling mod coming soon!
Disclaimer: No one else but you, the end user is responsible for anything good, bad or indifferent that may happen to your device attempting to modify it. As with all mods you do this mod at your own risk. Myself nor Bitbuilt Forums are not liable/responsible for your stupidity if you break something.
Links to stuff needed for the mod:
Mini Heatsinks: You will need 6-8 of these for this mod. Should be 8.8 x 8.8 x 5mm https://www.ebay.com/itm/20-x-Alumi...663010?hash=item23d5ca5762:g:iNwAAOSwHOFepof9
Thermal Paste:https://www.ebay.com/itm/New-Arctic...396253&hash=item2acb68a961:g:nL4AAOSwze9c0Gr9
Super Glue or Thermal Adhesive (This is the superglue I used, though any superglue would probably do. Artic silver thermal adhesive is probably overkill): https://www.ebay.com/itm/LOCTITE-40...440649?hash=item1a96571b09:g:MnUAAOSweRpdgFX8 or https://www.ebay.com/itm/Arctic-Alu...973708?hash=item3d958bd2cc:g:4vYAAOSwG8ldqJ6q
Other stuff needed: 800'ish grit sandpaper and access to a 3D Printer to print the custom fan shroud, you will also need a way to modify the small heat sinks. I used a small band saw, but a small hacksaw would work if you don't have access to a band saw. You will also need drill bits and a drill and some type of measuring device for the back case modifications.
I'm not going to go through the whole process of opening the GPD Win 2 up, there are plenty of video tutorials online that show how to open the device and remove the heat sink . Google is your friend. We'll start with the stock heat sink removed from the device.
The first thing you'll want to do is remove the fan from the heat sink by removing the 2 screws on top and set them aside for later (we will use these screws for the 3D printed fan shroud). You can also remove the stock shroud from the fan. To do this remove the tiny screw holding the shroud to the fan and pry up on the 2 clips around the outter edge of the shroud that hold the shroud to the fan. I appologize, I didnt plan to make an in depth tutorial on this so I have no pictures of these things.
You should be left with something like this (Depending on what model GPD Win 2 you have the heat sinks are slightly different):
I don't have before pictures, but both models heat sinks are completely covered in black paint. For the best thermal conductivity you must sand off the black paint from where we are going to adhere the mini heat sinks to as pictured above.
After the heat sink paint is sanded off and the copper is completely exposed you can get a rough idea of where your mini heatsinks will be positioned by stacking them on top of the main heat sink and placing the 3D printed fan shroud over them to check alignment and fit. After you are sure your mini heatsink placements are good and you have cut them to fit you should end up with something that looks like the pictures below:
As you can see pictured above, my mini heat sinks have been milled out for better airflow over them. This is optional, but recommended.
After you have your placement down and are 100% sure the mini heat sinks are positioned how you want them so that the 3D printed fan shroud AND the fan fit back together with them you have two options:
1. You can put a dab of thermal compound under each mini heat sink and super glue around the base-perimiter of each mini heat sink. (this is what I did for mine)
2. You can use thermal adhesive epoxy to "glue down" the mini heasinks to the main heatsink (untested by me but should work as good or better than the above, though probably overkill).
At this point we will need to discuss the fan, because the next step is to permanently glue the fan down to the main heasink. But, with my custom fan shroud the wires for the fan become extremely tight when run over top of the heatsink, I chose to extend the wires to the fan and run around the outter perimiter of the heat sink. This is optional, but recommended. If you choose to extend the wires, you can de-solder the wires/plug from the fan as shown here to splice in your extensions:
I extended my wires about 2.5-3" and I also added an extra +/- (red/black wire) that will be used for a future mod to cool the SSD and the rest of the system.
So, after all of that is done and after the mini heat sinks are permanently adhered to the main heatsink you can use super glue to glue down the fan to the main heatink. I was very liberal with the glue here as I don't ever want the fan coming back off. I would recommened against using thermal compound for this step and stick with super glue, as you don't actually want to transfer heat into the fan itself. Again, its a good idea to check alignment with the 3D printed fan shroud to make sure your fan is centered where it should be.
This is what you want at this point:
I also super glued the fan shroud down and used small bits of copper tape to tape off any holes around the bottom edge of the heat sink at this point. Again, not nesseceary, but recommended. I waited a full 24hrs for the glue and everything to set before reinstalling the heat sink into the main GPD unit.
That being said... If your glue is fully dried, you can re-apply your thermal paste to the CPU and re-install the heat sink to the main GPD unit. Again, I wont go into great detail about these steps. There are plenty of youtube videos of how to properly re-paste and reinstall the stock heat sink out there and the same methods apply here as well. Here is what your modded unit should look like with the completed modded heat sink reinstalled:
You can stuff the wires back in wherever you can that is out of the way and then we can start on the back case modifications.
The first thing we need to do to the back case housing is to clear some room for our newly modded heat sink so it will fit when we close the unit. To do this I used a pair of dikes (yes, that is actually the technical term for this tool).
Here is the inside of the case before modification:
And here it is after trimming the necessary bits:
Bits to trim out highlighted:
After these bits are trimmed out its time for some measuring and marking the outside for where you will drill your holes. For the 2 different models there will be different hole patterns. My unit is an 8100y unit, so as you can see below on the right side of my unit there are only 2 vent holes, for the 7y30 model you could add 4 vent holes on this side if you wanted.
The measurements above are to be measured from the edge of the SSD slot on the back of the case as marked. Measure to the centerpoints of each hole, mark and use a center punch to mark the drill spot then drill to size. I added in some thin screen material to the inside of the case but to do this I actually had to mill down the plastic a bit to get it to close properly. Unless you have the ability to do this I don't recommend adding the screen material.
Enjoy! Any questions feel free to ask. SSD cooling mod coming soon!
Attachments
-
152.2 KB Views: 480
Last edited: